使用批量推理进行视频对象检测#
本教程使用 Ray 和 Anyscale 进行分布式数据处理,使用带有预训练 Faster R-CNN 模型的 PyTorch 进行对象检测,以及其他几个用于图像和视频处理的 Python 库。它展示了如何
从 S3 加载视频。
将视频分割成单个帧。
应用对象检测模型进行掩码检测。
在每一帧上绘制边界框和标签。
从处理后的帧生成新视频。
此方法与前一个笔记本中的以评估为中心的管道非常相似,它利用 Ray Data 进行批量推理。但与前一个笔记本不同的是,本教程纯粹是推理,不计算 mAP 或 IoU 等指标。相反,它代表了一个实际的视频分析工作流,适用于生产环境的部署。
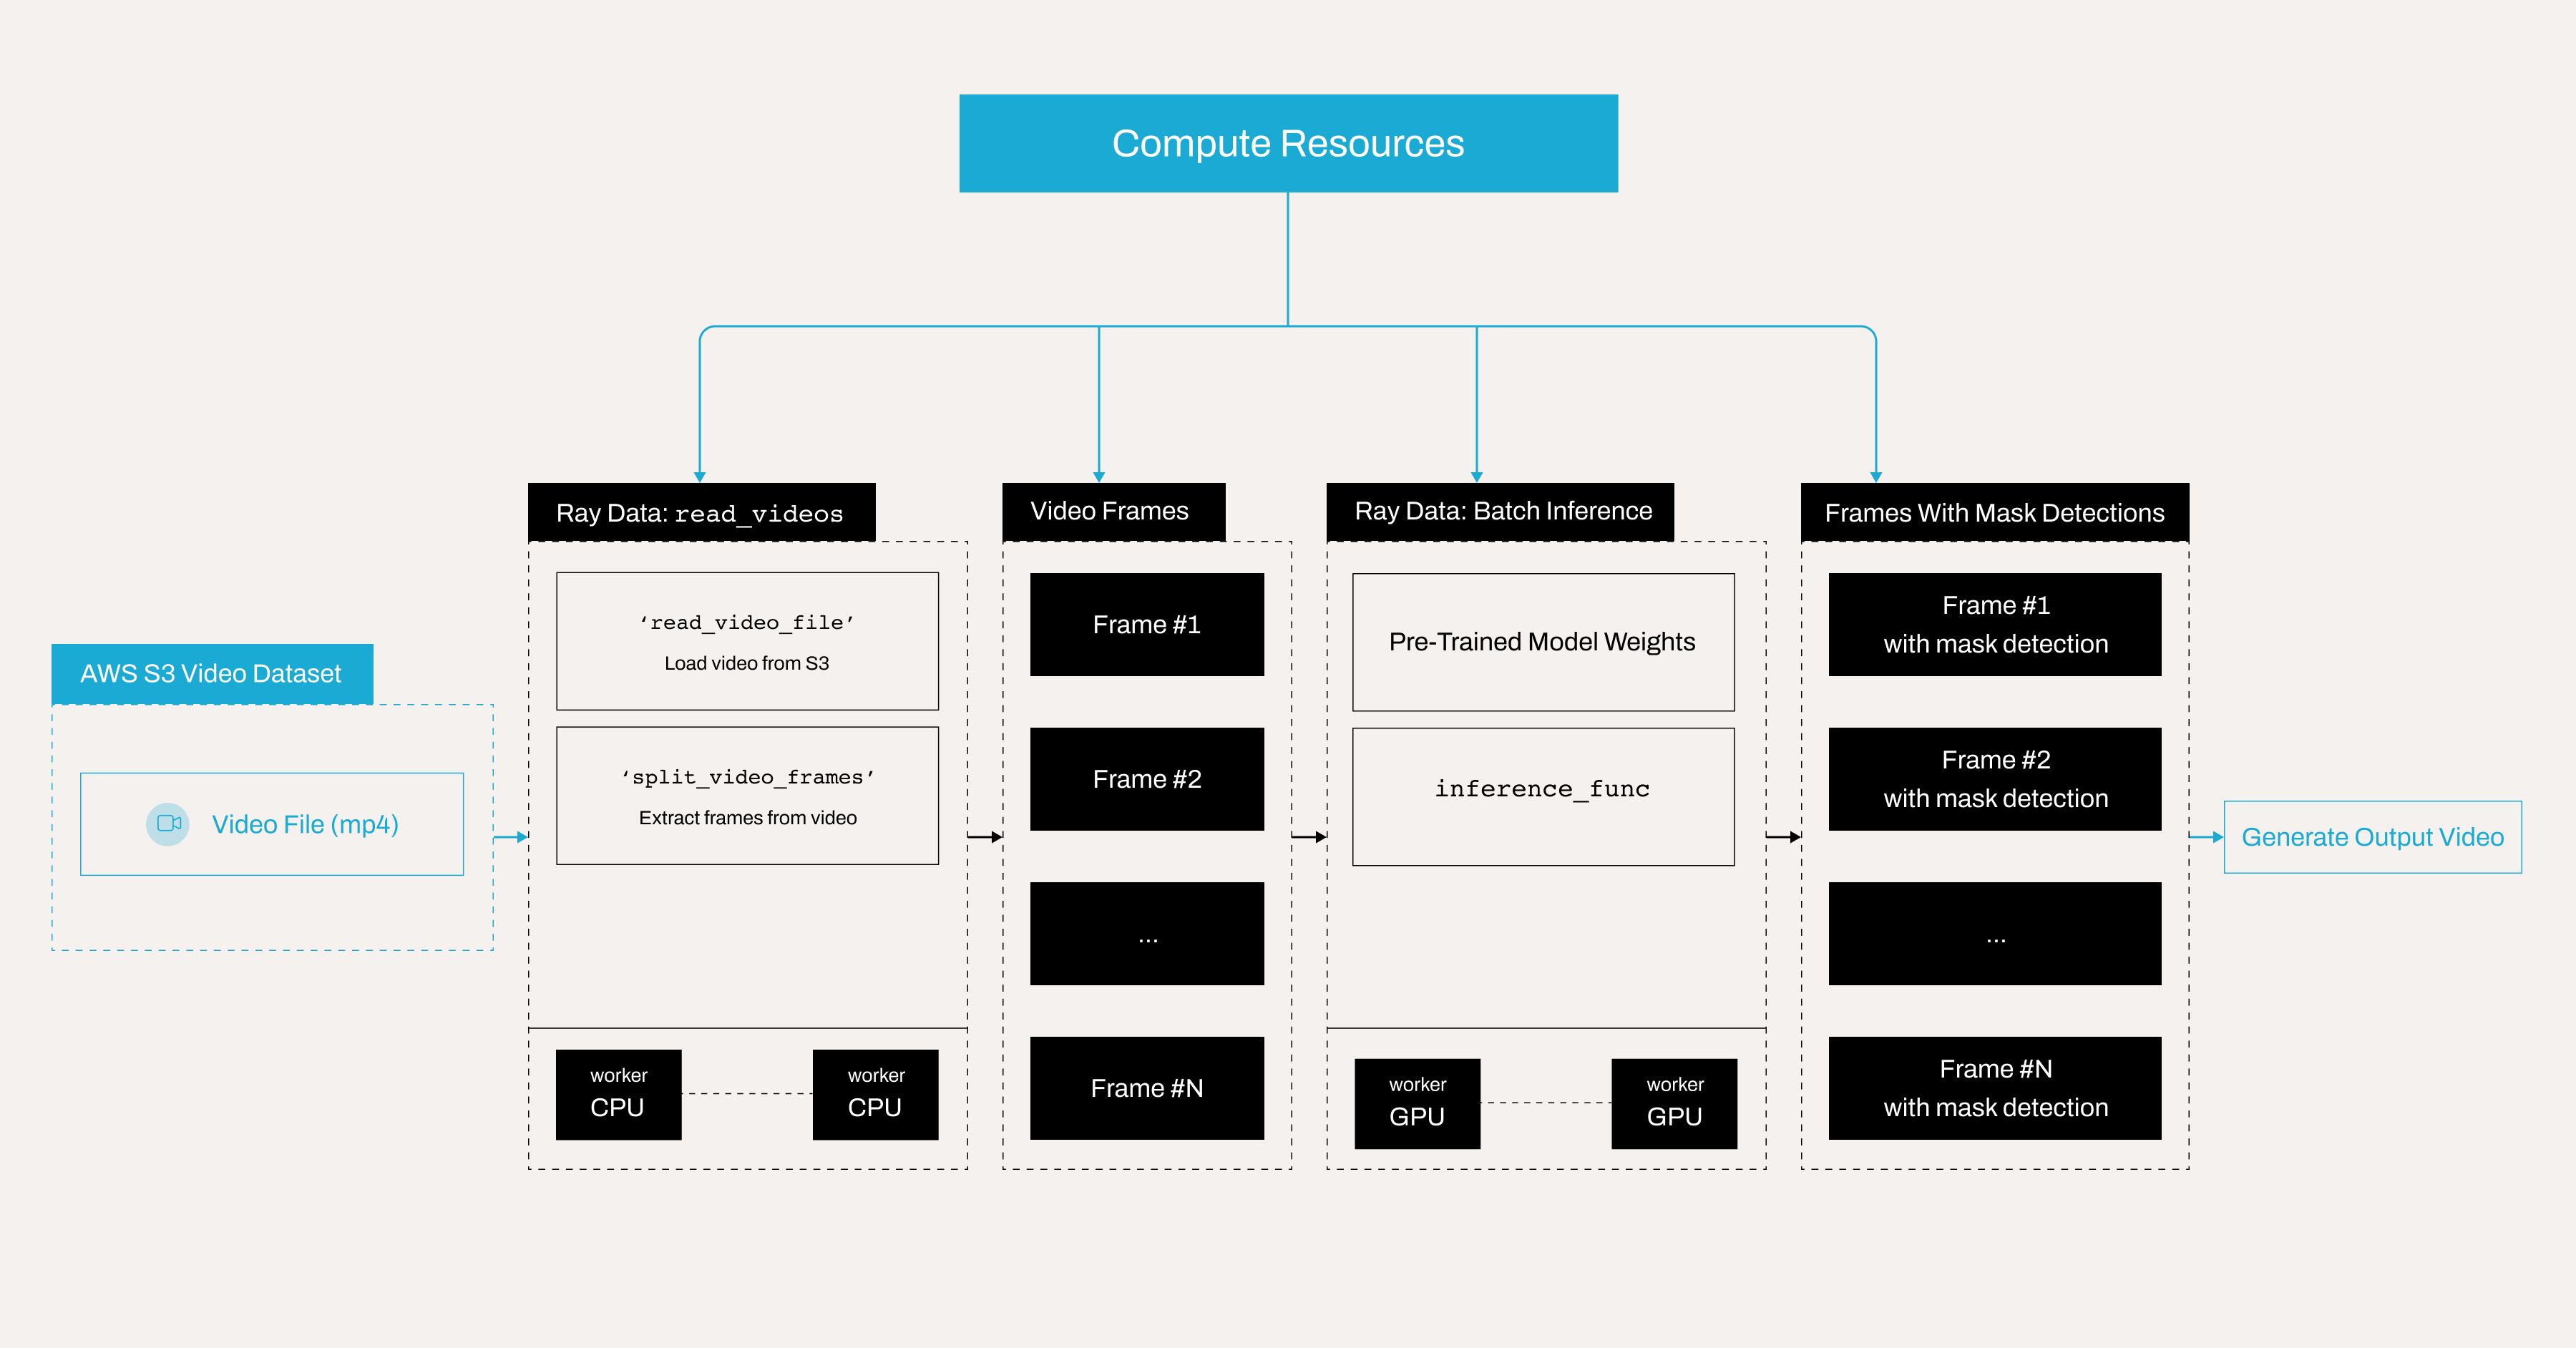
以下是说明使用 Anyscale 上的 Ray Data 批量推理进行掩码检测的分布式视频处理管道的架构图。
注意:本教程针对 Anyscale 平台进行了优化。在开源 Ray 上运行时,需要额外的配置。例如,您需要手动
- 配置您的 Ray 集群:设置您的多节点环境,包括头节点和工作节点,并管理诸如自动伸缩和 GPU/CPU 分配等资源分配,而无需 Anyscale 自动化。请参阅 Ray Clusters 获取详细信息。
- 管理依赖项:在每个节点上安装和管理依赖项,因为您将无法使用 Anyscale 的基于 Docker 的依赖项管理。请参阅 Environment Dependencies 获取在您的环境中安装和更新 Ray 的说明。
- 设置存储:配置您自己的分布式或共享存储系统(而不是依赖 Anyscale 的集成集群存储)。请参阅 Configuring Persistent Storage 获取有关设置共享存储解决方案的建议。
为什么使用 Ray 和 Anyscale 进行批量推理#
与使用 API 或端点逐个处理图像请求的传统方法相比,使用 Ray 和 Anyscale 进行批量推理是处理大规模推理任务的一种更有效的方式。批量推理不是单独处理每个请求,而是同时处理多个输入,从而带来显著的性能提升。主要优势包括:
更高的吞吐量—一次处理多张图像可以减少重复加载模型和管理单个推理请求的开销。
更好的资源利用率—Ray 在批量运行推理时比执行单张图像推理更能有效地利用 GPU 和其他硬件加速器,这可能会导致资源利用不足。
批量处理的更低延迟—虽然批量推理可能会给单个请求带来轻微延迟,但它显著减少了处理大型数据集所需的总时间,使其成为离线或更快处理视频的理想选择。
可伸缩性—Ray 的批量推理允许跨多个节点进行分布式处理,从而能够为高吞吐量工作负载实现高效的可伸缩性。
自动资源关闭和成本效益—Ray 不会一直保持推理服务器运行,批量推理完成后,Ray 会自动关闭空闲资源,避免不必要的计算使用。您还可以安排在非高峰时段或使用
spot instances进行批量处理,从而显著节省计算资源成本。
导入库并定义标签映射#
第一段代码导入所有必需的库,并为您的类(如 with_mask、without_mask 等)及其相应的可视化颜色设置映射。
import ray
import numpy as np
from PIL import Image, ImageDraw, ImageFont
from io import BytesIO
import cv2
import torch
from torchvision import models
import os
from smart_open import open as smart_open
import io
import ray


CLASS_TO_LABEL = {
    "background": 0,
    "with_mask": 1,
    "without_mask": 2,
    "mask_weared_incorrect": 3
}
LABEL_TO_CLASS = {v: k for k, v in CLASS_TO_LABEL.items()}
LABEL_COLORS = {
    "with_mask": "green",
    "without_mask": "red",
    "mask_weared_incorrect": "yellow"
}
加载视频并将其分割成帧#
使用 Ray Data API 从 S3 存储桶加载视频文件。然后将其转换为单个帧。每个帧都与帧号一起存储。
Dataset 应包含 frame 和 frame_index 两列。
请注意,ray.data.read_videos 还可以处理包含多个视频的目录。在这种情况下,请考虑将 include_paths 参数设置为 True,将文件路径存储在 path 列中。此设置有助于跟踪每个帧来自哪个视频。
更多详情,请参阅:https://docs.rayai.org.cn/en/latest/data/api/doc/ray.data.read_videos.html#ray.data.read_videos
ds_frames = ray.data.read_videos("s3://face-masks-data/videos/video1.mp4")
ds_frames.schema()
可视化一些帧#
您可以看到视频中总共有 383 帧。
import matplotlib.pyplot as plt
import random

# Convert to a Pandas DataFrame
df = ds_frames.to_pandas()

# Print the total number of frames
print("Total number of frames:", len(df))

# Randomly sample 5 frames
sampled_frames = df.sample(n=5, random_state=42).sort_values(by='frame_index')

# Display sampled frames
fig, axes = plt.subplots(1, 5, figsize=(20, 5))
for i, (idx, row) in enumerate(sampled_frames.iterrows()):
    frame_data = row["frame"]
    axes[i].imshow(frame_data)
    axes[i].axis("off")
    axes[i].set_title(f"Frame {row['frame_index']}")

plt.show()
加载对象检测模型#
接下来,创建一个类,将预训练的 Faster R-CNN 模型从 AWS S3 加载到集群存储中,并将其应用于一批图像。
定义 BatchObjectDetectionModel 类来封装检测逻辑,稍后您可以将其与 Ray Data 中的 map_batches 函数一起使用。
Ray Data 在应用 map 或 map_batches 等转换时提供了两种方法:
函数:这些使用无状态 Ray 任务,非常适合不需要加载重型模型的简单操作。
类:这些使用有状态 Ray Actor,非常适合涉及重型模型的更复杂任务——这正是您在此案例中需要的。
# Paths.
remote_model_path = "s3://face-masks-data/finetuned-models/fasterrcnn_model_mask_detection.pth"
cluster_model_path = "/mnt/cluster_storage/fasterrcnn_model_mask_detection.pth"

# Download model only once.
if not os.path.exists(cluster_model_path):
    with smart_open(remote_model_path, 'rb') as s3_file:
        with open(cluster_model_path, 'wb') as local_file:
            local_file.write(s3_file.read())

# Load the model (driver verifies it works).
loaded_model = models.detection.fasterrcnn_resnet50_fpn(num_classes=len(CLASS_TO_LABEL))
loaded_model.load_state_dict(torch.load(cluster_model_path, map_location="cpu"))
loaded_model.eval()


class BatchObjectDetectionModel:
    def __init__(self):
        self.model = loaded_model
        if torch.cuda.is_available():
            self.model = self.model.cuda()

    def __call__(self, batch: dict) -> dict:
        predictions = []
        for image_np in batch["frame"]:
            image_tensor = torch.from_numpy(image_np).permute(2, 0, 1).float() / 255.0
            if torch.cuda.is_available():
                image_tensor = image_tensor.cuda()
            with torch.no_grad():
                pred = self.model([image_tensor])[0]
            predictions.append({
                "boxes": pred["boxes"].detach().cpu().numpy(),
                "labels": pred["labels"].detach().cpu().numpy(),
                "scores": pred["scores"].detach().cpu().numpy()
            })
        batch["predictions"] = predictions
        return batch
应用对象检测模型#
使用 Ray Data 的 map_batches 方法将 BatchObjectDetectionModel 应用于每一批帧。此步骤并行执行所有帧的对象检测。
理解关键参数#
concurrency:定义处理批次的并行工作线程数。增加此值可使更多工作线程同时处理数据,从而加快计算速度,但需要更多系统资源(CPU、内存和 GPU)。batch_size:指定每个工作线程一次处理多少帧。更大的批处理大小会提高吞吐量,但可能需要更多的 GPU 内存。找到最佳批处理大小取决于 GPU 的可用内存。num_gpus:设置每个工作线程可用的 GPU 数量。在此案例中,您为每个工作线程分配 1 个 GPU,这意味着使用的 GPU 总数是concurrency*num_gpus。
针对性能进行调整:#
如果您的系统有更多 GPU,则可以增加并发性以使用更多并行工作线程。
如果 GPU 内存有限,请尝试减小
batch_size以避免内存溢出。
更多信息,请参阅:https://docs.rayai.org.cn/en/latest/data/api/doc/ray.data.Dataset.map_batches.html
# Apply object detection model.
ds_predicted = ds_frames.map_batches(
    BatchObjectDetectionModel,
    compute=ray.data.ActorPoolStrategy(size=2),   # Specify 2 workers.
    batch_size=8,
    num_gpus=1 # Each worker uses 1 GPU. In total Ray Data uses 2 GPUs.
)
在每一帧上绘制边界框和标签#
接下来,定义一个函数,在检测到的对象上绘制边界框和标签。此步骤使用模型预测和您之前定义的映射。
# Draw bounding boxes and labels on each frame.
def draw_boxes(row):
    image_np = row["frame"]
    predictions = row["predictions"]
    boxes = predictions["boxes"]
    labels = predictions["labels"]
    scores = predictions["scores"]

    confidence_threshold = 0.5
    valid = scores > confidence_threshold
    boxes = boxes[valid]
    labels = labels[valid]
    scores = scores[valid]

    pil_image = Image.fromarray(image_np)
    draw = ImageDraw.Draw(pil_image)
    font = ImageFont.load_default()

    for box, label, score in zip(boxes, labels, scores):
        x1, y1, x2, y2 = box
        class_name = LABEL_TO_CLASS.get(label, "unknown")
        color = LABEL_COLORS.get(class_name, "white")

        # Draw bounding box.
        draw.rectangle([x1, y1, x2, y2], outline=color, width=2)

        # Prepare text.
        text = f"{class_name} {score:.2f}"
        text_bbox = draw.textbbox((0, 0), text, font=font)
        text_width = text_bbox[2] - text_bbox[0]
        text_height = text_bbox[3] - text_bbox[1]

        # Draw text background.
        draw.rectangle(
            [x1, y1 - text_height - 2, x1 + text_width, y1],
            fill=color
        )

        # Draw text.
        text_color = "black" if color == "yellow" else "white"
        draw.text(
            (x1, y1 - text_height - 2),
            text,
            fill=text_color,
            font=font
        )

    return {
        "frame": np.array(pil_image),
        "frame_index": row["frame_index"]
    }


ds_visualized = ds_predicted.map(draw_boxes)
收集并排序处理后的帧#
处理后,收集所有帧并按帧号排序,以确保视频按正确的顺序播放。
请注意,Ray Data 在之前的步骤中对 map 和 map_batches 使用延迟执行,这意味着 Ray Data 不会立即执行任何操作。要强制计算并执行管道,请使用 ds_visualized.take_all()。
processed_frames = ds_visualized.take_all()
print("processed_frames", len(processed_frames))
sorted_frames = sorted(processed_frames, key=lambda x: x["frame_index"])
生成输出视频#
最后,使用 OpenCV 从处理后的帧生成新视频。生成一个 webm 格式的视频,并在 Jupyter notebook 中显示它。
您还可以修改代码生成 MP4 或其他格式。它们在本地播放时效果很好,但某些浏览器(包括依赖浏览器视频功能但需要 MP4 文件在文件开头具有 moov 原子(元数据)以实现流式传输的 Jupyter Notebook 界面)预期 MP4 文件具有 moov 原子(元数据)位于文件开头以实现流式传输。在许多情况下,cv2.VideoWriter 可能会将此元数据放在末尾,这对桌面播放器影响不大,但在浏览器中嵌入时可能会出现问题。像 webm 这样的格式通常对浏览器播放更友好,而无需额外的后处理步骤。
# Generate output video in WebM format.
output_video_path = "./saved_videos/output_video.webm"  # Save video to .webm format.
os.makedirs(os.path.dirname(output_video_path), exist_ok=True)  # Create directory if needed.

if sorted_frames:
    # Get video properties from the first frame.
    height, width, _ = sorted_frames[0]["frame"].shape

    # Initialize video writer with VP8 codec for WebM.
    fourcc = cv2.VideoWriter_fourcc(*'VP80')
    video_writer = cv2.VideoWriter(output_video_path, fourcc, 30.0, (width, height))

    for frame in sorted_frames:
        # Convert RGB to BGR for OpenCV.
        bgr_frame = cv2.cvtColor(frame["frame"], cv2.COLOR_RGB2BGR)
        video_writer.write(bgr_frame)

    video_writer.release()
    print(f"Output video saved to: {output_video_path}")
else:
    print("No frames available for video creation.")
检查输出视频#
您现在可以使用以下代码在 Jupyter Notebook 中可视化视频。或者,将视频下载到本地以验证对象检测模型是否渲染了带掩码的每一帧。
模型最初表现良好;但是,当一个人将笔移到脸前时,其准确性会下降,偶尔会产生错误的检测结果。
这种行为是对象检测中的一个常见挑战,尤其是在模型缺乏针对这种情况的充分训练数据时。为了缓解此问题,请考虑收集专门解决此问题的其他数据。
from IPython.core.display import display, HTML

video_path = "saved_videos/output_video.webm"

video_html = f"""
<video width="640" height="360" controls>
  <source src="{video_path}" type="video/mp4">
  Your browser does not support the video tag.
</video>
"""

display(HTML(video_html))