RayService Worker Pod 未就绪#
本指南探讨了 KubeRay 的 RayService API 中一个特定场景,其中 Ray Worker Pod 由于缺少 Ray Serve 副本而处于未就绪状态。
为了更好地理解本节,您应该熟悉以下 Ray Serve 组件:Ray Serve 副本和 ProxyActor。
ProxyActor 负责将传入请求转发到相应的 Ray Serve 副本。因此,如果没有正在运行的 ProxyActor 的 Ray Pod 接收到请求,这些请求将会失败。KubeRay 的就绪探针会失败,导致 Pod 未就绪,并阻止 ProxyActor 向它们发送请求。
Ray Serve 的默认行为只会在具有正在运行的 Ray Serve 副本的 Ray Pod 上创建 ProxyActor。为了说明这一点,以下示例使用 RayService 服务一个简单的 Ray Serve 应用程序。
步骤 1:使用 Kind 创建 Kubernetes 集群#
kind create cluster --image=kindest/node:v1.26.0
步骤 2:安装 KubeRay operator#
按照本文档使用 Helm 仓库安装最新稳定的 KubeRay operator。
步骤 3:安装 RayService#
curl -O https://raw.githubusercontent.com/ray-project/kuberay/master/ray-operator/config/samples/ray-service.no-ray-serve-replica.yaml
kubectl apply -f ray-service.no-ray-serve-replica.yaml
查看 RayService YAML 中嵌入的 Ray Serve 配置 serveConfigV2。注意名为 simple_app 的应用程序的 deployments 中唯一的部署
num_replicas:控制处理此部署请求的副本数量。初始化为 1 以确保 Ray Serve 副本的总数为 1。max_replicas_per_node:控制单个 Pod 上副本的最大数量。
有关更多详细信息,请参阅Ray Serve 文档。
serveConfigV2: |
  applications:
    - name: simple_app
      import_path: ray-operator.config.samples.ray-serve.single_deployment_dag:DagNode
      route_prefix: /basic
      runtime_env:
        working_dir: "https://github.com/ray-project/kuberay/archive/master.zip"
      deployments:
        - name: BaseService
          num_replicas: 1
          max_replicas_per_node: 1
          ray_actor_options:
            num_cpus: 0.1
查看 RayService YAML 中嵌入的 Head Pod 配置 rayClusterConfig:headGroupSpec。
此配置通过向 rayStartParams 传递选项 num-cpus: "0",将 Head Pod 的 CPU 资源设置为 0。此设置避免了 Ray Serve 副本在 Head Pod 上运行。有关更多详细信息,请参阅rayStartParams。
headGroupSpec:
  rayStartParams:
    num-cpus: "0"
  template: ...
步骤 4:为什么一个 Worker Pod 未就绪?#
# Step 4.1: Wait until the RayService is ready to serve requests.
kubectl describe rayservices.ray.io rayservice-no-ray-serve-replica

# [Example output]
#  Conditions:
#    Last Transition Time:  2025-03-18T14:14:43Z
#    Message:               Number of serve endpoints is greater than 0
#    Observed Generation:   1
#    Reason:                NonZeroServeEndpoints
#    Status:                True
#    Type:                  Ready
#    Last Transition Time:  2025-03-18T14:12:03Z
#    Message:               Active Ray cluster exists and no pending Ray cluster
#    Observed Generation:   1
#    Reason:                NoPendingCluster
#    Status:                False
#    Type:                  UpgradeInProgress

# Step 4.2: List all Ray Pods in the `default` namespace.
kubectl get pods -l=ray.io/is-ray-node=yes

# [Example output]
# NAME                                                              READY   STATUS    RESTARTS   AGE
# rayservice-no-ray-serve-replica-raycluster-dnm28-head-9h2qt       1/1     Running   0          2m21s
# rayservice-no-ray-serve-replica-raycluster-dnm28-s-worker-46t7l   1/1     Running   0          2m21s
# rayservice-no-ray-serve-replica-raycluster-dnm28-s-worker-77rzk   0/1     Running   0          2m20s

# Step 4.3: Check unready worker pod events
kubectl describe pods {YOUR_UNREADY_WORKER_POD_NAME}

# [Example output]
# Events:
#   Type     Reason     Age                   From               Message
#   ----     ------     ----                  ----               -------
#   Normal   Scheduled  3m4s                  default-scheduler  Successfully assigned default/rayservice-no-ray-serve-replica-raycluster-dnm28-s-worker-77rzk to kind-control-plane
#   Normal   Pulled     3m3s                  kubelet            Container image "rayproject/ray:2.41.0" already present on machine
#   Normal   Created    3m3s                  kubelet            Created container wait-gcs-ready
#   Normal   Started    3m3s                  kubelet            Started container wait-gcs-ready
#   Normal   Pulled     2m57s                 kubelet            Container image "rayproject/ray:2.41.0" already present on machine
#   Normal   Created    2m57s                 kubelet            Created container ray-worker
#   Normal   Started    2m57s                 kubelet            Started container ray-worker
#   Warning  Unhealthy  78s (x19 over 2m43s)  kubelet            Readiness probe failed: success
查看步骤 4.2 的输出。一个 Worker Pod 正在运行并就绪,而另一个正在运行但未就绪。
从 Ray 2.8 开始,没有任何 Ray Serve 副本的 Ray Worker Pod 将不会有 Proxy Actor。
从 KubeRay v1.1.0 开始,KubeRay 会为每个 Worker Pod 的 Ray 容器添加一个就绪探针,以检查 Worker Pod 是否具有 Proxy Actor。
如果 Worker Pod 缺少 Proxy Actor,就绪探针会失败,导致 Worker Pod 未就绪,从而无法接收任何流量。
使用 spec.serveConfigV2,KubeRay 只创建一个 Ray Serve 副本并将其调度到其中一个 Worker Pod 上。KubeRay 会配置带有 Ray Serve 副本和 Proxy Actor 的 Worker Pod,并将其标记为就绪。KubeRay 会将没有 Ray Serve 副本和 Proxy Actor 的另一个 Worker Pod 标记为未就绪。
步骤 5:验证 Serve 应用程序的状态#
kubectl port-forward svc/rayservice-no-ray-serve-replica-head-svc 8265:8265
有关 RayService 可观测性的更多详细信息,请参阅RayService 故障排除指南。
下方是 Ray Dashboard 中 Serve 页面的截图示例。
请注意,一个 ray::ServeReplica::simple_app::BaseService 和一个 ray::ProxyActor 在其中一个 Worker Pod 上运行,而另一个 Worker Pod 上没有 Ray Serve 副本和 Proxy Actor 运行。KubeRay 将前者标记为就绪,后者标记为未就绪。 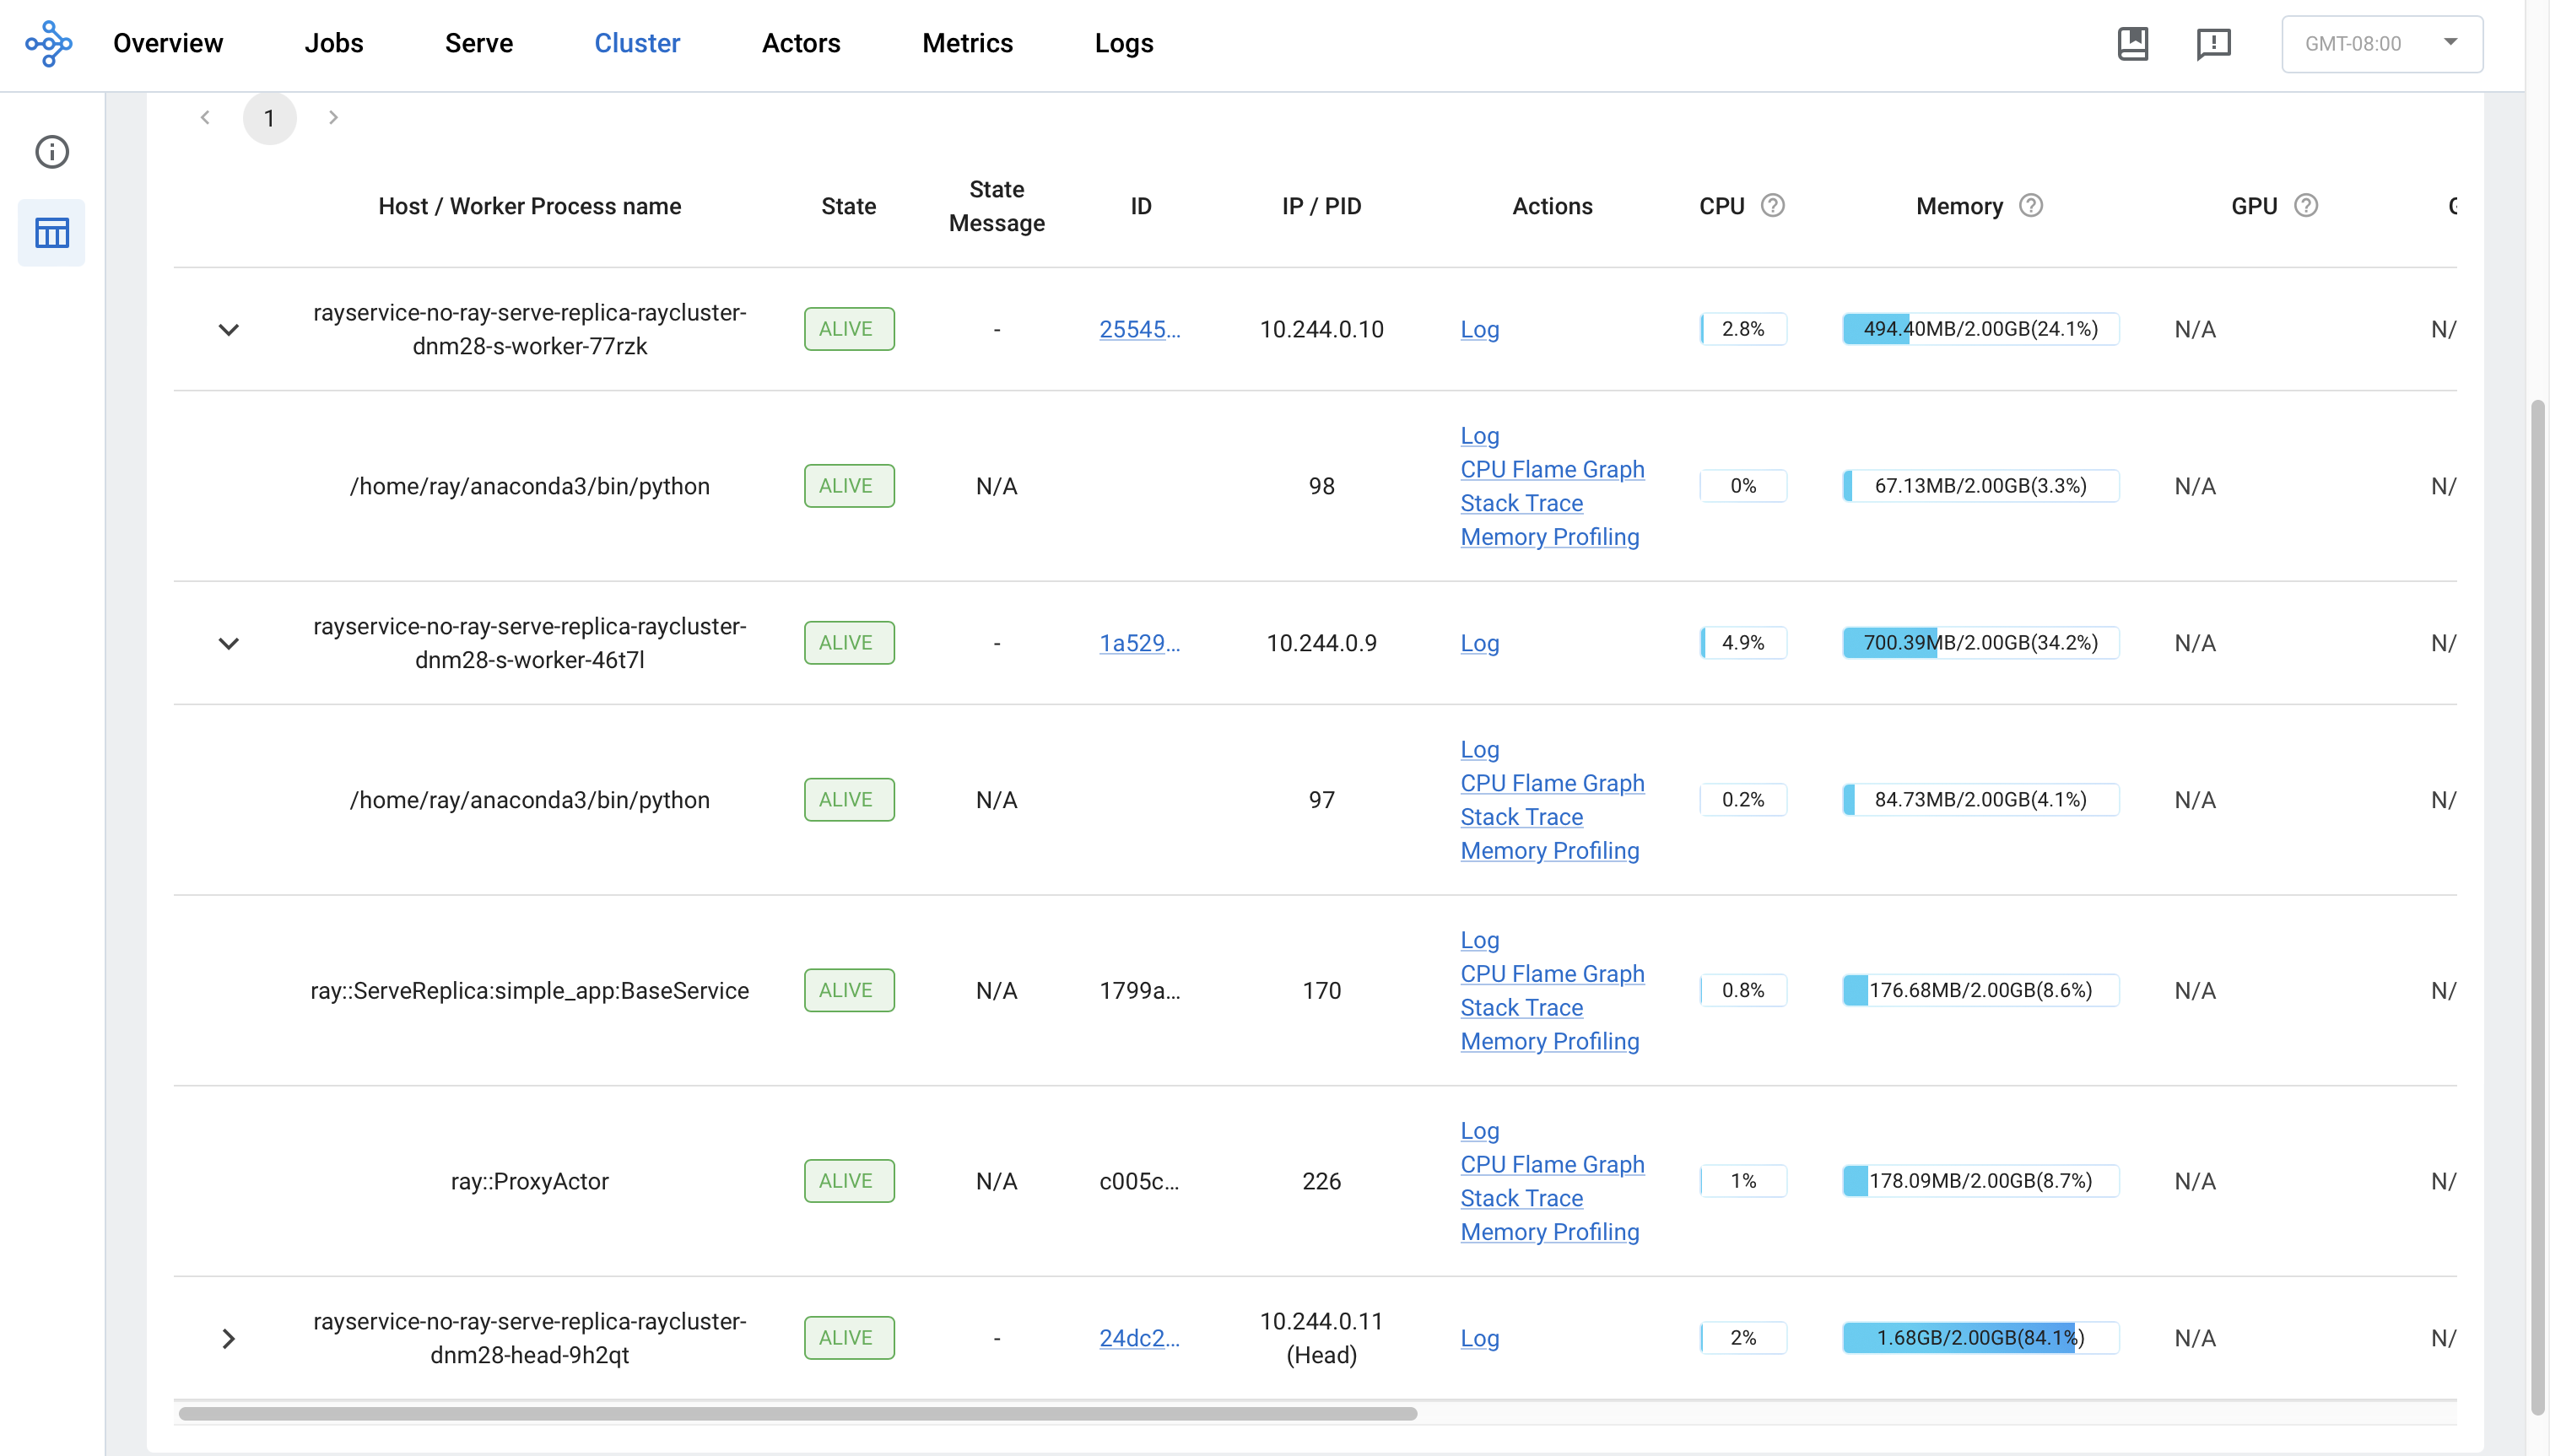
步骤 6:通过 Kubernetes 服务向 Serve 应用程序发送请求#
rayservice-no-ray-serve-serve-svc 在所有具有 Ray Serve 副本的 Worker 之间进行流量路由。尽管一个 Worker Pod 未就绪,Ray Serve 仍然可以将流量路由到具有正在运行的 Ray Serve 副本的就绪 Worker Pod。因此,用户仍然可以向应用程序发送请求并接收响应。
# Step 6.1: Run a curl Pod.
# If you already have a curl Pod, you can use `kubectl exec -it <curl-pod> -- sh` to access the Pod.
kubectl run curl --image=radial/busyboxplus:curl -i --tty

# Step 6.2: Send a request to the simple_app.
curl -X POST -H 'Content-Type: application/json' rayservice-no-ray-serve-replica-serve-svc:8000/basic
# [Expected output]: hello world
步骤 7:Ray Serve 应用程序的就地更新#
在 ray-service.no-ray-serve-replica.yaml 中,将应用程序的 num_replicas 从 1 更新为 2。此更改会重新配置现有的 RayCluster。
# Step 7.1: Update the num_replicas of the app from 1 to 2.
# [ray-service.no-ray-serve-replica.yaml]
# deployments:
#   - name: BaseService
#     num_replicas: 2
#     max_replicas_per_node: 1
#     ray_actor_options:
#       num_cpus: 0.1

# Step 7.2: Apply the updated RayService config.
kubectl apply -f ray-service.no-ray-serve-replica.yaml

# Step 7.3: List all Ray Pods in the `default` namespace.
kubectl get pods -l=ray.io/is-ray-node=yes

# [Example output]
# NAME                                                              READY   STATUS    RESTARTS   AGE
# rayservice-no-ray-serve-replica-raycluster-dnm28-head-9h2qt       1/1     Running   0          46m
# rayservice-no-ray-serve-replica-raycluster-dnm28-s-worker-46t7l   1/1     Running   0          46m
# rayservice-no-ray-serve-replica-raycluster-dnm28-s-worker-77rzk   1/1     Running   0          46m
重新配置后,KubeRay 请求 Head Pod 创建一个额外的 Ray Serve 副本,以匹配 num_replicas 配置。由于 max_replicas_per_node 为 1,新的 Ray Serve 副本会在没有任何副本的 Worker Pod 上运行。之后,KubeRay 会将该 Worker Pod 标记为就绪。
步骤 8:清理 Kubernetes 集群#
# Delete the RayService.
kubectl delete -f ray-service.no-ray-serve-replica.yaml

# Uninstall the KubeRay operator.
helm uninstall kuberay-operator

# Delete the curl Pod.
kubectl delete pod curl
后续步骤#
如果遇到任何问题,请参阅RayService 故障排除指南。
更多 RayService 示例,请参阅示例。