使用 Ray Tune 运行分布式实验#
Tune 通常用于大规模分布式超参数优化。本页将概述如何设置和启动分布式实验,以及运行分布式 Tune 实验时常用的命令。
总结#
要使用 Tune 运行分布式实验,你需要
首先,如果尚未启动,请启动一个 Ray 集群。
在头节点上运行脚本,或使用ray submit,或使用Ray 作业提交。
示例:在 AWS VM 上运行分布式 Tune#
按照以下说明在 AWS 上启动节点(使用深度学习 AMI)。请参阅集群设置文档。保存下面的集群配置(tune-default.yaml)
cluster_name: tune-default
provider: {type: aws, region: us-west-2}
auth: {ssh_user: ubuntu}
min_workers: 3
max_workers: 3
# Deep Learning AMI (Ubuntu) Version 21.0
available_node_types:
  head_node:
    node_config: {InstanceType: c5.xlarge, ImageId: ami-0b294f219d14e6a82}
  worker_nodes:
    node_config: {InstanceType: c5.xlarge, ImageId: ami-0b294f219d14e6a82}
head_node_type: head_node
setup_commands: # Set up each node.
    - pip install ray torch torchvision tensorboard
ray up 在节点集群上启动 Ray。
ray up tune-default.yaml
ray submit --start 按照给定的集群配置 YAML 文件启动集群,将 tune_script.py 上传到集群,并运行 python tune_script.py [args]。
ray submit tune-default.yaml tune_script.py --start -- --ray-address=localhost:6379
通过在远程头节点上启动 TensorBoard 来分析结果。
# Go to https://:6006 to access TensorBoard.
ray exec tune-default.yaml 'tensorboard --logdir=~/ray_results/ --port 6006' --port-forward 6006
请注意,你可以通过指定 RunConfig(storage_path=..) 来自定义结果目录,这会被 Tuner 接收。然后你可以将 TensorBoard 指向该目录来可视化结果。你也可以使用 awless 在 AWS 上轻松管理集群。
运行分布式 Tune 实验#
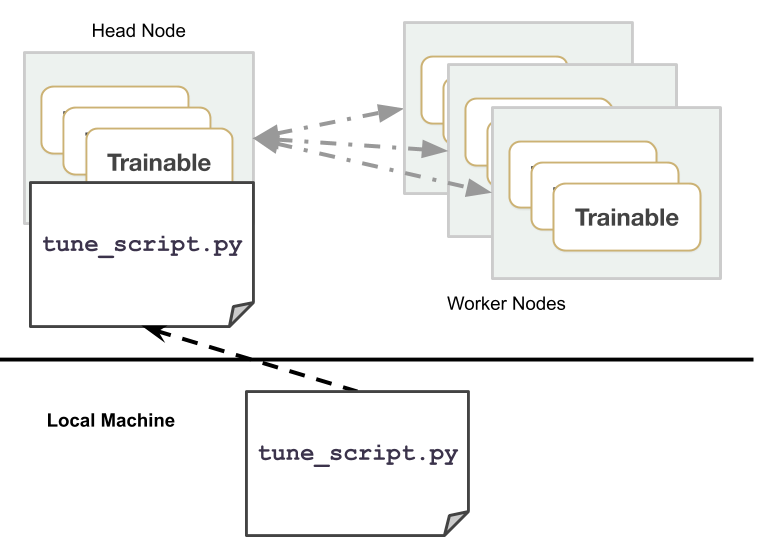
运行分布式(多节点)实验需要 Ray 已经启动。你可以在本地机器或云端执行此操作。
在你的机器上,Tune 将自动检测 GPU 和 CPU 的数量,你无需管理 CUDA_VISIBLE_DEVICES。
要执行分布式实验,请在调用 Tuner.fit() 之前调用 ray.init(address=XXX),其中 XXX 是 Ray 地址,默认为 localhost:6379。Tune Python 脚本应仅在 Ray 集群的头节点上执行。
一种常见的修改现有 Tune 实验以实现分布式运行的方法是设置一个 argparse 变量,以便在分布式和单节点模式之间无缝切换。
import ray
import argparse

parser = argparse.ArgumentParser()
parser.add_argument("--address")
args = parser.parse_args()
ray.init(address=args.address)

tuner = tune.Tuner(...)
tuner.fit()
# On the head node, connect to an existing ray cluster
$ python tune_script.py --ray-address=localhost:XXXX
如果你使用了集群配置(使用 ray up 或 ray submit --start 启动集群),则使用
ray submit tune-default.yaml tune_script.py -- --ray-address=localhost:6379
提示
在示例中,常用的 Ray 地址是
localhost:6379。如果 Ray 集群已经启动,你不需要在工作节点上运行任何东西。
分布式 Tune 运行中的存储选项#
在分布式实验中,你应该尝试使用云端检查点来减少同步开销。为此,你只需在 RunConfig 中指定一个远程 storage_path。
在以下示例中,my_trainable 是一个用户定义的 Tune Trainable
from ray import tune
from my_module import my_trainable

tuner = tune.Tuner(
    my_trainable,
    run_config=tune.RunConfig(
        name="experiment_name",
        storage_path="s3://bucket-name/sub-path/",
    )
)
tuner.fit()
欲了解更多详细信息或自定义,请参阅我们的关于在分布式 Tune 实验中配置存储的指南。
在可抢占实例上运行 Tune#
在 Spot 实例(或可抢占实例)上运行可以降低实验成本。你可以在 AWS 中通过以下配置修改启用 Spot 实例
# Provider-specific config for worker nodes, e.g. instance type.
worker_nodes:
    InstanceType: m5.large
    ImageId: ami-0b294f219d14e6a82 # Deep Learning AMI (Ubuntu) Version 21.0

    # Run workers on spot by default. Comment this out to use on-demand.
    InstanceMarketOptions:
        MarketType: spot
        SpotOptions:
            MaxPrice: 1.0  # Max Hourly Price
在 GCP 中,你可以使用以下配置修改
worker_nodes:
    machineType: n1-standard-2
    disks:
      - boot: true
        autoDelete: true
        type: PERSISTENT
        initializeParams:
          diskSizeGb: 50
          # See https://cloud.google.com/compute/docs/images for more images
          sourceImage: projects/deeplearning-platform-release/global/images/family/tf-1-13-cpu

    # Run workers on preemtible instances.
    scheduling:
      - preemptible: true
Spot 实例在试验运行时可能会突然被抢占。Tune 允许你通过检查点保留模型训练的进度,从而减轻此影响。
search_space = {
    "lr": tune.sample_from(lambda spec: 10 ** (-10 * np.random.rand())),
    "momentum": tune.uniform(0.1, 0.9),
}

tuner = tune.Tuner(
    TrainMNIST,
    run_config=tune.RunConfig(stop={"training_iteration": 10}),
    param_space=search_space,
)
results = tuner.fit()
使用 Spot 实例(AWS)运行 Tune 示例#
这里有一个在 Spot 实例上运行 Tune 的示例。这假设你已经设置了 AWS 凭证 (aws configure)
在此下载完整的 Tune 实验脚本示例。这包括一个带有检查点的 Trainable:
mnist_pytorch_trainable.py。要运行此示例,你需要安装以下内容
$ pip install ray torch torchvision filelock
在此下载集群 yaml 示例:
tune-default.yaml如下运行
ray submit以在它们之间运行 Tune。如果集群尚未启动,请附加[--start]。运行后自动关闭节点,请附加[--stop]。
ray submit tune-default.yaml mnist_pytorch_trainable.py --start -- --ray-address=localhost:6379
或者,为了在 AWS 或 GCP 上进行测试,你可以在所有工作节点启动后使用以下命令随机杀死一个工作节点
$ ray kill-random-node tune-default.yaml --hard
总结一下,以下是要运行的命令
wget https://raw.githubusercontent.com/ray-project/ray/master/python/ray/tune/examples/mnist_pytorch_trainable.py
wget https://raw.githubusercontent.com/ray-project/ray/master/python/ray/tune/tune-default.yaml
ray submit tune-default.yaml mnist_pytorch_trainable.py --start -- --ray-address=localhost:6379

# wait a while until after all nodes have started
ray kill-random-node tune-default.yaml --hard
你应该看到 Tune 最终在不同的工作节点上继续试验。更多详细信息请参阅容错部分。
你还可以将 storage_path=... 作为 RunConfig 的一部分进行指定,这会被 Tuner 接收,以便将结果上传到 S3 等云存储,从而在需要自动启动和停止集群时持久化结果。
Tune 运行的容错#
在试验失败的情况下(如果 max_failures != 0),无论是在单节点还是分布式设置中,Tune 都会自动重启试验。
例如,假设一个节点在试验仍在执行时被抢占或崩溃。如果该试验存在检查点(并且在分布式设置中,已配置某种形式的持久化存储来访问该试验的检查点),Tune 将等待可用资源准备就绪,然后从中断的地方继续执行该试验。如果找不到检查点,试验将从头开始重新启动。关于检查点的更多信息,请参阅此处。
如果试验或 actor 随后被放置在不同的节点上,Tune 会自动将之前的检查点文件推送到该节点并恢复远程试验 actor 状态,使得试验即使在发生故障后也能从最新的检查点继续运行。
从故障中恢复#
Tune 会自动持久化整个实验的进度(一个 Tuner.fit() 会话),因此如果实验崩溃或被取消,可以通过 restore() 来恢复。
常用 Tune 命令#
以下是一些提交实验常用的命令。请参阅集群页面以查找更全面的命令文档。
# Upload `tune_experiment.py` from your local machine onto the cluster. Then,
# run `python tune_experiment.py --address=localhost:6379` on the remote machine.
$ ray submit CLUSTER.YAML tune_experiment.py -- --address=localhost:6379

# Start a cluster and run an experiment in a detached tmux session,
# and shut down the cluster as soon as the experiment completes.
# In `tune_experiment.py`, set `RunConfig(storage_path="s3://...")`
# to persist results
$ ray submit CLUSTER.YAML --tmux --start --stop tune_experiment.py -- --address=localhost:6379

# To start or update your cluster:
$ ray up CLUSTER.YAML [-y]

# Shut-down all instances of your cluster:
$ ray down CLUSTER.YAML [-y]

# Run TensorBoard and forward the port to your own machine.
$ ray exec CLUSTER.YAML 'tensorboard --logdir ~/ray_results/ --port 6006' --port-forward 6006

# Run Jupyter Lab and forward the port to your own machine.
$ ray exec CLUSTER.YAML 'jupyter lab --port 6006' --port-forward 6006

# Get a summary of all the experiments and trials that have executed so far.
$ ray exec CLUSTER.YAML 'tune ls ~/ray_results'

# Upload and sync file_mounts up to the cluster with this command.
$ ray rsync-up CLUSTER.YAML

# Download the results directory from your cluster head node to your local machine on ``~/cluster_results``.
$ ray rsync-down CLUSTER.YAML '~/ray_results' ~/cluster_results

# Launching multiple clusters using the same configuration.
$ ray up CLUSTER.YAML -n="cluster1"
$ ray up CLUSTER.YAML -n="cluster2"
$ ray up CLUSTER.YAML -n="cluster3"
故障排除#
有时,你的程序可能会卡死。运行此命令可以重启 Ray 集群,而无需执行任何安装命令。
$ ray up CLUSTER.YAML --restart-only