入门#
Ray 是一个用于扩展 AI 和 Python 应用的开源统一框架。它提供了一个简单通用的 API,用于构建可从笔记本电脑扩展到集群的分布式应用。
什么是 Ray?#
Ray 通过提供以下功能简化了分布式计算:
可扩展的计算原语:任务和 actor,实现无痛并行编程
专业的 AI 库:用于常见 ML 工作负载的工具,如数据处理、模型训练、超参数调优和模型服务
统一资源管理:自动资源处理,实现从笔记本电脑到云端的无缝扩展
选择你的路径#
选择符合你需求的指南:
扩展 ML 工作负载:Ray Libraries 快速入门
扩展通用 Python 应用:Ray Core 快速入门
部署到云端:Ray 集群快速入门
调试和监控应用:调试和监控快速入门

Ray AI Libraries 快速入门#
使用独立的库处理 ML 工作负载。每个库专注于 ML 工作流的特定部分,从数据处理到模型服务。点击下方与你的工作负载对应的下拉菜单。
 Data:用于 ML 的可扩展数据集
Ray Data 提供针对机器学习和 AI 工作负载优化的分布式数据处理。它能有效地通过数据管道流式传输数据。
下面是使用 Ray Data 扩展离线推理和训练数据摄取的示例。
注意
要运行此示例,请安装 Ray Data
pip install -U "ray[data]"
from typing import Dict
import numpy as np
import ray

# Create datasets from on-disk files, Python objects, and cloud storage like S3.
ds = ray.data.read_csv("s3://anonymous@ray-example-data/iris.csv")

# Apply functions to transform data. Ray Data executes transformations in parallel.
def compute_area(batch: Dict[str, np.ndarray]) -> Dict[str, np.ndarray]:
    length = batch["petal length (cm)"]
    width = batch["petal width (cm)"]
    batch["petal area (cm^2)"] = length * width
    return batch

transformed_ds = ds.map_batches(compute_area)

# Iterate over batches of data.
for batch in transformed_ds.iter_batches(batch_size=4):
    print(batch)

# Save dataset contents to on-disk files or cloud storage.
transformed_ds.write_parquet("local:///tmp/iris/")
Train:分布式模型训练
Ray Train 使分布式模型训练变得简单。它抽象了在 PyTorch 和 TensorFlow 等流行框架上设置分布式训练的复杂性。
此示例展示了如何将 Ray Train 与 PyTorch 一起使用。
要运行此示例,请安装 Ray Train 和 PyTorch 包
注意
pip install -U "ray[train]" torch torchvision
设置数据集和模型。
import torch
import torch.nn as nn
from torch.utils.data import DataLoader
from torchvision import datasets
from torchvision.transforms import ToTensor

def get_dataset():
    return datasets.FashionMNIST(
        root="/tmp/data",
        train=True,
        download=True,
        transform=ToTensor(),
    )

class NeuralNetwork(nn.Module):
    def __init__(self):
        super().__init__()
        self.flatten = nn.Flatten()
        self.linear_relu_stack = nn.Sequential(
            nn.Linear(28 * 28, 512),
            nn.ReLU(),
            nn.Linear(512, 512),
            nn.ReLU(),
            nn.Linear(512, 10),
        )

    def forward(self, inputs):
        inputs = self.flatten(inputs)
        logits = self.linear_relu_stack(inputs)
        return logits
现在定义你的单 worker PyTorch 训练函数。
def train_func():
    num_epochs = 3
    batch_size = 64

    dataset = get_dataset()
    dataloader = DataLoader(dataset, batch_size=batch_size)

    model = NeuralNetwork()

    criterion = nn.CrossEntropyLoss()
    optimizer = torch.optim.SGD(model.parameters(), lr=0.01)

    for epoch in range(num_epochs):
        for inputs, labels in dataloader:
            optimizer.zero_grad()
            pred = model(inputs)
            loss = criterion(pred, labels)
            loss.backward()
            optimizer.step()
        print(f"epoch: {epoch}, loss: {loss.item()}")
此训练函数可以使用以下方式执行:
train_func()
将其转换为分布式多 worker 训练函数。
使用 ray.train.torch.prepare_model 和 ray.train.torch.prepare_data_loader 工具函数设置模型和数据进行分布式训练。这会自动将模型包装在 DistributedDataParallel 中并放置在正确的设备上,并向 DataLoaders 添加 DistributedSampler。
import ray.train.torch

def train_func_distributed():
    num_epochs = 3
    batch_size = 64

    dataset = get_dataset()
    dataloader = DataLoader(dataset, batch_size=batch_size, shuffle=True)
    dataloader = ray.train.torch.prepare_data_loader(dataloader)

    model = NeuralNetwork()
    model = ray.train.torch.prepare_model(model)

    criterion = nn.CrossEntropyLoss()
    optimizer = torch.optim.SGD(model.parameters(), lr=0.01)

    for epoch in range(num_epochs):
        if ray.train.get_context().get_world_size() > 1:
            dataloader.sampler.set_epoch(epoch)

        for inputs, labels in dataloader:
            optimizer.zero_grad()
            pred = model(inputs)
            loss = criterion(pred, labels)
            loss.backward()
            optimizer.step()
        print(f"epoch: {epoch}, loss: {loss.item()}")
实例化一个包含 4 个 worker 的 TorchTrainer,并使用它运行新的训练函数。
from ray.train.torch import TorchTrainer
from ray.train import ScalingConfig

# For GPU Training, set `use_gpu` to True.
use_gpu = False

trainer = TorchTrainer(
    train_func_distributed,
    scaling_config=ScalingConfig(num_workers=4, use_gpu=use_gpu)
)

results = trainer.fit()
要使用 GPU 加速训练作业,请确保已配置 GPU,然后将 use_gpu 设置为 True。如果你没有 GPU 环境,Anyscale 提供了一个集成了自动伸缩 GPU 集群的开发工作空间,可用于此目的。

此示例展示了如何使用 Ray Train 设置 使用 Keras 的多 worker 训练。
要运行此示例,请安装 Ray Train 和 Tensorflow 包
注意
pip install -U "ray[train]" tensorflow
设置数据集和模型。
import sys
import numpy as np

if sys.version_info >= (3, 12):
    # Tensorflow is not installed for Python 3.12 because of keras compatibility.
    sys.exit(0)
else:
    import tensorflow as tf

def mnist_dataset(batch_size):
    (x_train, y_train), _ = tf.keras.datasets.mnist.load_data()
    # The `x` arrays are in uint8 and have values in the [0, 255] range.
    # You need to convert them to float32 with values in the [0, 1] range.
    x_train = x_train / np.float32(255)
    y_train = y_train.astype(np.int64)
    train_dataset = tf.data.Dataset.from_tensor_slices(
        (x_train, y_train)).shuffle(60000).repeat().batch(batch_size)
    return train_dataset


def build_and_compile_cnn_model():
    model = tf.keras.Sequential([
        tf.keras.layers.InputLayer(input_shape=(28, 28)),
        tf.keras.layers.Reshape(target_shape=(28, 28, 1)),
        tf.keras.layers.Conv2D(32, 3, activation='relu'),
        tf.keras.layers.Flatten(),
        tf.keras.layers.Dense(128, activation='relu'),
        tf.keras.layers.Dense(10)
    ])
    model.compile(
        loss=tf.keras.losses.SparseCategoricalCrossentropy(from_logits=True),
        optimizer=tf.keras.optimizers.SGD(learning_rate=0.001),
        metrics=['accuracy'])
    return model
现在定义你的单 worker TensorFlow 训练函数。
def train_func():
    batch_size = 64
    single_worker_dataset = mnist_dataset(batch_size)
    single_worker_model = build_and_compile_cnn_model()
    single_worker_model.fit(single_worker_dataset, epochs=3, steps_per_epoch=70)
此训练函数可以使用以下方式执行:
train_func()
现在将其转换为分布式多 worker 训练函数。
设置全局批处理大小 - 每个 worker 处理与单 worker 代码中相同大小的批处理。
选择你的 TensorFlow 分布式训练策略。此示例使用
MultiWorkerMirroredStrategy。
import json
import os

def train_func_distributed():
    per_worker_batch_size = 64
    # This environment variable will be set by Ray Train.
    tf_config = json.loads(os.environ['TF_CONFIG'])
    num_workers = len(tf_config['cluster']['worker'])

    strategy = tf.distribute.MultiWorkerMirroredStrategy()

    global_batch_size = per_worker_batch_size * num_workers
    multi_worker_dataset = mnist_dataset(global_batch_size)

    with strategy.scope():
        # Model building/compiling need to be within `strategy.scope()`.
        multi_worker_model = build_and_compile_cnn_model()

    multi_worker_model.fit(multi_worker_dataset, epochs=3, steps_per_epoch=70)
实例化一个包含 4 个 worker 的 TensorflowTrainer,并使用它运行新的训练函数。
    from ray.train.tensorflow import TensorflowTrainer
    from ray.train import ScalingConfig

    # For GPU Training, set `use_gpu` to True.
    use_gpu = False

    trainer = TensorflowTrainer(train_func_distributed, scaling_config=ScalingConfig(num_workers=4, use_gpu=use_gpu))

    trainer.fit()
要使用 GPU 加速训练作业,请确保已配置 GPU,然后将 use_gpu 设置为 True。如果你没有 GPU 环境,Anyscale 提供了一个集成了自动伸缩 GPU 集群的开发工作空间,可用于此目的。
Tune:大规模超参数调优
Ray Tune 是一个用于任何规模超参数调优的库。它使用高效的分布式搜索算法自动为模型找到最佳超参数。使用 Tune,你可以在不到 10 行代码中启动多节点分布式超参数扫描,支持包括 PyTorch、TensorFlow 和 Keras 在内的任何深度学习框架。
注意
要运行此示例,请安装 Ray Tune
pip install -U "ray[tune]"
此示例使用迭代训练函数运行一个小型网格搜索。
from ray import tune


def objective(config):  # ①
    score = config["a"] ** 2 + config["b"]
    return {"score": score}


search_space = {  # ②
    "a": tune.grid_search([0.001, 0.01, 0.1, 1.0]),
    "b": tune.choice([1, 2, 3]),
}

tuner = tune.Tuner(objective, param_space=search_space)  # ③

results = tuner.fit()
print(results.get_best_result(metric="score", mode="min").config)
如果安装了 TensorBoard (pip install tensorboard),你可以自动可视化所有试验结果
tensorboard --logdir ~/ray_results
Serve:可扩展模型服务
Ray Serve 为 ML 模型和业务逻辑提供可扩展和可编程的服务。部署任何框架的模型,实现生产就绪的性能。
注意
要运行此示例,请安装 Ray Serve 和 scikit-learn
pip install -U "ray[serve]" scikit-learn
此示例服务于一个 scikit-learn 梯度提升分类器。
import requests
from starlette.requests import Request
from typing import Dict

from sklearn.datasets import load_iris
from sklearn.ensemble import GradientBoostingClassifier

from ray import serve


# Train model.
iris_dataset = load_iris()
model = GradientBoostingClassifier()
model.fit(iris_dataset["data"], iris_dataset["target"])


@serve.deployment
class BoostingModel:
    def __init__(self, model):
        self.model = model
        self.label_list = iris_dataset["target_names"].tolist()

    async def __call__(self, request: Request) -> Dict:
        payload = (await request.json())["vector"]
        print(f"Received http request with data {payload}")

        prediction = self.model.predict([payload])[0]
        human_name = self.label_list[prediction]
        return {"result": human_name}


# Deploy model.
serve.run(BoostingModel.bind(model), route_prefix="/iris")

# Query it!
sample_request_input = {"vector": [1.2, 1.0, 1.1, 0.9]}
response = requests.get(
    "https://:8000/iris", json=sample_request_input)
print(response.text)
响应显示 {"result": "versicolor"}。
RLlib:工业级强化学习
RLlib 是一个强化学习 (RL) 库,提供流行 RL 算法的高性能实现,并支持各种训练环境。RLlib 为各种工业和研究应用提供高可扩展性和统一 API。
注意
要运行此示例,请安装 rllib 以及 tensorflow 或 pytorch
pip install -U "ray[rllib]" tensorflow # or torch
你可能还需要在系统上安装 CMake。
import gymnasium as gym
import numpy as np
import torch
from typing import Dict, Tuple, Any, Optional

from ray.rllib.algorithms.ppo import PPOConfig


# Define your problem using python and Farama-Foundation's gymnasium API:
class SimpleCorridor(gym.Env):
    """Corridor environment where an agent must learn to move right to reach the exit.

    ---------------------
    | S | 1 | 2 | 3 | G |   S=start; G=goal; corridor_length=5
    ---------------------

    Actions:
        0: Move left
        1: Move right

    Observations:
        A single float representing the agent's current position (index)
        starting at 0.0 and ending at corridor_length

    Rewards:
        -0.1 for each step
        +1.0 when reaching the goal

    Episode termination:
        When the agent reaches the goal (position >= corridor_length)
    """

    def __init__(self, config):
        self.end_pos = config["corridor_length"]
        self.cur_pos = 0.0
        self.action_space = gym.spaces.Discrete(2)  # 0=left, 1=right
        self.observation_space = gym.spaces.Box(0.0, self.end_pos, (1,), np.float32)

    def reset(
        self, *, seed: Optional[int] = None, options: Optional[Dict] = None
    ) -> Tuple[np.ndarray, Dict]:
        """Reset the environment for a new episode.

        Args:
            seed: Random seed for reproducibility
            options: Additional options (not used in this environment)

        Returns:
            Initial observation of the new episode and an info dict.
        """
        super().reset(seed=seed)  # Initialize RNG if seed is provided
        self.cur_pos = 0.0
        # Return initial observation.
        return np.array([self.cur_pos], np.float32), {}

    def step(self, action: int) -> Tuple[np.ndarray, float, bool, bool, Dict]:
        """Take a single step in the environment based on the provided action.

        Args:
            action: 0 for left, 1 for right

        Returns:
            A tuple of (observation, reward, terminated, truncated, info):
                observation: Agent's new position
                reward: Reward from taking the action (-0.1 or +1.0)
                terminated: Whether episode is done (reached goal)
                truncated: Whether episode was truncated (always False here)
                info: Additional information (empty dict)
        """
        # Walk left if action is 0 and we're not at the leftmost position
        if action == 0 and self.cur_pos > 0:
            self.cur_pos -= 1
        # Walk right if action is 1
        elif action == 1:
            self.cur_pos += 1
        # Set `terminated` flag when end of corridor (goal) reached.
        terminated = self.cur_pos >= self.end_pos
        truncated = False
        # +1 when goal reached, otherwise -0.1.
        reward = 1.0 if terminated else -0.1
        return np.array([self.cur_pos], np.float32), reward, terminated, truncated, {}


# Create an RLlib Algorithm instance from a PPOConfig object.
print("Setting up the PPO configuration...")
config = (
    PPOConfig().environment(
        # Env class to use (our custom gymnasium environment).
        SimpleCorridor,
        # Config dict passed to our custom env's constructor.
        # Use corridor with 20 fields (including start and goal).
        env_config={"corridor_length": 20},
    )
    # Parallelize environment rollouts for faster training.
    .env_runners(num_env_runners=3)
    # Use a smaller network for this simple task
    .training(model={"fcnet_hiddens": [64, 64]})
)

# Construct the actual PPO algorithm object from the config.
algo = config.build_algo()
rl_module = algo.get_module()

# Train for n iterations and report results (mean episode rewards).
# Optimal reward calculation:
# - Need at least 19 steps to reach the goal (from position 0 to 19)
# - Each step (except last) gets -0.1 reward: 18 * (-0.1) = -1.8
# - Final step gets +1.0 reward
# - Total optimal reward: -1.8 + 1.0 = -0.8
print("\nStarting training loop...")
for i in range(5):
    results = algo.train()

    # Log the metrics from training results
    print(f"Iteration {i+1}")
    print(f"  Training metrics: {results['env_runners']}")

# Save the trained algorithm (optional)
checkpoint_dir = algo.save()
print(f"\nSaved model checkpoint to: {checkpoint_dir}")

print("\nRunning inference with the trained policy...")
# Create a test environment with a shorter corridor to verify the agent's behavior
env = SimpleCorridor({"corridor_length": 10})
# Get the initial observation (should be: [0.0] for the starting position).
obs, info = env.reset()
terminated = truncated = False
total_reward = 0.0
step_count = 0

# Play one episode and track the agent's trajectory
print("\nAgent trajectory:")
positions = [float(obs[0])]  # Track positions for visualization

while not terminated and not truncated:
    # Compute an action given the current observation
    action_logits = rl_module.forward_inference(
        {"obs": torch.from_numpy(obs).unsqueeze(0)}
    )["action_dist_inputs"].numpy()[
        0
    ]  # [0]: Batch dimension=1

    # Get the action with highest probability
    action = np.argmax(action_logits)

    # Log the agent's decision
    action_name = "LEFT" if action == 0 else "RIGHT"
    print(f"  Step {step_count}: Position {obs[0]:.1f}, Action: {action_name}")

    # Apply the computed action in the environment
    obs, reward, terminated, truncated, info = env.step(action)
    positions.append(float(obs[0]))

    # Sum up rewards
    total_reward += reward
    step_count += 1

# Report final results
print(f"\nEpisode complete:")
print(f"  Steps taken: {step_count}")
print(f"  Total reward: {total_reward:.2f}")
print(f"  Final position: {obs[0]:.1f}")

# Verify the agent has learned the optimal policy
if total_reward > -0.5 and obs[0] >= 9.0:
    print("  Success! The agent has learned the optimal policy (always move right).")
Ray Core 快速入门#

Ray Core 提供简单的原语,用于构建和运行分布式应用。它使你只需几行代码,即可将普通的 Python 或 Java 函数和类转换为分布式的无状态任务和有状态 actor。
下面的示例展示了如何:
将 Python 函数转换为 Ray 任务以进行并行执行
将 Python 类转换为 Ray actor 以进行分布式有状态计算
Core:使用 Ray 任务并行化函数
注意
要运行此示例,请安装 Ray Core
pip install -U "ray"
导入 Ray 并使用 ray.init() 进行初始化。然后使用 @ray.remote 装饰器修饰函数,声明你要远程运行此函数。最后,使用 .remote() 调用该函数,而不是正常调用。此远程调用会生成一个 future,即 Ray 对象引用,你可以使用 ray.get 来获取实际结果。
import ray
ray.init()

@ray.remote
def f(x):
    return x * x

futures = [f.remote(i) for i in range(4)]
print(ray.get(futures)) # [0, 1, 4, 9]
注意
要运行此示例,请在项目中添加 ray-api 和 ray-runtime 依赖项。
使用 Ray.init 初始化 Ray 运行时。然后使用 Ray.task(...).remote() 将任何 Java 静态方法转换为 Ray 任务。任务在远程 worker 进程中异步运行。remote 方法返回一个 ObjectRef,你可以使用 get 获取实际结果。
import io.ray.api.ObjectRef;
import io.ray.api.Ray;
import java.util.ArrayList;
import java.util.List;

public class RayDemo {

    public static int square(int x) {
        return x * x;
    }

    public static void main(String[] args) {
        // Initialize Ray runtime.
        Ray.init();
        List<ObjectRef<Integer>> objectRefList = new ArrayList<>();
        // Invoke the `square` method 4 times remotely as Ray tasks.
        // The tasks run in parallel in the background.
        for (int i = 0; i < 4; i++) {
            objectRefList.add(Ray.task(RayDemo::square, i).remote());
        }
        // Get the actual results of the tasks.
        System.out.println(Ray.get(objectRefList));  // [0, 1, 4, 9]
    }
}
在上面的代码块中,我们定义了一些 Ray 任务。虽然它们非常适合无状态操作,但有时你必须维护应用程序的状态。你可以使用 Ray Actor 来实现这一点。
Core:使用 Ray Actor 并行化类
Ray 提供 actor,允许你在 Python 或 Java 中并行化类的实例。当你实例化一个 Ray actor 类时,Ray 会在集群中启动该类的远程实例。然后,这个 actor 可以执行远程方法调用并维护自己的内部状态。
注意
要运行此示例,请安装 Ray Core
pip install -U "ray"
import ray
ray.init() # Only call this once.

@ray.remote
class Counter(object):
    def __init__(self):
        self.n = 0

    def increment(self):
        self.n += 1

    def read(self):
        return self.n

counters = [Counter.remote() for i in range(4)]
[c.increment.remote() for c in counters]
futures = [c.read.remote() for c in counters]
print(ray.get(futures)) # [1, 1, 1, 1]
注意
要运行此示例,请在项目中添加 ray-api 和 ray-runtime 依赖项。
import io.ray.api.ActorHandle;
import io.ray.api.ObjectRef;
import io.ray.api.Ray;
import java.util.ArrayList;
import java.util.List;
import java.util.stream.Collectors;

public class RayDemo {

    public static class Counter {

        private int value = 0;

        public void increment() {
            this.value += 1;
        }

        public int read() {
            return this.value;
        }
    }

    public static void main(String[] args) {
        // Initialize Ray runtime.
        Ray.init();
        List<ActorHandle<Counter>> counters = new ArrayList<>();
        // Create 4 actors from the `Counter` class.
        // These run in remote worker processes.
        for (int i = 0; i < 4; i++) {
            counters.add(Ray.actor(Counter::new).remote());
        }

        // Invoke the `increment` method on each actor.
        // This sends an actor task to each remote actor.
        for (ActorHandle<Counter> counter : counters) {
            counter.task(Counter::increment).remote();
        }
        // Invoke the `read` method on each actor, and print the results.
        List<ObjectRef<Integer>> objectRefList = counters.stream()
            .map(counter -> counter.task(Counter::read).remote())
            .collect(Collectors.toList());
        System.out.println(Ray.get(objectRefList));  // [1, 1, 1, 1]
    }
}
Ray 集群快速入门#
将你的应用程序部署到 AWS、GCP、Azure 等平台上的 Ray 集群,通常只需对现有代码进行少量修改。
Clusters:在 AWS 上启动 Ray 集群
Clusters:在 Kubernetes 上启动 Ray 集群
Ray 程序可以在单节点 Kubernetes 集群上运行,也可以无缝扩展到更大的集群。
Clusters:在 Anyscale 上启动 Ray 集群
Anyscale 是 Ray 背后的公司。Anyscale 平台在你的 AWS、GCP、Azure 或本地 Kubernetes 集群之上提供了企业级的 Ray 部署。
调试和监控快速入门#
使用内置的可观测性工具监控和调试 Ray 应用程序和集群。这些工具帮助你理解应用程序的性能并识别瓶颈。
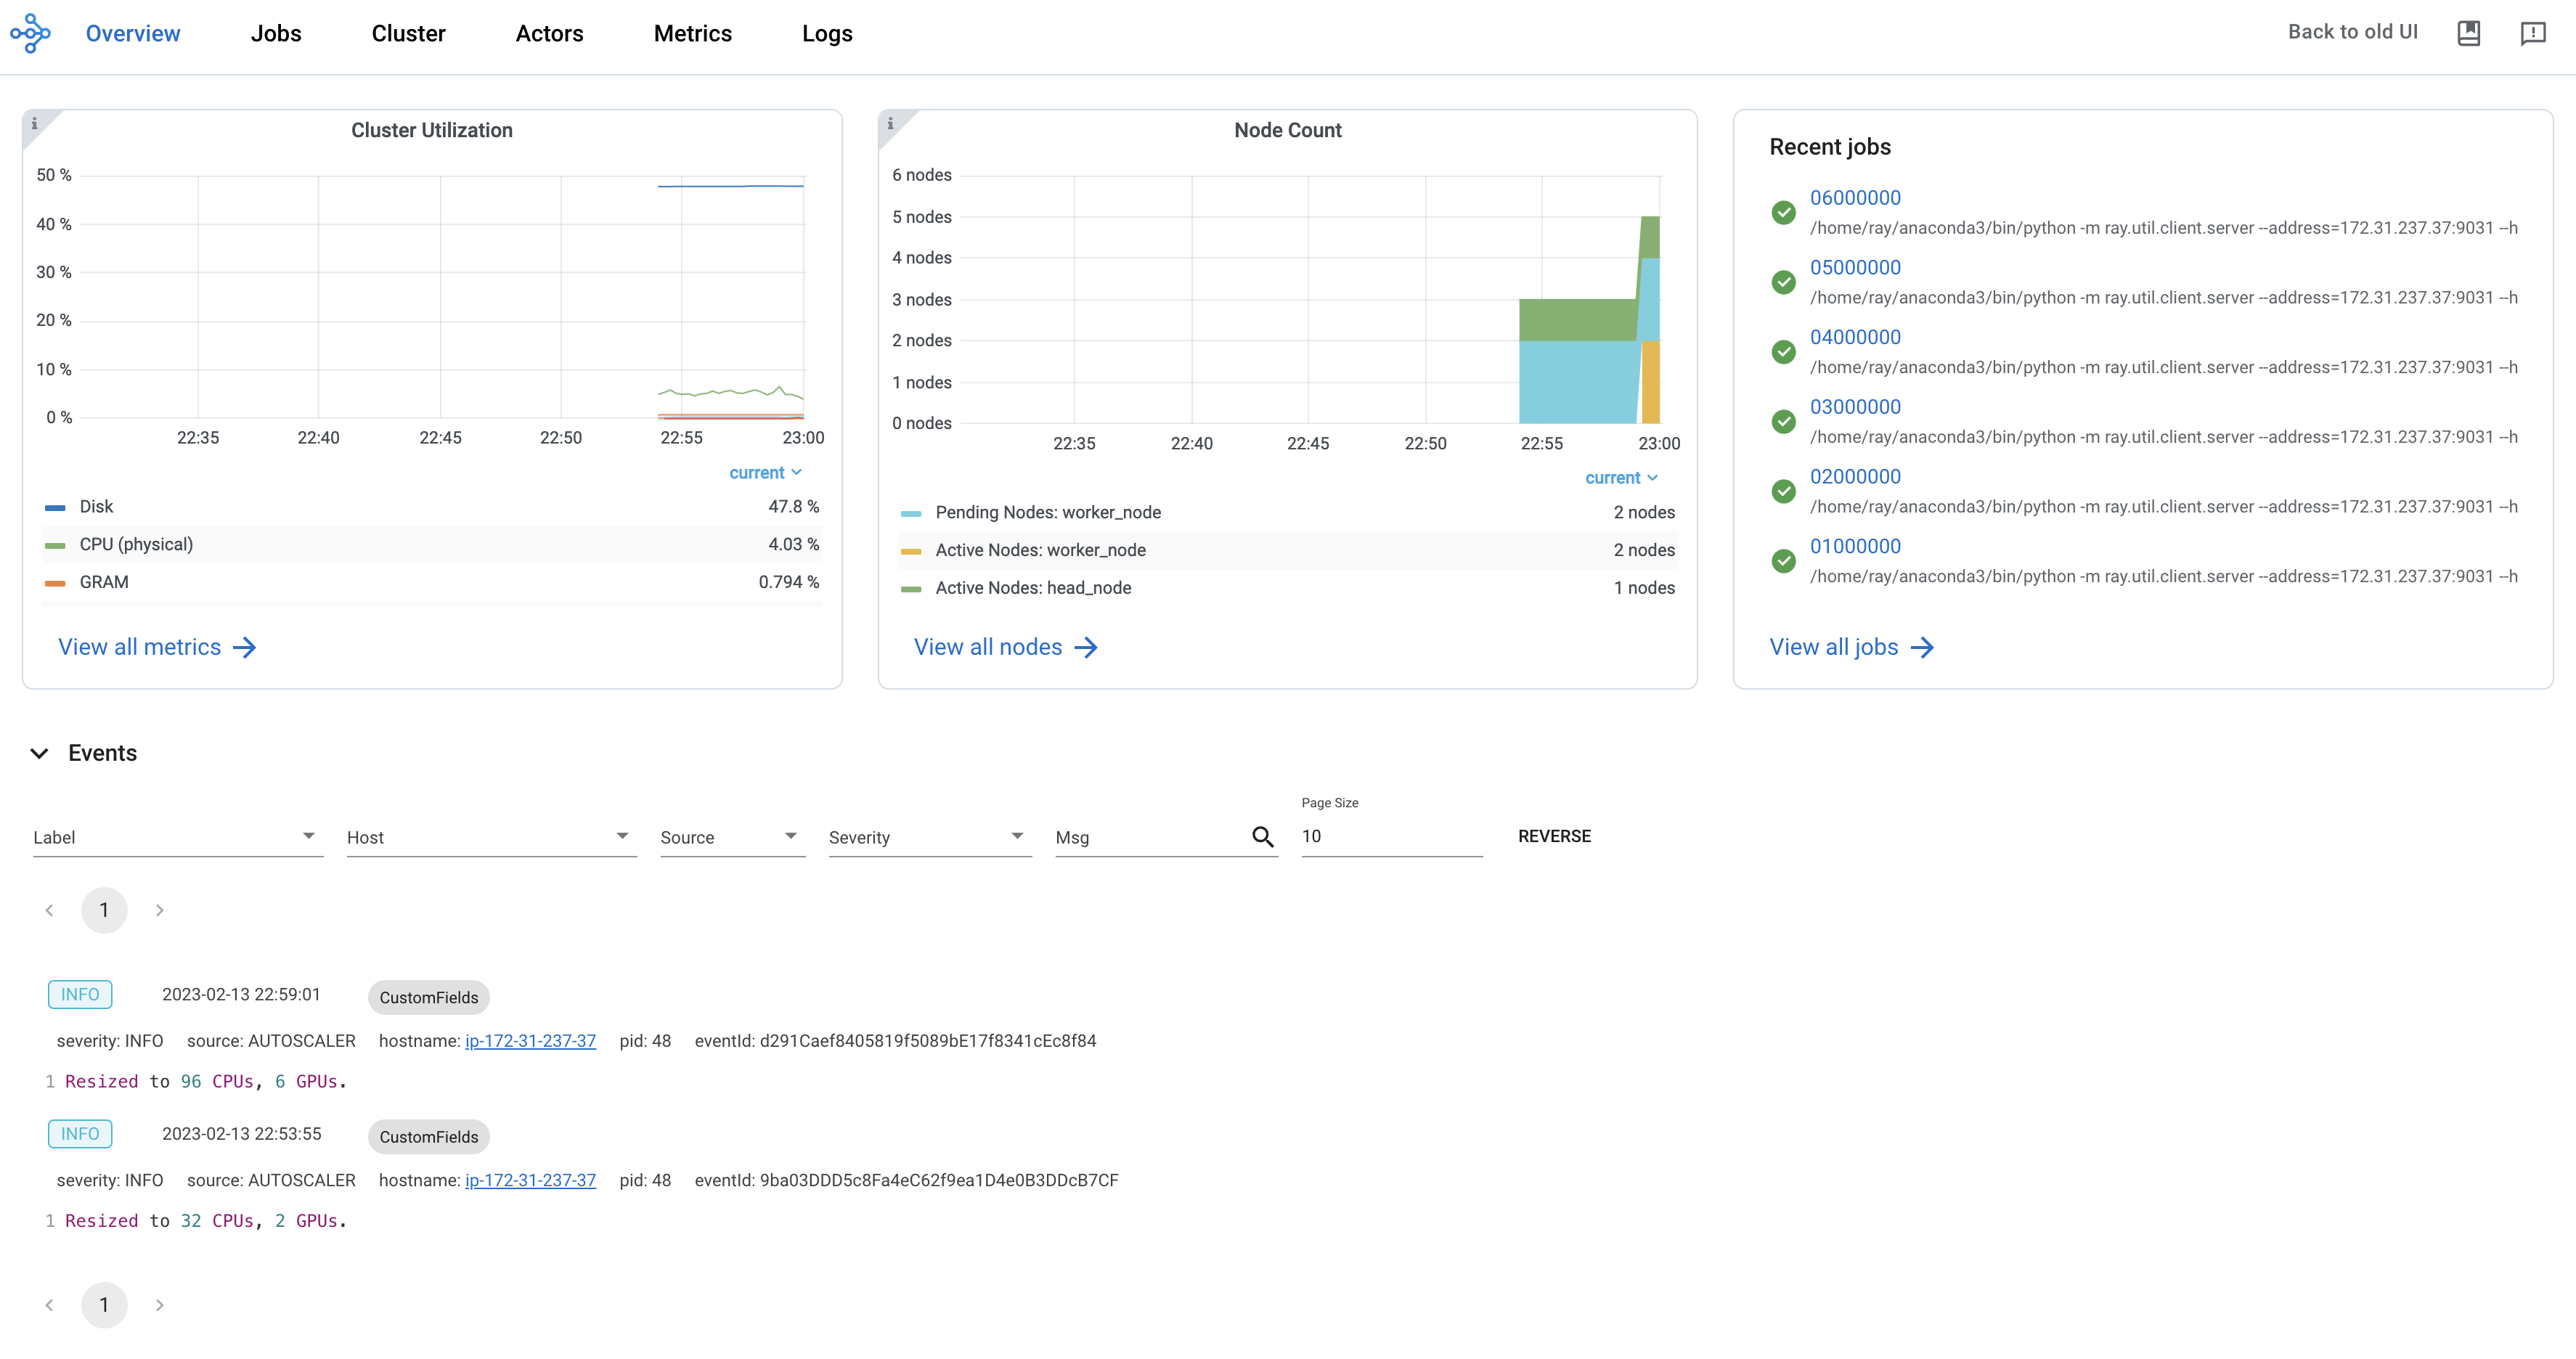
Ray Dashboard:用于监控和调试 Ray 的 Web GUI
Ray dashboard 提供了一个可视化界面,显示实时系统指标、节点级资源监控、作业性能分析和任务可视化。该仪表板旨在帮助用户理解 Ray 应用程序的性能并识别潜在问题。
注意
要开始使用 dashboard,请按如下方式进行默认安装:
pip install -U "ray[default]"
运行 Ray 脚本时,dashboard 会自动可用。通过默认 URL https://:8265 访问 dashboard。
Ray State APIs:用于访问集群状态的命令行界面
Ray State APIs 允许用户通过命令行界面或 Python SDK 方便地访问 Ray 的当前状态(快照)。
注意
要开始使用 state API,请按如下方式进行默认安装:
pip install -U "ray[default]"
运行以下代码。
import ray
import time

ray.init(num_cpus=4)

@ray.remote
def task_running_300_seconds():
    print("Start!")
    time.sleep(300)

@ray.remote
class Actor:
    def __init__(self):
        print("Actor created")

# Create 2 tasks
tasks = [task_running_300_seconds.remote() for _ in range(2)]

# Create 2 actors
actors = [Actor.remote() for _ in range(2)]

ray.get(tasks)
在终端中使用 ray summary tasks 查看 Ray 任务的汇总统计信息。
ray summary tasks
======== Tasks Summary: 2022-07-22 08:54:38.332537 ========
Stats:
------------------------------------
total_actor_scheduled: 2
total_actor_tasks: 0
total_tasks: 2


Table (group by func_name):
------------------------------------
FUNC_OR_CLASS_NAME        STATE_COUNTS    TYPE
0   task_running_300_seconds  RUNNING: 2      NORMAL_TASK
1   Actor.__init__            FINISHED: 2     ACTOR_CREATION_TASK
了解更多#
Ray 拥有丰富的资源生态系统,可帮助你了解更多关于分布式计算和 AI 扩展的信息。
博客和新闻#
视频#
幻灯片#
论文#
如果遇到技术问题,请在 Ray 讨论区发帖。对于一般问题、公告和社区讨论,请加入 Slack 上的 Ray 社区。