部署 Ray Serve 应用#
前提条件#
本指南主要关注 KubeRay v1.3.0 和 Ray 2.41.0 的行为。
什么是 RayService?#
RayService 管理两个组件
RayCluster:管理 Kubernetes 集群中的资源。
Ray Serve 应用:管理用户应用。
RayService 提供什么?#
对 Ray 集群和 Ray Serve 应用的原生 Kubernetes 支持:在使用 Kubernetes 配置定义 Ray 集群及其 Ray Serve 应用后,可以使用
kubectl创建集群及其应用。Ray Serve 应用的就地更新:用户可以在 RayService CR 配置中更新 Ray Serve 配置,并使用
kubectl apply更新应用。更多详情请参阅 步骤 7。Ray 集群的零停机升级:用户可以在 RayService CR 配置中更新 Ray 集群配置,并使用
kubectl apply更新集群。RayService 会临时创建一个待定集群并等待其就绪,然后将流量切换到新集群并终止旧集群。更多详情请参阅 步骤 8。高可用服务:更多详情请参阅 RayService 高可用性。
示例:使用 RayService 服务两个简单的 Ray Serve 应用#
步骤 1:使用 Kind 创建 Kubernetes 集群#
kind create cluster --image=kindest/node:v1.26.0
步骤 2:安装 KubeRay Operator#
按照 本文档 使用 Helm 仓库安装最新的稳定版 KubeRay Operator。
步骤 3:安装 RayService#
curl -O https://raw.githubusercontent.com/ray-project/kuberay/v1.3.0/ray-operator/config/samples/ray-service.sample.yaml
kubectl apply -f ray-service.sample.yaml
查看 RayService YAML 中嵌入的 Ray Serve 配置 serveConfigV2。请注意两个高级应用:一个水果摊应用和一个计算器应用。请记下水果摊应用的一些细节:
import_path:导入 Serve 应用的路径。对于fruit_app,fruit.py 在deployment_graph变量中定义了应用。route_prefix:更多详情请参阅 Ray Serve API。working_dir:工作目录指向 test_dag 仓库,RayService 会在运行时下载该仓库并用于启动你的应用。更多详情请参阅 Runtime Environments。deployments:请参阅 Ray Serve 文档。
serveConfigV2: |
  applications:
    - name: fruit_app
      import_path: fruit.deployment_graph
      route_prefix: /fruit
      runtime_env:
        working_dir: "https://github.com/ray-project/test_dag/archive/....zip"
      deployments: ...
    - name: math_app
      import_path: conditional_dag.serve_dag
      route_prefix: /calc
      runtime_env:
        working_dir: "https://github.com/ray-project/test_dag/archive/....zip"
      deployments: ...
步骤 4:验证 Kubernetes 集群状态#
# Step 4.1: List all RayService custom resources in the `default` namespace.
kubectl get rayservice

# [Example output]
# NAME                SERVICE STATUS   NUM SERVE ENDPOINTS
# rayservice-sample   Running          1

# Step 4.2: List all RayCluster custom resources in the `default` namespace.
kubectl get raycluster

# [Example output]
# NAME                                 DESIRED WORKERS   AVAILABLE WORKERS   CPUS    MEMORY   GPUS   STATUS   AGE
# rayservice-sample-raycluster-fj2gp   1                 1                   2500m   4Gi      0      ready    75s

# Step 4.3: List all Ray Pods in the `default` namespace.
kubectl get pods -l=ray.io/is-ray-node=yes

# [Example output]
# NAME                                                          READY   STATUS    RESTARTS   AGE
# rayservice-sample-raycluster-fj2gp-head-6wwqp                 1/1     Running   0          93s
# rayservice-sample-raycluster-fj2gp-small-group-worker-hxrxc   1/1     Running   0          93s

# Step 4.4: Check whether the RayService is ready to serve requests.
kubectl describe rayservices.ray.io rayservice-sample

# [Example output]
# Conditions:
#   Last Transition Time:  2025-02-13T18:28:51Z
#   Message:               Number of serve endpoints is greater than 0
#   Observed Generation:   1
#   Reason:                NonZeroServeEndpoints
#   Status:                True <--- RayService is ready to serve requests
#   Type:                  Ready

# Step 4.5: List services in the `default` namespace.
kubectl get services

# NAME                                          TYPE        CLUSTER-IP      EXTERNAL-IP   PORT(S)                                                   AGE
# ...
# rayservice-sample-head-svc                    ClusterIP   10.96.34.90     <none>        10001/TCP,8265/TCP,52365/TCP,6379/TCP,8080/TCP,8000/TCP   4m58s
# rayservice-sample-raycluster-6mj28-head-svc   ClusterIP   10.96.171.184   <none>        10001/TCP,8265/TCP,52365/TCP,6379/TCP,8080/TCP,8000/TCP   6m21s
# rayservice-sample-serve-svc                   ClusterIP   10.96.161.84    <none>        8000/TCP                                                  4m58s
KubeRay 基于 RayService 自定义资源 YAML 中定义的 spec.rayClusterConfig 创建一个 RayCluster。接下来,一旦 head Pod 运行并就绪,KubeRay 会向 head 的 Dashboard 端口提交请求,以创建 spec.serveConfigV2 中定义的 Ray Serve 应用。
用户可以通过 RayService 的 head 服务 rayservice-sample-head-svc 和 RayCluster 的 head 服务 rayservice-sample-raycluster-xxxxx-head-svc 访问 head Pod。
然而,在零停机升级期间,KubeRay 会为新的 RayCluster 创建一个新的 RayCluster 和一个新的 head 服务 rayservice-sample-raycluster-yyyyy-head-svc。
如果你不使用 rayservice-sample-head-svc,则需要更新 Ingress 配置以指向新的 head 服务。但是,如果你使用 rayservice-sample-head-svc,KubeRay 会自动更新选择器以指向新的 head Pod,从而无需更新 Ingress 配置。
注意:默认端口及其定义。
端口 |
定义 |
|---|---|
6379 |
Ray GCS |
8265 |
Ray Dashboard |
10001 |
Ray Client |
8000 |
Ray Serve |
步骤 5:验证 Serve 应用的状态#
# Step 5.1: Check the status of the RayService.
kubectl describe rayservices rayservice-sample
# [Example output: Ray Serve application statuses]
# Status:
# Active Service Status:
# Application Statuses:
# fruit_app:
# Serve Deployment Statuses:
# Fruit Market:
# Status: HEALTHY
# ...
# Status: RUNNING
# math_app:
# Serve Deployment Statuses:
# Adder:
# Status: HEALTHY
# ...
# Status: RUNNING
# [Example output: RayService conditions]
# Conditions:
# Last Transition Time: 2025-02-13T18:28:51Z
# Message: Number of serve endpoints is greater than 0
# Observed Generation: 1
# Reason: NonZeroServeEndpoints
# Status: True
# Type: Ready
# Last Transition Time: 2025-02-13T18:28:00Z
# Message: Active Ray cluster exists and no pending Ray cluster
# Observed Generation: 1
# Reason: NoPendingCluster
# Status: False
# Type: UpgradeInProgress
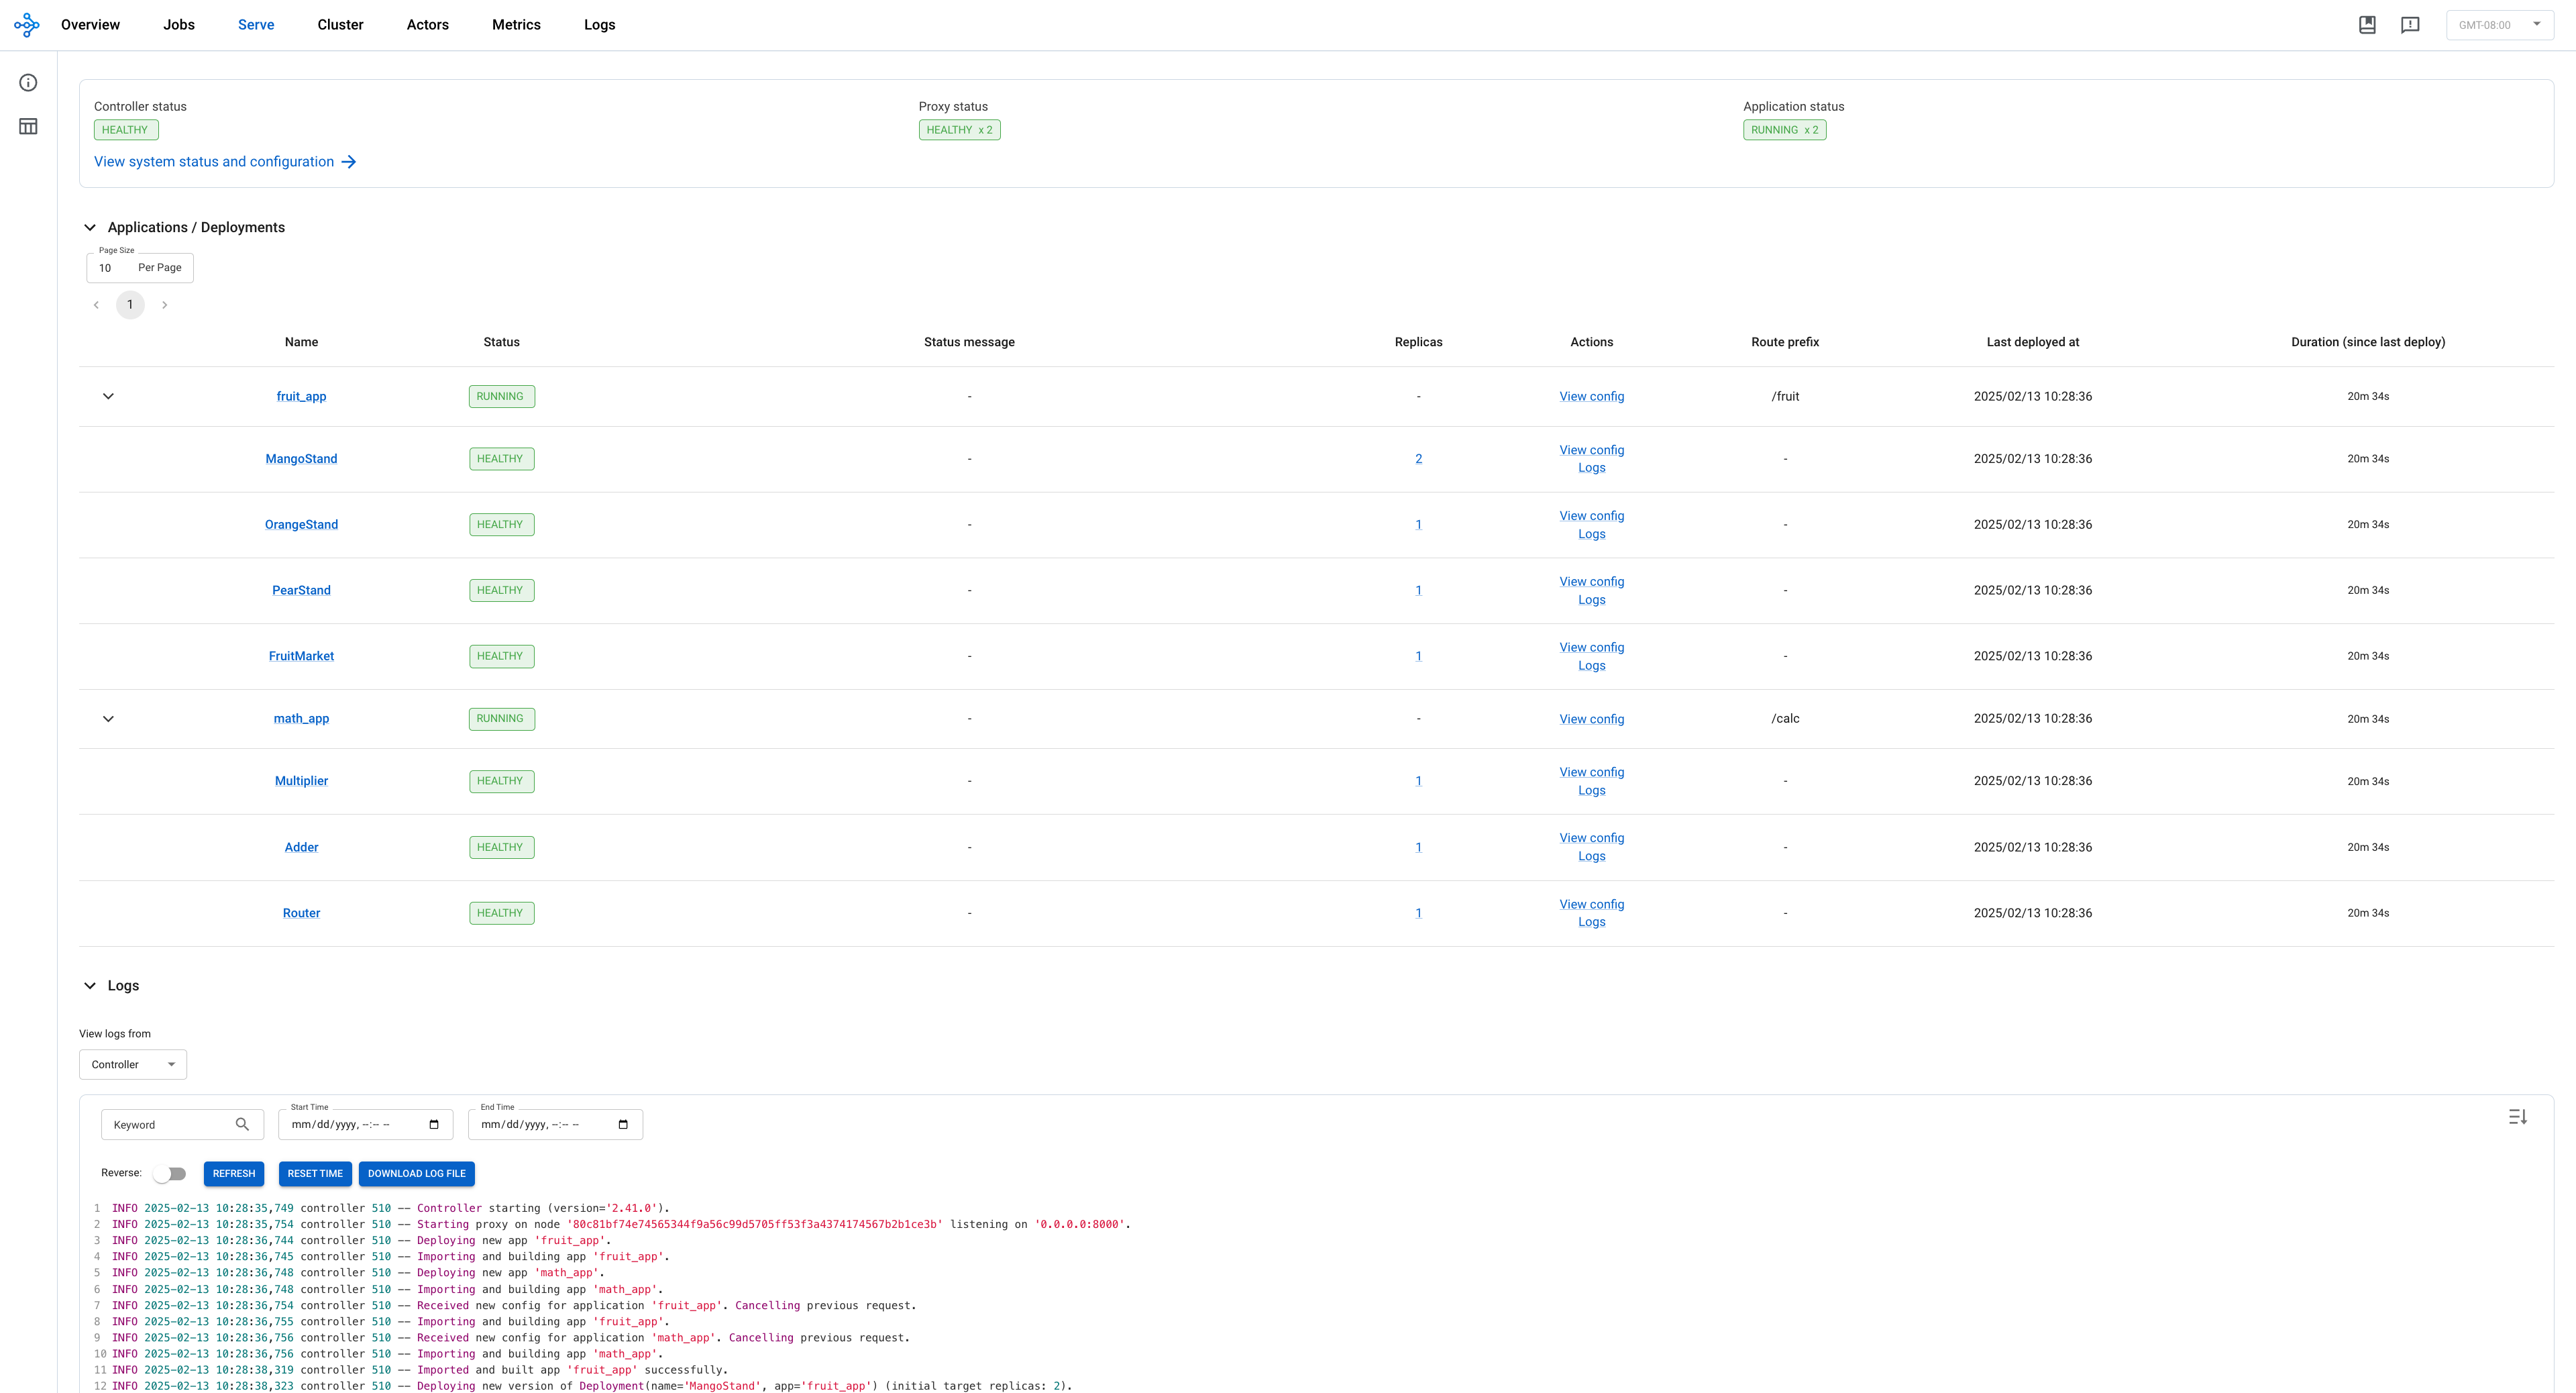
# Step 5.2: Check the Serve applications in the Ray dashboard.
# (1) Forward the dashboard port to localhost.
# (2) Check the Serve page in the Ray dashboard at https://:8265/#/serve.
kubectl port-forward svc/rayservice-sample-head-svc 8265:8265
更多关于 RayService 可观测性的详情请参阅 rayservice-troubleshooting.md。以下是 Ray Dashboard 中 Serve 页面的截图示例。
步骤 6:通过 Kubernetes Serve 服务向 Serve 应用发送请求#
# Step 6.1: Run a curl Pod.
# If you already have a curl Pod, you can use `kubectl exec -it <curl-pod> -- sh` to access the Pod.
kubectl run curl --image=radial/busyboxplus:curl -i --tty

# Step 6.2: Send a request to the fruit stand app.
curl -X POST -H 'Content-Type: application/json' rayservice-sample-serve-svc:8000/fruit/ -d '["MANGO", 2]'
# [Expected output]: 6

# Step 6.3: Send a request to the calculator app.
curl -X POST -H 'Content-Type: application/json' rayservice-sample-serve-svc:8000/calc/ -d '["MUL", 3]'
# [Expected output]: "15 pizzas please!"
rayservice-sample-serve-svc在所有拥有 Ray Serve 副本的 worker 之间进行流量路由。
步骤 7:Ray Serve 应用的就地更新#
你可以通过修改 RayService 配置文件中的 serveConfigV2 来更新应用的配置。使用 kubectl apply 重新应用修改后的配置,会将新配置重新应用到现有的 RayCluster,而不是创建一个新的 RayCluster。
在 ray-service.sample.yaml 中,将水果摊应用的芒果价格从 3 更新到 4。此更改会重新配置现有的 MangoStand 部署,未来的请求将使用更新后的芒果价格。
# Step 7.1: Update the price of mangos from 3 to 4.
# [ray-service.sample.yaml]
# - name: MangoStand
#   num_replicas: 1
#   max_replicas_per_node: 1
#   user_config:
#     price: 4

# Step 7.2: Apply the updated RayService config.
kubectl apply -f ray-service.sample.yaml

# Step 7.3: Check the status of the RayService.
kubectl describe rayservices rayservice-sample
# [Example output]
# Serve Deployment Statuses:
#   Mango Stand:
#     Status: UPDATING

# Step 7.4: Send a request to the fruit stand app again after the Serve deployment status changes from UPDATING to HEALTHY.
# (Execute the command in the curl Pod from Step 6)
curl -X POST -H 'Content-Type: application/json' rayservice-sample-serve-svc:8000/fruit/ -d '["MANGO", 2]'
# [Expected output]: 8
步骤 8:Ray 集群的零停机升级#
在步骤 7 中,修改 serveConfigV2 不会触发 Ray 集群的零停机升级。相反,它会将新配置重新应用到现有的 RayCluster。但是,如果你修改 RayService YAML 文件中的 spec.rayClusterConfig,则会触发 Ray 集群的零停机升级。RayService 会临时创建一个新的 RayCluster 并等待其就绪,然后通过更新 RayService 管理的 head 服务 rayservice-sample-head-svc 的选择器,将流量切换到新的 RayCluster,并终止旧集群。
在零停机升级过程中,RayService 会临时创建一个新的 RayCluster 并等待其就绪。一旦新的 RayCluster 就绪,RayService 会更新 RayService 管理的 head 服务 rayservice-sample-head-svc 的选择器,使其指向新的 RayCluster,从而将流量切换到新的 RayCluster。最后,KubeRay 会删除旧的 RayCluster。
某些例外情况不会触发零停机升级。只有由 Ray autoscaler 管理的字段,即 replicas 和 scaleStrategy.workersToDelete,不会触发零停机升级。当你更新这些字段时,KubeRay 不会将更新从 RayService 传播到 RayCluster 自定义资源,因此不会发生任何变化。
# Step 8.1: Update `spec.rayClusterConfig.workerGroupSpecs[0].replicas` in the RayService YAML file from 1 to 2.
# This field is an exception that doesn't trigger a zero-downtime upgrade, and KubeRay doesn't update the
# RayCluster as a result. Therefore, no changes occur.
kubectl apply -f ray-service.sample.yaml

# Step 8.2: Check RayService CR
kubectl describe rayservices rayservice-sample
# Worker Group Specs:
#   ...
#   Replicas:  2

# Step 8.3: Check RayCluster CR. The update doesn't propagate to the RayCluster CR.
kubectl describe rayclusters $YOUR_RAY_CLUSTER
# Worker Group Specs:
#   ...
#   Replicas:  1

# Step 8.4: Update `spec.rayClusterConfig.rayVersion` to `2.100.0`.
# This field determines the Autoscaler sidecar image, and triggers a zero downtime upgrade.
kubectl apply -f ray-service.sample.yaml

# Step 8.5: List all RayCluster custom resources in the `default` namespace.
# Note that the new RayCluster is created based on the updated RayService config to have 2 workers.
kubectl get raycluster

# NAME                                 DESIRED WORKERS   AVAILABLE WORKERS   CPUS    MEMORY   GPUS   STATUS   AGE
# rayservice-sample-raycluster-fj2gp   1                 1                   2500m   4Gi      0      ready    40m
# rayservice-sample-raycluster-pddrb   2                 2                   3       6Gi      0               13s

# Step 8.6: Wait for the old RayCluster terminate.

# Step 8.7: Submit a request to the fruit stand app via the same serve service.
curl -X POST -H 'Content-Type: application/json' rayservice-sample-serve-svc:8000/fruit/ -d '["MANGO", 2]'
# [Expected output]: 8
步骤 9:清理 Kubernetes 集群#
# Delete the RayService.
kubectl delete -f ray-service.sample.yaml

# Uninstall the KubeRay operator.
helm uninstall kuberay-operator

# Delete the curl Pod.
kubectl delete pod curl
下一步#
更多 RayService HA 的详情请参阅 RayService 高可用性。
如果遇到任何问题,请参阅 RayService 故障排除指南。
更多 RayService 示例请参阅 示例。MobileNet 示例 是一个很好的入门示例,因为它不需要 GPU 且易于在本地机器上运行。