面向 Ray 开发者的性能分析#
本指南帮助 Ray 项目贡献者分析 Ray 性能。
获取 Ray C++ 进程的堆栈跟踪#
您可以使用以下 GDB 命令查看任何正在运行的 Ray 进程(例如 raylet)的当前堆栈跟踪。这对于调试 100% CPU 利用率或无限循环非常有用(只需运行几次命令即可查看进程卡在哪里)。
sudo gdb -batch -ex "thread apply all bt" -p <pid>
请注意,您可以使用 pgrep raylet 命令找到 raylet 的 pid。
安装#
这些说明仅适用于 Ubuntu。尝试在 Mac OS 上使 pprof 正确符号化已失败。
sudo apt-get install google-perftools libgoogle-perftools-dev
您可能需要安装 graphviz,以便 pprof 生成火焰图。
sudo apt-get install graphviz
CPU 性能分析#
要在性能分析模式下启动 Ray 并对 Raylet 进行性能分析,请定义以下变量
export PERFTOOLS_PATH=/usr/lib/x86_64-linux-gnu/libprofiler.so
export PERFTOOLS_LOGFILE=/tmp/pprof.out
export RAY_RAYLET_PERFTOOLS_PROFILER=1
文件 /tmp/pprof.out 最初是空的,直到您让二进制文件运行目标工作负载一段时间,然后通过 ray stop 或让驱动程序退出终止它。
注意:启用 RAY_RAYLET_PERFTOOLS_PROFILER 可以对 Raylet 组件进行性能分析。要对其他模块进行性能分析,请使用 RAY_{MODULE}_PERFTOOLS_PROFILER,其中 MODULE 代表进程类型的大写形式,例如 GCS_SERVER。
可视化 CPU 性能分析结果#
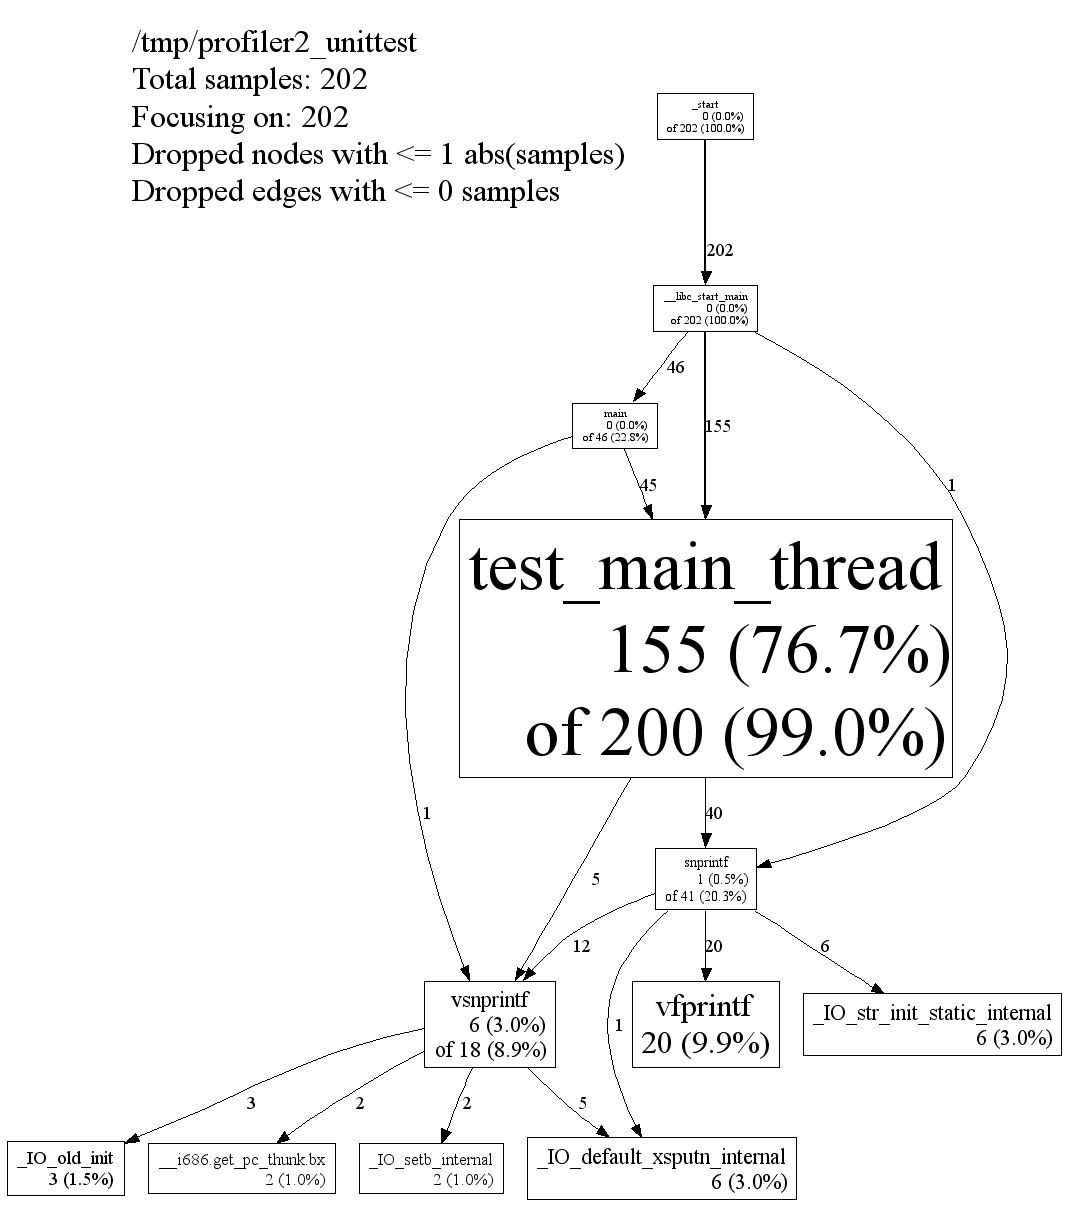
您可以通过不同的方式可视化 pprof 的输出。下面,输出是一个可缩放的 .svg 图像,显示了标注有热路径的调用图。
# Use the appropriate path.
RAYLET=ray/python/ray/core/src/ray/raylet/raylet

google-pprof -svg $RAYLET /tmp/pprof.out > /tmp/pprof.svg
# Then open the .svg file with Chrome.

# If you realize the call graph is too large, use -focus=<some function> to zoom
# into subtrees.
google-pprof -focus=epoll_wait -svg $RAYLET /tmp/pprof.out > /tmp/pprof.svg
下面是官方文档中的 SVG 输出示例快照

内存性能分析#
要对 Ray 核心组件运行内存性能分析,请使用 jemalloc。Ray 支持环境变量,这些变量可以覆盖核心组件的 LD_PRELOAD。
您可以从 ray_constants.py 中找到组件名称。例如,如果您想对 gcs_server 进行性能分析,请在 ray_constants.py 中搜索 PROCESS_TYPE_GCS_SERVER。您可以看到其值为 gcs_server。
用户需要提供 3 个环境变量进行内存性能分析。
RAY_JEMALLOC_LIB_PATH:jemalloc 共享库libjemalloc.so的路径RAY_JEMALLOC_CONF:jemalloc 的 MALLOC_CONF 配置,使用逗号分隔值。更多详细信息请阅读 jemalloc 文档。RAY_JEMALLOC_PROFILE:逗号分隔的 Ray 组件列表,用于运行 Jemalloc.so。例如,(“raylet,gcs_server”)。请注意,组件名称应与ray_constants.py中的进程类型匹配。(这意味着“RAYLET,GCS_SERVER”将不起作用)。
# Install jemalloc
wget https://github.com/jemalloc/jemalloc/releases/download/5.2.1/jemalloc-5.2.1.tar.bz2
tar -xf jemalloc-5.2.1.tar.bz2
cd jemalloc-5.2.1
export JEMALLOC_DIR=$PWD
./configure --enable-prof --enable-prof-libunwind
make
sudo make install

# Verify jeprof is installed.
which jeprof

# Start a Ray head node with jemalloc enabled.
# (1) `prof_prefix` defines the path to the output profile files and the prefix of their file names.
# (2) This example only profiles the GCS server component.
RAY_JEMALLOC_CONF=prof:true,lg_prof_interval:33,lg_prof_sample:17,prof_final:true,prof_leak:true,prof_prefix:$PATH_TO_OUTPUT_DIR/jeprof.out \
RAY_JEMALLOC_LIB_PATH=$JEMALLOC_DIR/lib/libjemalloc.so \
RAY_JEMALLOC_PROFILE=gcs_server \
ray start --head

# Check the output files. You should see files with the format of "jeprof.<pid>.0.f.heap".
# Example: jeprof.out.1904189.0.f.heap
ls $PATH_TO_OUTPUT_DIR/

# If you don't see any output files, try stopping the Ray cluster to force it to flush the
# profile data since `prof_final:true` is set.
ray stop

# Use jeprof to view the profile data. The first argument is the binary of GCS server.
# Note that you can also use `--pdf` or `--svg` to generate different formats of the profile data.
jeprof --text $YOUR_RAY_SRC_DIR/python/ray/core/src/ray/gcs/gcs_server $PATH_TO_OUTPUT_DIR/jeprof.out.1904189.0.f.heap

# [Example output]
Using local file ../ray/core/src/ray/gcs/gcs_server.
Using local file jeprof.out.1904189.0.f.heap.
addr2line: DWARF error: section .debug_info is larger than its filesize! (0x93f189 vs 0x530e70)
Total: 1.0 MB
    0.3  25.9%  25.9%      0.3  25.9% absl::lts_20230802::container_internal::InitializeSlots
    0.1  12.9%  38.7%      0.1  12.9% google::protobuf::DescriptorPool::Tables::CreateFlatAlloc
    0.1  12.4%  51.1%      0.1  12.4% ::do_tcp_client_global_init
    0.1  12.3%  63.4%      0.1  12.3% grpc_core::Server::Start
    0.1  12.2%  75.6%      0.1  12.2% std::__cxx11::basic_string::_M_assign
    0.1  12.2%  87.8%      0.1  12.2% std::__cxx11::basic_string::_M_mutate
    0.1  12.2% 100.0%      0.1  12.2% std::__cxx11::basic_string::reserve
    0.0   0.0% 100.0%      0.8  75.4% EventTracker::RecordExecution
...
运行微基准测试#
要运行一组单节点 Ray 微基准测试,请使用
ray microbenchmark
您可以在 GitHub 发布日志中找到 Ray 版本的微基准测试结果。
参考资料#
gperftools,包括 libprofiler、tcmalloc 和其他有用的工具。