使用 Ray Serve 部署 DLinear 模型进行在线服务#

本教程将启动一个在线服务,该服务
部署已训练的 DLinear 模型工件以生成时间序列预测
根据实时入站流量自动缩放
涵盖服务周围的可观测性和调试
请注意,此笔记本要求您运行 DLinear 模型分布式训练 教程,以生成此教程所需的预训练模型工件。
Ray Serve 是一个高度可伸缩且灵活的模型服务库,用于构建在线推理 API。您可以
避免使用一个受网络和计算限制的大型服务,从而浪费资源
利用异构资源的分数,而 SageMaker、Vertex、KServe 等无法做到这一点,并且可以通过
num_replicas进行水平缩放设置 gRPC 服务以构建分布式系统和微服务
启用基于批量大小、时间等的 动态批处理。
访问用于 服务 LLM 的实用工具集,这些工具集与推理引擎无关,并对 LLM 特定的功能(如多 LoRA 支持)提供了开箱即用的支持。

设置环境#
首先,导入必要的模块并设置 Ray Serve 部署的环境
import asyncio
import os

import aiohttp
import numpy as np
import pandas as pd
import requests
import torch
from fastapi import FastAPI
# Remove this setting when it becomes the default in a future release.
os.environ["RAY_TRAIN_V2_ENABLED"] = "1"

# Now it's safe to import from Ray.
import ray
from ray import serve
from starlette.requests import Request
使用 e2e_timeseries 模块初始化 Ray 集群,以便新生成的 worker 可以从中导入。
import e2e_timeseries
from e2e_timeseries.model import DLinear

ray.init(runtime_env={"py_modules": [e2e_timeseries]})
创建 Ray Serve 部署#
接下来,定义 DLinear 模型的 Ray Serve 端点。此实现使用可重用类来避免为每个请求重新加载模型。该部署支持 Pythonic 和 HTTP 请求,并具有动态批处理以实现高效推理。
DEPLOYMENT_NAME = "dlinear-ett-server"

# Create a FastAPI app that adds endpoints to the Serve deployment.
app = FastAPI(title="DLinear", description="predict future oil temperatures", version="0.1")


@serve.deployment(num_replicas=1, ray_actor_options={"num_cpus": 1, "num_gpus": 1})
@serve.ingress(app)
class DLinearModelServe:
    def __init__(self, model_checkpoint_path: str | None = None):
        checkpoint = torch.load(model_checkpoint_path, map_location=torch.device("cpu"))  # Load to CPU first
        self.args = checkpoint["train_args"]
        self.device = torch.device("cuda" if torch.cuda.is_available() else "cpu")
        print(f"Using device: {self.device}")

        # Load model from checkpoint.
        self.model = DLinear(self.args).float()
        self.model.load_state_dict(checkpoint["model_state_dict"])
        print(f"Model loaded successfully from {model_checkpoint_path}")

        self.model.to(self.device)
        self.model.eval()

    @serve.batch(max_batch_size=32, batch_wait_timeout_s=0.1)
    async def predict_batch(self, batch_x: list[list[float]]) -> list[list[float]]:
        """
        Expects a list of series, where each series is a 1D list of floats/integers.
        e.g., [[0.1, 0.2, ..., 0.N], [0.3, 0.4, ..., 0.M]]
        Each series is a 1D list of floats/integers.
        """

        # Convert list of 1D series to a 2D numpy array (batch_size, seq_len).
        batch_x = np.array(batch_x, dtype=np.float32)
        batch_x = torch.from_numpy(batch_x).float().to(self.device)

        # Ensure batch_x is 3D: (batch_size, seq_len, num_features)
        # For univariate 'S' models, num_features is 1.
        if batch_x.ndim == 2:
            batch_x = batch_x.unsqueeze(-1)

        with torch.no_grad():
            outputs = self.model(batch_x)
            # Output shape: (batch_size, pred_len, features_out)

        # Slice to get the prediction length part of the output.
        # The [:, :, :] part takes all output features.
        # For 'S' (single-feature) forecasting, DLinear typically outputs 1 feature.
        # For 'M' (multi-feature) forecasting, DLinear typically outputs multiple features.
        outputs = outputs[:, -self.args["pred_len"] :, :]

        # If 'S' (single feature forecasting) and the model's output for that single
        # feature has an explicit last dimension of 1, squeeze it.
        # This approach makes the output a list of 1D series (list of lists of floats).
        if outputs.shape[-1] == 1:
            outputs = outputs.squeeze(-1)  # Shape: (batch_size, pred_len)

        outputs_list = outputs.cpu().numpy().tolist()
        return outputs_list

    @app.post("/predict")
    async def predict_endpoint(self, request: Request):
        """
        Expects a JSON body, which is a list of floats/integers.
        e.g., [0.1, 0.2, ..., 0.N]
        where N must be equal to self.args.seq_len.
        """
        try:
            input_data = await request.json()
            if not isinstance(input_data, list):
                return {"error": "Invalid input. JSON list of numbers expected."}
            if len(input_data) != self.args["seq_len"]:
                return {"error": f"Invalid series length. Expected {self.args['seq_len']}, got {len(input_data)}."}

        except Exception as e:
            return {"error": f"Failed to parse JSON request: {str(e)}"}

        # Pass the single list input_data, wrapped in another list, to predict_batch.
        # Ray Serve's @serve.batch handles collecting these into a batch for predict_batch.
        # The await call returns the specific result for this input_data.
        single_prediction_output = await self.predict_batch(input_data)

        # single_prediction_output is expected to be a list[float] (the prediction for one series)
        return single_prediction_output

    # Expose get_seq_len as a GET endpoint.
    @app.get("/seq_len")
    async def get_sequence_length(self):
        return {"seq_len": self.args["seq_len"]}
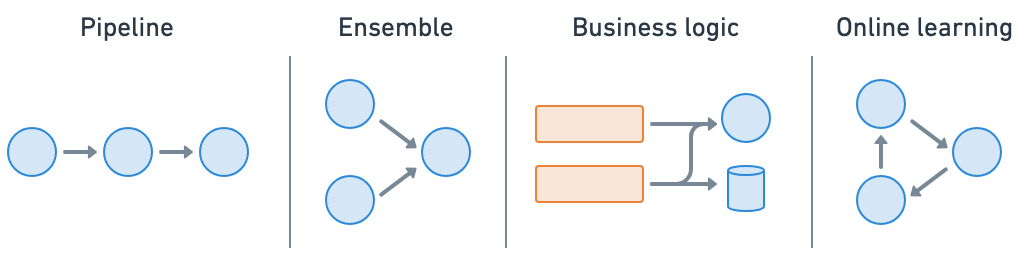
Ray Serve 可以轻松进行模型组合,您可以将包含 ML 模型或业务逻辑的多个部署组合成一个应用程序。您可以独立缩放分数资源并配置每个部署。
加载模型并启动服务#
加载已训练的 DLinear 模型并启动 Ray Serve 部署。模型检查点路径从训练期间创建的元数据文件中加载。
# Load the best checkpoint path from the metadata file created in the training notebook.
best_checkpoint_metadata_fpath = "/mnt/cluster_storage/checkpoints/best_checkpoint_path.txt"
with open(best_checkpoint_metadata_fpath, "r") as f:
    best_checkpoint_path = f.read().strip()


def serve_model(best_checkpoint_path):
    dlinear_app = DLinearModelServe.bind(model_checkpoint_path=best_checkpoint_path)

    # The route_prefix applies to all routes within the FastAPI app.
    serve.run(dlinear_app, name=DEPLOYMENT_NAME, route_prefix="/predict_dlinear")
    print(f"DLinear model deployment '{DEPLOYMENT_NAME}' is running with FastAPI app.")
    print("  Prediction endpoint: http://127.0.0.1:8000/predict_dlinear/predict")
    print("  Sequence length endpoint: http://127.0.0.1:8000/predict_dlinear/seq_len")

    print("\nTo stop the server, press Ctrl+C in the terminal where it's running.")


serve_model(best_checkpoint_path)
您应该会看到表明服务正在本地运行的日志。
INFO 2025-04-09 14:06:55,760 serve 31684 -- Started Serve in namespace "serve".
INFO 2025-04-09 14:06:57,875 serve 31684 -- Application 'dlinear-ett-server' is ready at http://127.0.0.1:8000/.
测试服务#
使用单个请求和并发批处理请求来测试已部署的 DLinear 模型,以演示动态批处理功能。
async def test_serve():
    # --- Example Client Code, which can be run in a separate script or after serve starts ---

    # Base URL for the service.
    base_url = "http://127.0.0.1:8000/predict_dlinear"
    seq_len_url = f"{base_url}/seq_len"
    predict_url = f"{base_url}/predict"

    # Get the proper seq_len for the deployed model.
    response = requests.get(seq_len_url)
    response.raise_for_status()
    seq_len_data = response.json()
    seq_len = seq_len_data.get("seq_len")

    # Load sample data for demonstration purposes.
    df = pd.read_csv("s3://air-example-data/electricity-transformer/ETTh2.csv")
    ot_series = df["OT"].tolist()

    # Create a single sample request from the loaded data.
    sample_input_series = ot_series[:seq_len]
    sample_request_body = sample_input_series

    print("\n--- Sending Single Synchronous Request to /predict endpoint ---")
    response = requests.post(predict_url, json=sample_request_body)
    response.raise_for_status()
    prediction = response.json()
    print(f"Prediction (first 5 values): {prediction[:5]}")

    print("\n--- Sending Batch Asynchronous Requests to /predict endpoint ---")
    sample_input_list = [sample_input_series] * 100  # Use identical requests

    async def fetch(session, url, data):
        async with session.post(url, json=data) as response:
            response.raise_for_status()
            return await response.json()

    async def fetch_all_concurrently(requests_to_send: list):
        async with aiohttp.ClientSession() as session:
            tasks = [fetch(session, predict_url, input_data) for input_data in requests_to_send]
            responses = await asyncio.gather(*tasks, return_exceptions=True)
            return responses

    predictions = await fetch_all_concurrently(sample_input_list)
    print(f"Finished predictions for {len(sample_input_list)} inputs")


# Running this code in a notebook creates an asyncio event loop in the global scope.
# So, use await directly.
await test_serve()
# Use `asyncio.run(test_serve())` instead if running the code in a script.
Ray Serve 的动态批处理会自动分块入站请求,以最大化吞吐量和硬件利用率,同时保持低延迟。

生产部署注意事项#
Anyscale Services 提供了一种容错、可伸缩且经过优化的方式来服务 Ray Serve 应用程序。有关更多详细信息,请参阅 API 参考。您可以
通过专用服务页面、统一日志查看器、追踪等方式监控服务,并设置警报。
使用
num_replicas=auto缩放服务,并利用副本压缩来合并分数利用率的节点。拥有主节点容错。OSS Ray 可以从失败的 worker 和副本中恢复,但不能从主节点崩溃中恢复。
在单个服务中服务多个应用程序。

Anyscale 上的 RayTurbo Serve 具有 Ray Serve 之上的更多功能
部署到生产环境#
要在 Anyscale 上进行生产部署,您可以使用以下命令
# Production online service.
anyscale service deploy e2e_timeseries.serve:dlinear_model --name=dlinear-ett-forecaster \
  --containerfile="${WORKING_DIR}/containerfile" \
  --working-dir="${WORKING_DIR}" \
  --exclude=""
注意:
此示例使用
containerfile来定义依赖项,但您也可以轻松使用预构建的镜像。当您不指定计算并在工作区中启动时,默认情况下使用的是工作区的计算配置。
服务在远程运行后,您需要使用 bearer token 来查询它。您可以修改请求代码以使用此 token。
# Service specific config. Replace with your own values from the deployment logs.
base_url = "https://dlinear-ett-forecaster-jgz99.cld-kvedzwag2qa8i5bj.s.anyscaleuserdata.com"
token = "tXhmYYY7qMbrb1ToO9_J3n5_kD7ym7Nirs8djtip7P0"

# Requests config.
path = "/predict_dlinear/predict"
full_url = f"{base_url}{path}"
headers = {"Authorization": f"Bearer {token}"}

prediction = requests.post(full_url, json=sample_input_series, headers=headers).json()
不要忘记在不再需要服务时停止它。
anyscale service terminate --name dlinear-ett-forecaster
