使用 Faster R-CNN 微调人脸口罩检测模型#
本教程将微调 PyTorch 中预训练的 Faster R-CNN 模型,以创建一个人脸口罩检测模型,该模型可以检测一个人是否正确佩戴口罩、未佩戴口罩或佩戴不正确。本示例演示了如何
使用来自 Kaggle 的数据集,包含 853 张 Pascal VOC 格式的带注释图像。
使用 Ray Data 解析 Pascal VOC XML 注释。
从 S3 中检索图像并将其附加到数据集中。
使用 Ray Train 设置分布式训练循环。
运行推理并可视化检测结果。
保存最终训练的模型以备后用。
这种方法利用迁移学习进行高效的目标检测,并通过 Anyscale 上的 Ray 扩展分布式训练。
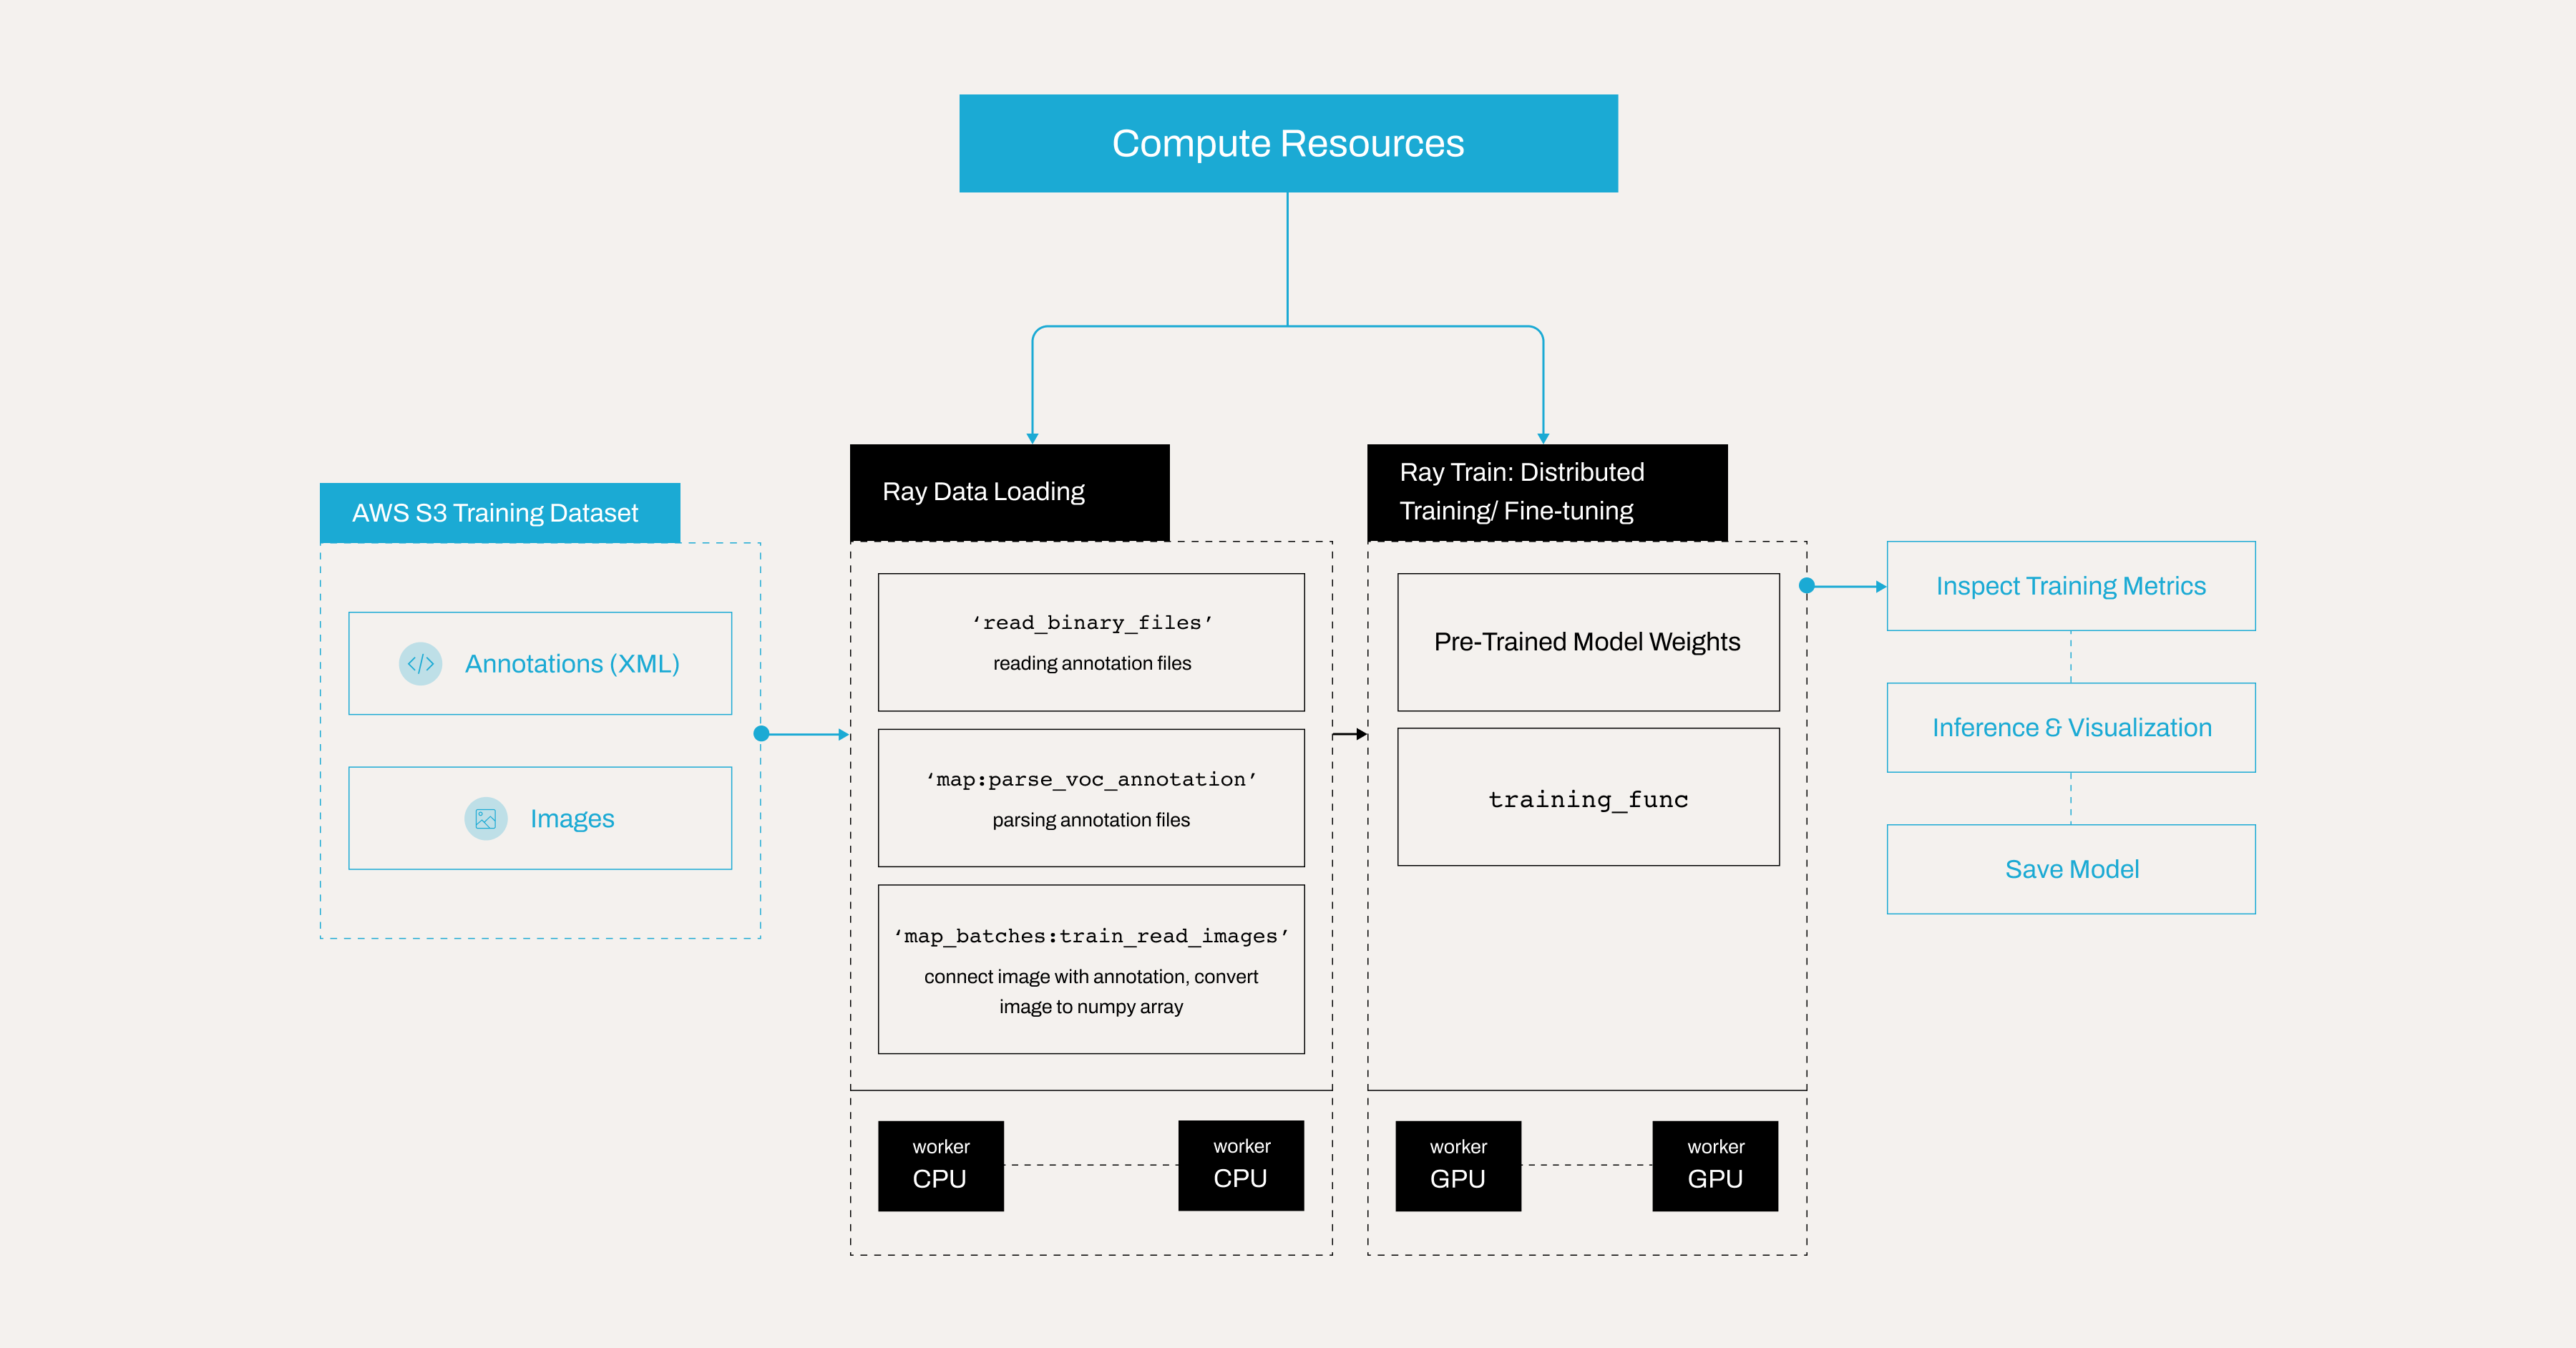
管道概述如下
注意:本教程已针对 Anyscale 平台进行了优化。在开源 Ray 上运行需要额外的配置。例如,您需要手动
- 配置 Ray 集群:设置多节点环境,包括主节点和工作节点,并管理资源分配,如自动扩展和 GPU/CPU 分配,而无需 Anyscale 的自动化。有关详细信息,请参阅 Ray Clusters。
- 管理依赖项:在每个节点上安装和管理依赖项,因为您将没有 Anyscale 基于 Docker 的依赖项管理。有关安装和更新 Ray 的说明,请参阅 Environment Dependencies。
- 设置存储:配置自己的分布式或共享存储系统,而不是依赖 Anyscale 的集成集群存储。有关设置共享存储解决方案的建议,请参阅 Configuring Persistent Storage。
设置依赖项#
在继续之前,请安装必要的依赖项。您有两个选项。
选项 1:构建 Docker 镜像#
要在 Anyscale 上设置环境,您需要构建一个包含所需依赖项的 Docker 镜像。有关依赖项管理的 Anyscale 文档,请参阅:https://docs.anyscale.com/configuration/dependency-management/dependency-byod/
此工作区包含 Dockerfile。您可以随时在 Anyscale 上自行构建镜像。
使用 Docker 镜像可以缩短工作区启动时间和工作节点加载时间。
注意:对于开源 Ray,请使用 rayproject/ray:2.41.0-py312-cu123 作为基础镜像。
选项 2:直接安装库#
或者,您可以按照以下指南手动安装所需的库:https://docs.anyscale.com/configuration/dependency-management/dependency-development
设置计算资源#
为该项目设置计算资源
配置工作区或主节点,使其具有足够的 CPU 和内存用于任务调度和协调,例如 8 个 CPU 和 16 GB 内存。
避免为主节点分配 GPU,因为它不处理训练或需要 GPU 资源。
通过指定基于 CPU 和 GPU 的实例来添加工作节点
CPU 节点,例如 8 个 CPU 和 16 GB,用于处理常规处理任务,设置自动扩展从 0 到 10。
GPU 节点,例如 1×T4,具有 4 个 CPU 和 16 GB,用于加速机器学习和深度学习工作负载,设置自动扩展从 0 到 10。
采用这种混合设置,通过将任务动态分配给最合适的资源来优化成本和性能。
使用 Anyscale 的优势#
工作节点在没有训练或推理任务运行时自动关闭,从而消除空闲资源成本。
利用自动扩展根据工作负载需求动态地将任务分配给 CPU 或 GPU 节点。
通过确保 GPU 资源仅在 ML 工作负载需要时激活来最大限度地减少基础设施浪费。
通过利用
Spot instances处理海量数据训练来降低成本。如果未提供 Spot 实例,Anyscale 还允许回退到按需实例。
有关设置计算配置的更多详细信息,请参阅:https://docs.anyscale.com/configuration/compute-configuration/
AWS S3 上的 Kaggle 数据#
Anyscale 已将 Kaggle 口罩数据集上传到一个公开可用的 AWS S3 存储桶。原始数据集来自 Kaggle:https://www.kaggle.com/datasets/andrewmvd/face-mask-detection
数据集分为三个主要文件夹:train、test 和 all
all/:包含 853 个样本。train/:包含 682 个样本。test/:包含 171 个样本。
每个文件夹包含两个子文件夹
annotations/:包含 Pascal VOC XML 注释文件。这些文件包含每张图像的边界框信息和类别标签。images/:包含与注释对应的实际图像文件。
此结构有助于高效地管理和处理数据,无论您是在训练还是评估模型。all 文件夹通常聚合所有可用的图像和注释,以便于访问。
## Note: Ray train v2 will be available on public Ray very soon, but in the meantime we use this workaround
## This will be removed once train v2 is pushed
import ray
ray.shutdown()
ray.init(
    runtime_env={
        "env_vars": {
            "RAY_TRAIN_V2_ENABLED": "1",
        },
    },
)
%%bash
## Note: Ray train v2 will be available on public Ray very soon, but in the meantime we use this workaround
## This will be removed once train v2 is pushed

echo "RAY_TRAIN_V2_ENABLED=1" > .env
## Note: Ray train v2 will be available on public Ray very soon, but in the meantime we use this workaround
## This will be removed once train v2 is pushed

from dotenv import load_dotenv
load_dotenv()
检查示例图像#
首先从 S3 存储中获取并显示一个示例图像。
import io

from PIL import Image
import requests

response = requests.get("https://face-masks-data.s3.us-east-2.amazonaws.com/all/images/maksssksksss0.png")
image = Image.open(io.BytesIO(response.content))
image
检查 Pascal VOC 格式的注释文件#
PASCAL VOC 是一种广泛认可的目标检测注释格式,它在 XML 文件中存储边界框、对象类别和图像元数据。其结构化设计和在流行检测框架中的普遍采用使其成为许多计算机视觉任务的标准选择。有关更多详细信息,请参阅:http://host.robots.ox.ac.uk/pascal/VOC/
查看前面图像的注释,它以 Pascal VOC XML 格式存储。
!curl "https://face-masks-data.s3.us-east-2.amazonaws.com/all/annotations/maksssksksss0.xml"
观察一些关键字段
该
<size>包含有关图像尺寸(宽度、高度)和颜色深度的详细信息。例如,以下块指示图像宽度为 512 像素,高度为 366 像素,并且有 3 个颜色通道,如 RGB。
        <size>
          <width>512</width>
          <height>366</height>
          <depth>3</depth>
        </size>
每个
<object>块描述了图像中的一个带注释对象。<name>是该对象的标签。在此数据集中,它可以是with_mask、without_mask或mask_weared_incorrect每个
<object>都包含一个<bndbox>标签,该标签指定了边界框的坐标,即紧密包围对象的矩形。<xmin>和<ymin>是边界框的左上角。<xmax>和<ymax>是边界框的右下角。
解析 Pascal VOC 注释#
注释文件是 XML 格式的;但是,由于 Ray 数据缺少 XML 解析器,请使用 ray.data.read_binary_files 直接从 S3 读取二进制文件。
然后,使用 parse_voc_annotation 函数从存储在数据集记录的 bytes 字段中的二进制输入中提取和解析 XML 注释数据。然后,它处理 XML 结构以提取边界框坐标、对象标签和文件名,并将它们作为 NumPy 数组返回以供进一步使用。
from typing import List, Tuple
import xmltodict
import numpy as np
import ray.data
import boto3

# # Create a Ray Dataset from the S3 uri.
annotation_s3_uri = "s3://face-masks-data/train/annotations/"
ds = ray.data.read_binary_files(annotation_s3_uri)
CLASS_TO_LABEL = {
    "background": 0,
    "with_mask": 1,
    "without_mask": 2,
    "mask_weared_incorrect": 3
}


def parse_voc_annotation(record) -> dict:
    xml_str = record["bytes"].decode("utf-8")
    if not xml_str.strip():
        raise ValueError("Empty XML string")

    annotation = xmltodict.parse(xml_str)["annotation"]

    # Normalize the object field to a list.
    objects = annotation["object"]
    if isinstance(objects, dict):
        objects = [objects]

    boxes: List[Tuple] = []
    for obj in objects:
        x1 = float(obj["bndbox"]["xmin"])
        y1 = float(obj["bndbox"]["ymin"])
        x2 = float(obj["bndbox"]["xmax"])
        y2 = float(obj["bndbox"]["ymax"])
        boxes.append((x1, y1, x2, y2))

    labels: List[int] = [CLASS_TO_LABEL[obj["name"]] for obj in objects]
    filename = annotation["filename"]

    return {
        "boxes": np.array(boxes),
        "labels": np.array(labels),
        "filename": filename
    }


annotations = ds.map(parse_voc_annotation)
annotations.take(2)
从 S3 批量检索图像#
接下来,根据批处理字典中存在的文件名,从 S3 URL 获取图像。对于每个文件名,检查文件是否具有适当的图像扩展名,构造 S3 URL,然后下载图像并将其转换为 RGB NumPy 数组。之后,将所有加载的图像附加到数据集字典中的新键“image”下。
请注意,在 Ray Data 中,map_batches 方法仅将数据批次传递给您的函数,这意味着您无法直接提供 images_s3_url 等额外参数。为解决此问题,请使用 partial 将 images_s3_url 参数预绑定到您的 read_images 函数。read_images 函数然后只接受批次,因为这是 map_batches 提供的全部内容,并在内部使用绑定的 URL 从 S3 存储桶获取图像。
请注意,您可以使用 function 或 callable class 来执行 map 或 map_batches 转换
对于函数,Ray Data 使用无状态的Ray 任务,这对于不需要加载重型模型的简单任务非常理想。
对于类,Ray Data 使用有状态的Ray 参与者,使其非常适合涉及加载重型模型的复杂任务。
有关更多信息,请参阅:https://docs.rayai.org.cn/en/latest/data/api/doc/ray.data.Dataset.map.html 和 https://docs.rayai.org.cn/en/latest/data/api/doc/ray.data.Dataset.map_batches.html
from typing import Dict
import numpy as np
from PIL import Image
from functools import partial


def read_images(images_s3_url:str, batch: Dict[str, np.ndarray]) -> Dict[str, np.ndarray]:
    images: List[np.ndarray] = []

    for filename in batch["filename"]:

        if not filename.lower().endswith((".png", ".jpg", ".jpeg", ".bmp", ".gif")):
            continue

        url = os.path.join(images_s3_url, filename)
        response = requests.get(url)
        image = Image.open(io.BytesIO(response.content)).convert("RGB")  # Ensure image is in RGB.

        images.append(np.array(image))
    batch["image"] = np.array(images, dtype=object)
    return batch


# URL for training images stored in S3.
train_images_s3_url = "https://face-masks-data.s3.us-east-2.amazonaws.com/train/images/"

# Bind the URL to your image reading function.
train_read_images = partial(read_images, train_images_s3_url)

# Map the image retrieval function over your annotations dataset.
train_dataset = annotations.map_batches(train_read_images)
设置 Ray Train 进行分布式微调/训练#
本节使用 Ray Train 配置并运行分布式训练循环。训练函数处理几个关键步骤
定义模型:初始化 Faster R-CNN 模型。
配置优化器和调度器:为训练设置优化器和学习率调度器。
运行训练循环:遍历 epoch 和批次以更新模型参数。
检查点:保存检查点,但仅在主(rank 0)工作节点上保存,以避免重复写入。
使用 Ray Train 进行分布式训练#
在启动分布式训练作业时,每个工作节点都会执行此训练函数 train_func。
不使用 Ray Train:您将在单台机器上进行训练,或手动配置 PyTorch 的
DistributedDataParallel来处理数据拆分、梯度同步和工作节点之间的通信。此设置需要大量手动协调。使用 Ray Train:。Ray Train 自动管理并行性。它启动多个训练进程(参与者),每个进程处理其自己的数据集分片。在底层,Ray 在工作节点之间同步梯度,并提供检查点、指标报告等功能。并行性主要发生在批处理步骤,每个工作节点处理不同的数据部分。
有关 Ray Train 的更多信息,请参阅:https://docs.rayai.org.cn/en/latest/train/overview.html
import os
import torch
from torchvision import models
from tempfile import TemporaryDirectory

import ray
from ray import train

from torchvision import transforms
import tempfile
from tqdm.auto import tqdm


def train_func(config):
    # Get device
    device = ray.train.torch.get_device()

    # Define model
    model = models.detection.fasterrcnn_resnet50_fpn(num_classes=len(CLASS_TO_LABEL))
    model = ray.train.torch.prepare_model(model)

    # Define optimizer
    parameters = [p for p in model.parameters() if p.requires_grad]
    optimizer = torch.optim.SGD(
        parameters,
        lr=config["lr"],
        momentum=config["momentum"],
        weight_decay=config["weight_decay"],
    )

    # Define learning rate scheduler
    lr_scheduler = torch.optim.lr_scheduler.MultiStepLR(
        optimizer, milestones=config["lr_steps"], gamma=config["lr_gamma"]
    )


    for epoch in range(config["epochs"]):
        model.train()

        # Warmup learning rate scheduler for first epoch
        if epoch == 0:
            warmup_factor = 1.0 / 1000
            lr_scheduler = torch.optim.lr_scheduler.LinearLR(
                optimizer, start_factor=warmup_factor, total_iters=250
            )

        # Retrieve the training dataset shard for the current worker.
        train_dataset_shard = train.get_dataset_shard("train")
        batch_iter = train_dataset_shard.iter_batches(batch_size=config["batch_size"])
        batch_iter = tqdm(batch_iter, desc=f"Epoch {epoch+1}/{config['epochs']}", unit="batch")


        for batch_idx, batch in enumerate(batch_iter):
            inputs = [transforms.ToTensor()(image).to(device) for image in batch["image"]]
            targets = [
                {
                    "boxes": torch.as_tensor(boxes).to(device),
                    "labels": torch.as_tensor(labels).to(device),
                }
                for boxes, labels in zip(batch["boxes"], batch["labels"])
            ]

            # Forward pass through the model.
            loss_dict = model(inputs, targets)
            losses = sum(loss for loss in loss_dict.values())

             # Backpropagation.
            optimizer.zero_grad()
            losses.backward()
            optimizer.step()

            # Step the learning rate scheduler.
            if lr_scheduler is not None:
                lr_scheduler.step()

            # Report metrics.
            current_worker = ray.train.get_context().get_world_rank()
            metrics = {
                "losses": losses.item(),
                "epoch": epoch,
                "lr": optimizer.param_groups[0]["lr"],
                **{key: value.item() for key, value in loss_dict.items()},
            }

            # Print batch metrics.
            print(f"Worker {current_worker} - Batch {batch_idx}: {metrics}")


        if lr_scheduler is not None:
            lr_scheduler.step()

        # Save a checkpoint on the primary worker for each epoch.
        if ray.train.get_context().get_world_rank() == 0:
            with tempfile.TemporaryDirectory() as temp_checkpoint_dir:
                torch.save(
                    model.module.state_dict(), os.path.join(temp_checkpoint_dir, "model.pt")
                )
                checkpoint = ray.train.Checkpoint.from_directory(temp_checkpoint_dir)
                train.report(metrics, checkpoint=checkpoint)
        else: # Save metrics from all workers for each epoch.
            train.report(metrics)
train.get_dataset_shard(“train”) 的工作原理#
分片是分配给特定工作节点的整个数据集的一个分区。例如,如果您有 4 个工作节点和 10,000 张图像,每个工作节点将收到 2,500 张图像,即每个分片 2,500 张。
Ray Train 会自动将您的数据集分片到多个工作节点。调用 train.get_dataset_shard("train") 会返回当前工作节点的数据集子集(分片)。每个工作节点并行处理不同的分片。这种方法与典型的单机 PyTorch 设置形成对比,在后者中,您可能依赖 PyTorch 的 DataLoader 或 DistributedSampler 进行数据分发。有关更多详细信息:https://docs.rayai.org.cn/en/latest/train/api/doc/ray.train.get_dataset_shard.html
批量大小#
批量大小指定每个工作节点在一次前向/后向传递中处理多少个样本。例如,批量大小为 4 意味着每个训练步骤在执行梯度更新之前,在工作节点的分片内处理 4 个样本。实际上,您应根据模型大小和 GPU 内存大小仔细选择批量大小。
在主(rank 0)工作节点上进行检查点#
在此示例中,所有工作节点都维护相同的模型参数。它们在更新过程中保持同步。因此,在每个 epoch 结束时或检查点时,每个工作节点的模型状态都是相同的。仅从主工作节点(rank 0)保存检查点可以防止重复或冲突写入,并确保一个清晰、一致的检查点。
有关保存和加载检查点的更多信息,请参阅:https://docs.rayai.org.cn/en/latest/train/user-guides/checkpoints.html
报告所有工作节点的指标#
使用 train.report 来跟踪所有工作节点的指标。Ray Train 的内部记录会记录这些指标,使您能够在训练完成后监控进度和分析结果。
注意:如果您仅报告主工作节点的指标,您将收到错误,这是一个常见的错误,需要避免。
使用 TorchTrainer 启动微调/训练过程#
使用 Ray Train 中的 TorchTrainer 配置并启动训练。请耐心等待,因为此过程可能需要一些时间。
出于演示目的,将 epochs 设置为 2,但微调模型的性能不会达到最佳。 实际上,通常需要训练 20-30 个 epoch 才能获得一个经过良好微调的模型。
该 num_workers 参数指定 Ray 为数据并行训练启动多少个并行工作进程。出于演示目的,将 num_workers 设置为 2,但在实际场景中,此设置取决于
您的可用 GPU 最大数量:如果 use_gpu=True,Ray 可以将每个工作节点分配给一个 GPU。因此,如果您有 4 个 GPU,您可以将 num_workers 设置为 4。
期望的训练速度:更多的工作节点可能导致训练速度更快,因为 Ray Train 会在多个设备或进程之间拆分工作负载。如果您的训练数据量很大并且您拥有计算资源,则可以增加
num_workers来加速训练。
from ray.train.torch import TorchTrainer


storage_path = "/mnt/cluster_storage/face-mask-experiments_v1/"
run_config = ray.train.RunConfig(storage_path=storage_path, name="face-mask-experiments_v1")

trainer = TorchTrainer(
    train_func,
    train_loop_config={
        "batch_size": 4, # ajust it based on your GPU memory, a batch size that is too large could cause OOM issue
        "lr": 0.02,
        "epochs": 2,  # You'd normally train for 20-30 epochs to get a good performance.
        "momentum": 0.9,
        "weight_decay": 1e-4,
        "lr_steps": [16, 22],
        "lr_gamma": 0.1,
    },
    scaling_config = ray.train.ScalingConfig(num_workers=2, use_gpu=True),
    run_config = run_config,
    datasets={"train": train_dataset},
)

results = trainer.fit()
训练完成后检查结果#
import torch
import os


print("Metrics reported during training:")
print(results.metrics)

print("\nLatest checkpoint reported during training:")
print(results.checkpoint)

print("\nPath where logs are stored:")
print(results.path)

print("\nException raised, if training failed:")
print(results.error)
在测试图像上运行推理并可视化预测#
训练后,在单个测试图像上运行模型进行健全性检查
从 URL 下载图像。
运行模型进行预测。
可视化检测结果(边界框和标签)。
import io
import requests
import numpy as np
import torch
from PIL import Image, ImageDraw, ImageFont

# CLASS_TO_LABEL dictionary
CLASS_TO_LABEL = {
    "background": 0,
    "with_mask": 1,
    "without_mask": 2,
    "mask_weared_incorrect": 3
}

# Create reverse label mapping
LABEL_TO_CLASS = {v: k for k, v in CLASS_TO_LABEL.items()}

# Define colors for each category
LABEL_COLORS = {
    "with_mask": "green",
    "without_mask": "red",
    "mask_weared_incorrect": "yellow"
}

def load_image_from_url(url):
    """
    Downloads the image from the given URL and returns it as a NumPy array.
    """
    response = requests.get(url)
    response.raise_for_status()  # Raise an error if the download failed.
    image = Image.open(io.BytesIO(response.content)).convert('RGB')
    return np.array(image)

def predict_and_visualize(image_np, model, confidence_threshold=0.5):
    """Run model prediction on an image array and visualize results."""
    # Convert numpy array to PIL Image.
    image_pil = Image.fromarray(image_np)
    draw = ImageDraw.Draw(image_pil)
    font = ImageFont.load_default()

    # Preprocess image for model.
    image_tensor = torch.from_numpy(image_np).permute(2, 0, 1).float() / 255.0

    # Make prediction.
    with torch.no_grad():
        predictions = model([image_tensor])[0]  # Get first (and only) prediction

    # Filter predictions by confidence.
    keep = predictions['scores'] > confidence_threshold
    boxes = predictions['boxes'][keep]
    labels = predictions['labels'][keep]
    scores = predictions['scores'][keep]

    # Draw each detection.
    for box, label, score in zip(boxes, labels, scores):
        x1, y1, x2, y2 = box.tolist()

        # Convert numeric label back to class name.
        class_name = LABEL_TO_CLASS.get(label.item(), "unknown")

        # Get corresponding color.
        box_color = LABEL_COLORS.get(class_name, "white")  # Default to white if unknown.

        # Draw bounding box.
        draw.rectangle([x1, y1, x2, y2], outline=box_color, width=2)

        # Prepare text.
        text = f"{class_name} {score:.2f}"

        # Calculate text size.
        text_bbox = draw.textbbox((0, 0), text, font=font)
        text_width = text_bbox[2] - text_bbox[0]
        text_height = text_bbox[3] - text_bbox[1]

        # Draw text background.
        draw.rectangle(
            [x1, y1 - text_height - 2, x1 + text_width, y1],
            fill=box_color
        )

        # Draw text.
        draw.text(
            (x1, y1 - text_height - 2),
            text,
            fill="black" if box_color in ["yellow"] else "white",  # Ensure good contrast
            font=font
        )

    return image_pil
# Load model.
ckpt = results.checkpoint
with ckpt.as_directory() as ckpt_dir:
    model_path = os.path.join(ckpt_dir, "model.pt")
    model = models.detection.fasterrcnn_resnet50_fpn(num_classes=len(CLASS_TO_LABEL))
    state_dict = torch.load(model_path, map_location=torch.device('cpu'), weights_only=True)
    model.load_state_dict(state_dict)
    model.eval()

# URL for a test image.
url = "https://face-masks-data.s3.us-east-2.amazonaws.com/all/images/maksssksksss0.png"

# Load image from URL.
image_np = load_image_from_url(url)

# Run prediction and visualization.
result_image = predict_and_visualize(image_np, model, confidence_threshold=0.7)
result_image.show()
将训练好的模型本地存储#
训练完成后,您可以访问检查点,加载模型权重,并将模型保存在本地工作区中。这使您可以轻松地将模型下载到本地计算机,检查模型或进行健全性检查。不要直接从工作区加载模型并运行批量推理,因为这会强制 Ray 集群将权重复制到其他节点,从而显著减慢过程。为了实现更快的批量推理,请使用 Anyscale 的集群存储来存储模型。
ckpt = results.checkpoint
with ckpt.as_directory() as ckpt_dir:
    model_path = os.path.join(ckpt_dir, "model.pt")
    model = models.detection.fasterrcnn_resnet50_fpn(num_classes=len(CLASS_TO_LABEL))
    state_dict = torch.load(model_path, map_location=torch.device('cpu'), weights_only=True)
    model.load_state_dict(state_dict)
    model.eval()

# Save the model locally.
save_path = "./saved_model/fasterrcnn_model_mask_detection.pth"  # Choose your path.
os.makedirs(os.path.dirname(save_path), exist_ok=True)  # Create directory if needed.
torch.save(model.state_dict(), save_path)
将模型存储在 Anyscale 集群存储上#
您可以将模型存储在 Anyscale 集群存储 /mnt/cluster_storage 上,以实现更快的批量推理或在 Anyscale 上进行服务。如果多个工作节点需要在分布式计算环境中访问模型,将其存储在集群存储中可以确保所有节点快速加载模型并避免重复复制。
有关更多信息,请参阅:https://docs.anyscale.com/configuration/storage/
ckpt = results.checkpoint
with ckpt.as_directory() as ckpt_dir:
    model_path = os.path.join(ckpt_dir, "model.pt")
    model = models.detection.fasterrcnn_resnet50_fpn(num_classes=len(CLASS_TO_LABEL))
    state_dict = torch.load(model_path, map_location=torch.device('cpu'), weights_only=True)
    model.load_state_dict(state_dict)
    model.eval()

# Save the model locally
save_path = "/mnt/cluster_storage/fasterrcnn_model_mask_detection.pth"  # Choose your path
os.makedirs(os.path.dirname(save_path), exist_ok=True)  # Create directory if needed
torch.save(model.state_dict(), save_path)
将模型存储在云端#
您可以将模型存储在 AWS S3、Google Cloud Storage 或 Hugging Face 等云端。将模型远程存储在云端有助于团队协作、版本控制以及高效的部署和推理。稍后,您可以使用 smart-open 从 AWS S3、Google Cloud Storage 加载模型,或使用 AutoModel 从 Hugging Face 加载模型。有关如何从 AWS S3 加载模型的说明,请参阅下一个笔记本。
此示例代码会将您的模型上传到 AWS S3。请务必正确安装 boto3 库并配置其 AWS 凭证
import os
import torch
import boto3
import smart_open
from torchvision import models

# Define S3 details
S3_BUCKET = "your-s3-bucket-name"
S3_KEY = "path/in/s3/fasterrcnn_model_mask_detection.pth"
S3_URI = f"s3://{S3_BUCKET}/{S3_KEY}"

# Load the model checkpoint
ckpt = results.checkpoint
with ckpt.as_directory() as ckpt_dir:
    model_path = os.path.join(ckpt_dir, "model.pt")
    model = models.detection.fasterrcnn_resnet50_fpn(num_classes=len(CLASS_TO_LABEL))
    state_dict = torch.load(model_path, map_location=torch.device('cpu'), weights_only=True)
    model.load_state_dict(state_dict)
    model.eval()

# Upload to S3 directly using smart_open
try:
    with smart_open.open(S3_URI, "wb") as f:
        torch.save(model.state_dict(), f)
    print(f"Model successfully uploaded to {S3_URI}")
except Exception as e:
    print(f"Error uploading to S3: {e}")
清理集群存储#
您可以查看存储在集群存储中的文件。您可以看到,您创建了 /mnt/cluster_storage/face-mask-experiments_v1/ 来存储训练的工件。
!ls -lah /mnt/cluster_storage/
请记住通过删除来清理集群存储
!rm -rf /mnt/cluster_storage/face-mask-experiments_v1/
下一步#
对于接下来的笔记本,Anyscale 已将一个微调后的口罩检测模型(批量大小为 20)上传到 AWS S3。以下笔记本演示了如何将模型下载到 Anyscale 集群进行批量推理等任务。
但是,如果您愿意,也可以使用自己的微调模型(大约 20 个 epoch)。