批量推理#


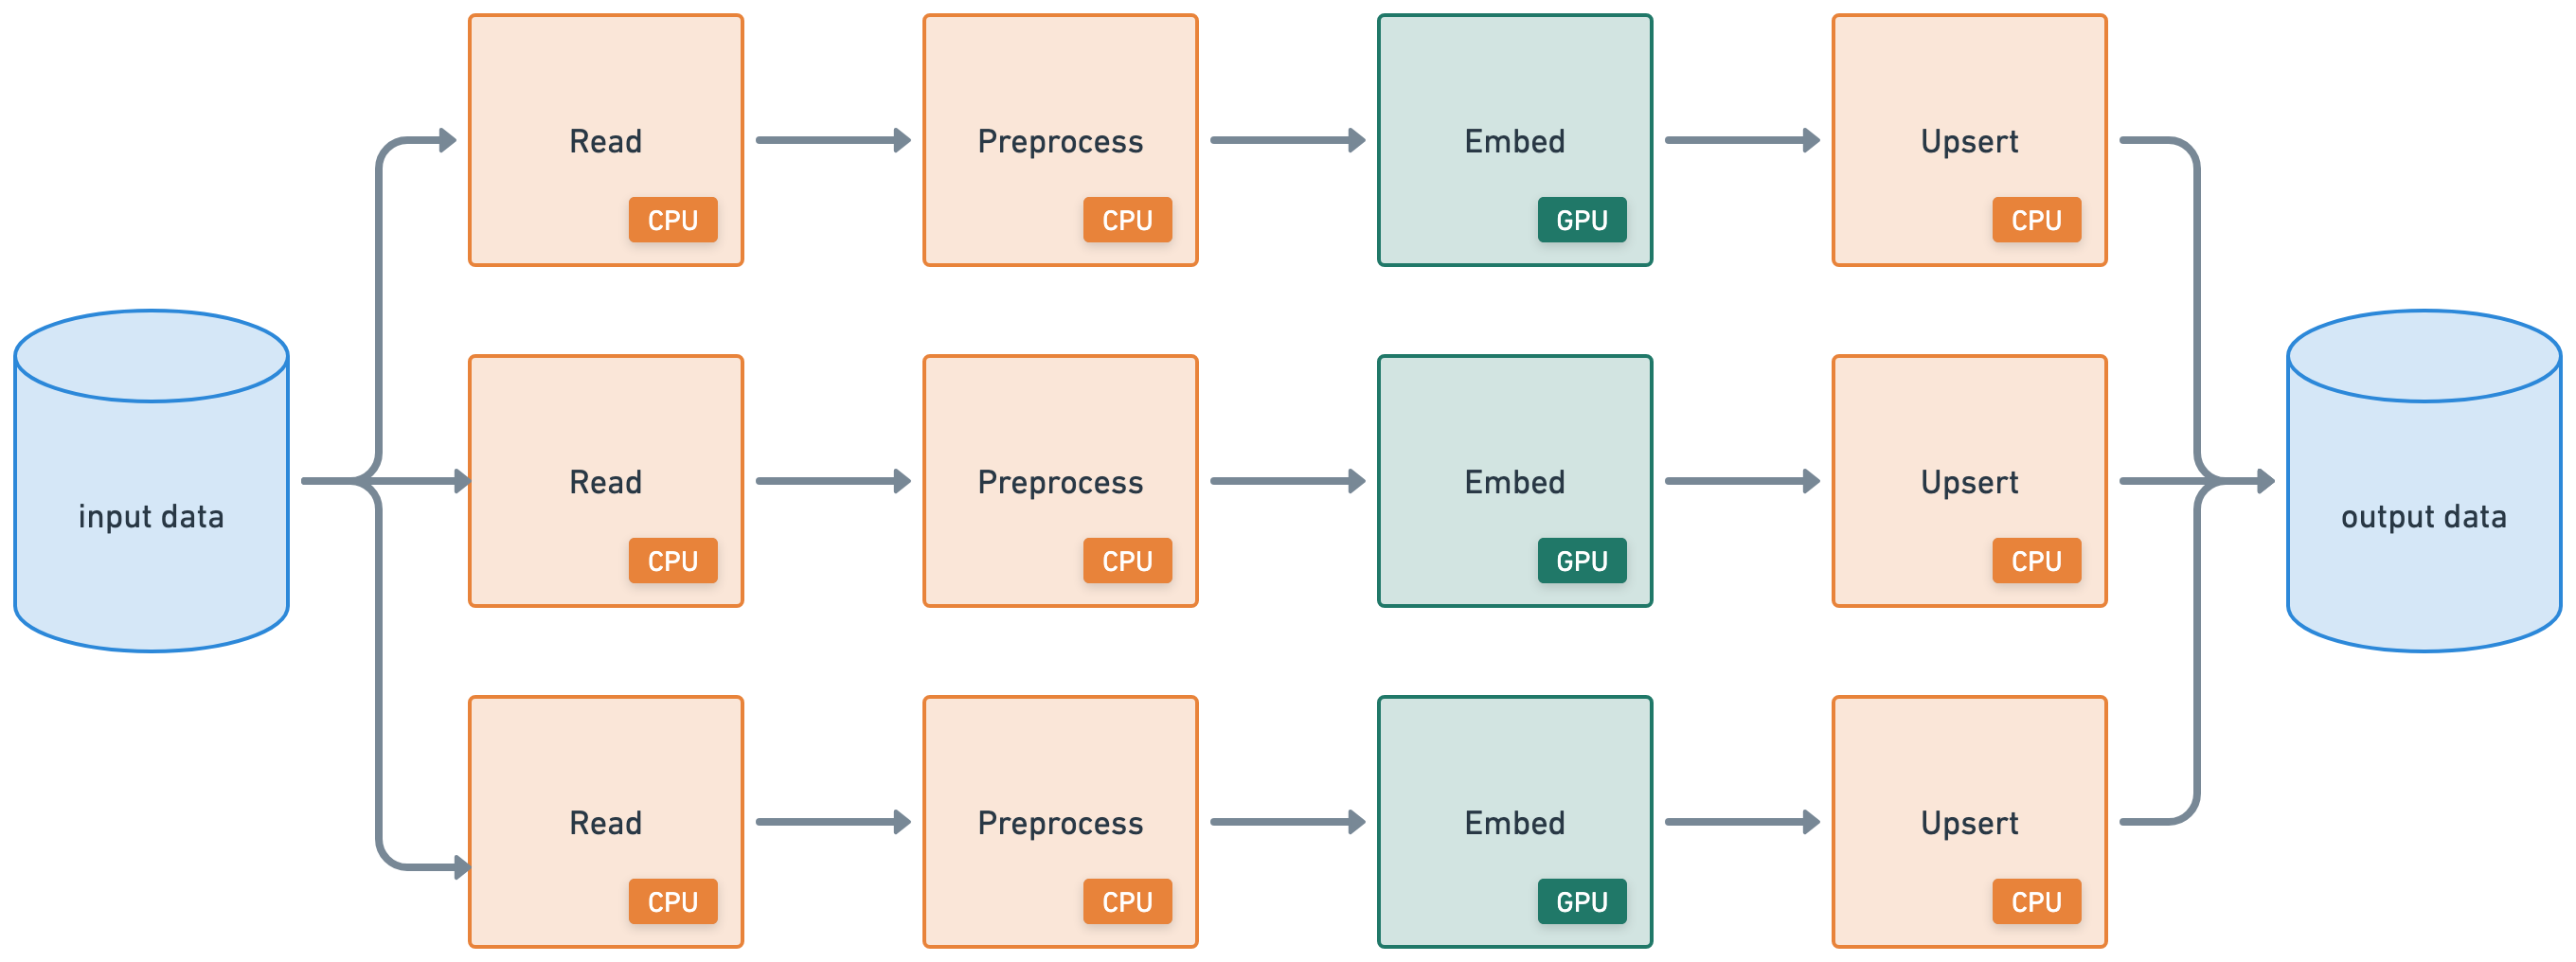
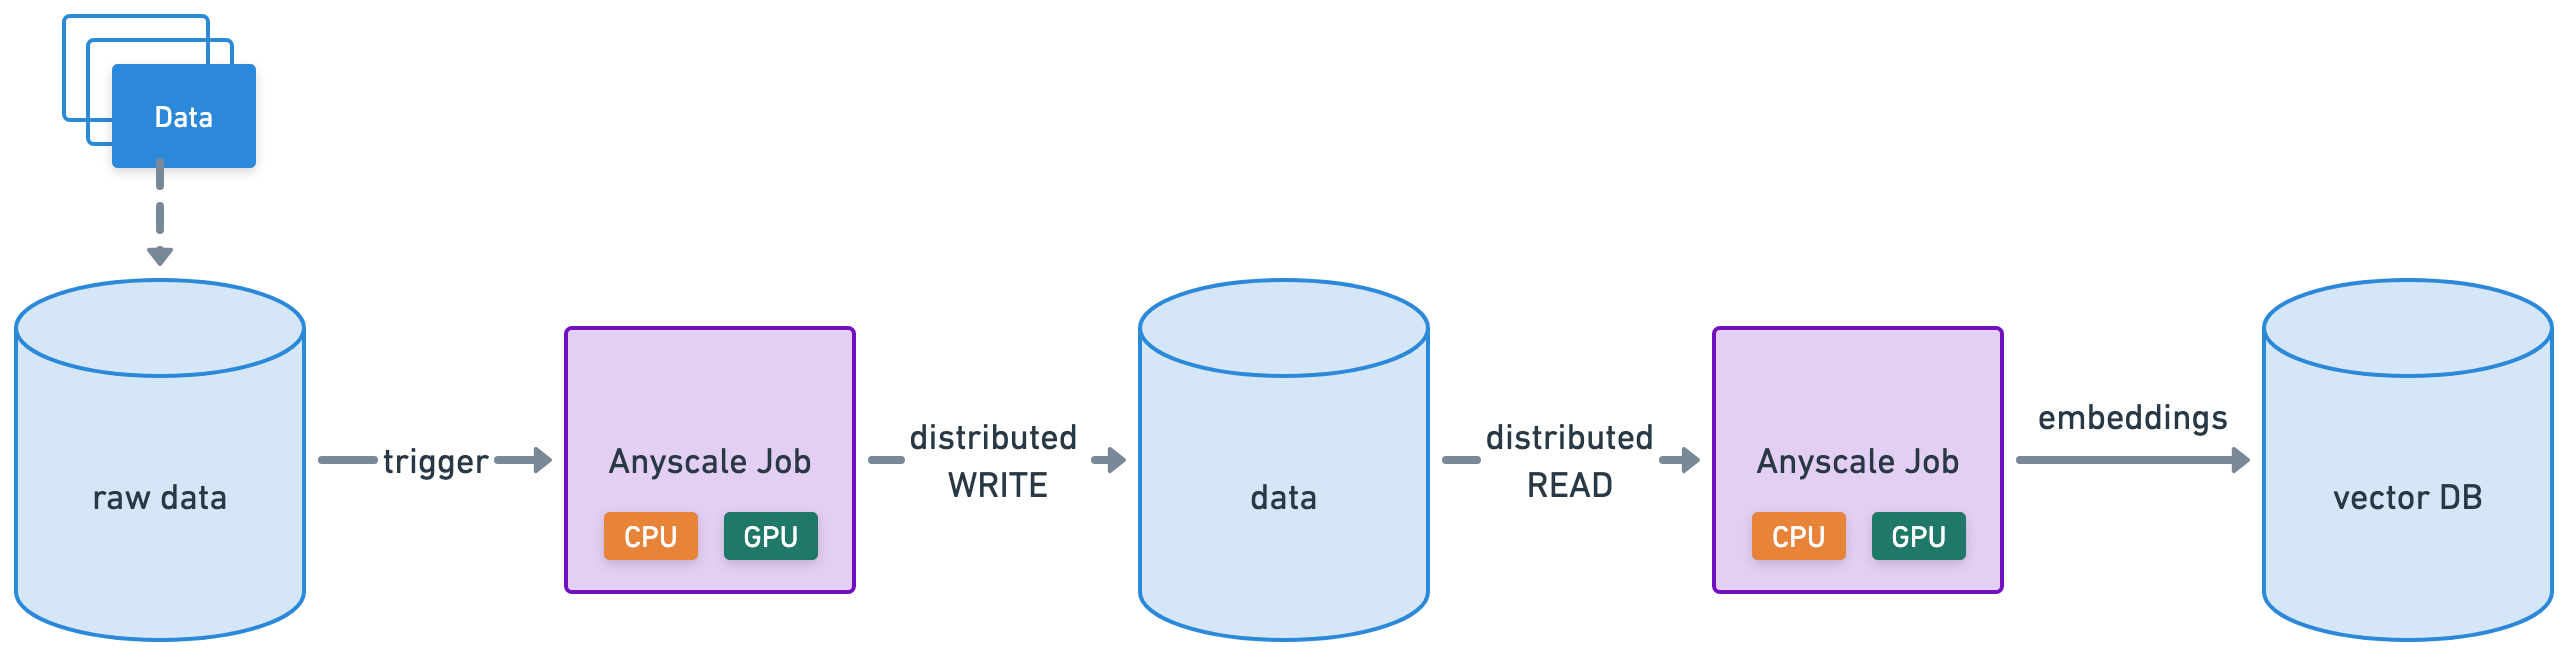
本教程将执行一个批量推理工作负载,该工作负载连接了以下异构工作负载:
从云存储分布式读取 (CPU)
应用分布式预处理 (CPU)
批量推理 (GPU)
写入云存储分布式 (CPU)
%%bash
pip install -q -r /home/ray/default/requirements.txt
pip install -q -e /home/ray/default/doggos
Successfully registered `ipywidgets, matplotlib` and 4 other packages to be installed on all cluster nodes.
View and update dependencies here: https://console.anyscale.com/cld_kvedZWag2qA8i5BjxUevf5i7/prj_cz951f43jjdybtzkx1s5sjgz99/workspaces/expwrk_23ry3pgfn3jgq2jk3e5z25udhz?workspace-tab=dependencies
Successfully registered `doggos` package to be installed on all cluster nodes.
View and update dependencies here: https://console.anyscale.com/cld_kvedZWag2qA8i5BjxUevf5i7/prj_cz951f43jjdybtzkx1s5sjgz99/workspaces/expwrk_23ry3pgfn3jgq2jk3e5z25udhz?workspace-tab=dependencies
注意:可能需要重启内核才能使所有依赖项可用。
如果使用 uv,则
关闭运行时依赖项(顶部“
Dependencies”选项卡 > 关闭Pip packages)。无需运行上面的pip install命令。将此笔记本的 Python 内核更改为使用
venv(点击笔记本右上角的base (Python x.yy.zz)>Select another Kernel>Python Environments...>Create Python Environment>Venv>Use Existing),完成!现在笔记本的所有单元格都将使用虚拟环境。通过在导入 ray 后添加此行,将 Python 可执行文件更改为使用
uv run而不是python。
import os
os.environ.pop("RAY_RUNTIME_ENV_HOOK", None)
import ray
ray.init(runtime_env={"py_executable": "uv run", "working_dir": "/home/ray/default"})
%load_ext autoreload
%autoreload all
import os
import ray
import sys
sys.path.append(os.path.abspath("../doggos/"))
# If using UV
# os.environ.pop("RAY_RUNTIME_ENV_HOOK", None)
# ray.init(runtime_env={"py_executable": "uv run", "working_dir": "/home/ray/default"})
from doggos import utils
数据摄取#
首先从公共云存储存储桶读取数据。
# Load data.
ds = ray.data.read_images(
    "s3://doggos-dataset/train",
    include_paths=True,
    shuffle="files",
)
ds.take(1)
2025-08-28 05:00:43,606	INFO worker.py:1771 -- Connecting to existing Ray cluster at address: 10.0.17.148:6379...
2025-08-28 05:00:43,617	INFO worker.py:1942 -- Connected to Ray cluster. View the dashboard at https://session-jhxhj69d6ttkjctcxfnsfe7gwk.i.anyscaleuserdata.com
2025-08-28 05:00:43,621	INFO packaging.py:588 -- Creating a file package for local module '/home/ray/default/doggos/doggos'.
2025-08-28 05:00:43,625	INFO packaging.py:380 -- Pushing file package 'gcs://_ray_pkg_7400f2bea399eebc.zip' (0.02MiB) to Ray cluster...
2025-08-28 05:00:43,625	INFO packaging.py:393 -- Successfully pushed file package 'gcs://_ray_pkg_7400f2bea399eebc.zip'.
2025-08-28 05:00:43,628	INFO packaging.py:380 -- Pushing file package 'gcs://_ray_pkg_a31dca6092632244a5c9467084f1b1f8df982200.zip' (1.10MiB) to Ray cluster...
2025-08-28 05:00:43,634	INFO packaging.py:393 -- Successfully pushed file package 'gcs://_ray_pkg_a31dca6092632244a5c9467084f1b1f8df982200.zip'.
2025-08-28 05:00:48,035	INFO dataset.py:3248 -- Tip: Use `take_batch()` instead of `take() / show()` to return records in pandas or numpy batch format.
2025-08-28 05:00:48,039	INFO logging.py:295 -- Registered dataset logger for dataset dataset_1_0
2025-08-28 05:00:48,101	INFO streaming_executor.py:159 -- Starting execution of Dataset dataset_1_0. Full logs are in /tmp/ray/session_2025-08-28_04-57-43_348032_12595/logs/ray-data
2025-08-28 05:00:48,102	INFO streaming_executor.py:160 -- Execution plan of Dataset dataset_1_0: InputDataBuffer[Input] -> TaskPoolMapOperator[ListFiles] -> LimitOperator[limit=1] -> TaskPoolMapOperator[ReadFiles]
2025-08-28 05:00:48,137	WARNING resource_manager.py:134 -- ⚠️  Ray's object store is configured to use only 27.3% of available memory (8.7GiB out of 32.0GiB total). For optimal Ray Data performance, we recommend setting the object store to at least 50% of available memory. You can do this by setting the 'object_store_memory' parameter when calling ray.init() or by setting the RAY_DEFAULT_OBJECT_STORE_MEMORY_PROPORTION environment variable.
2025-08-28 05:00:52,084	INFO streaming_executor.py:279 -- ✔️  Dataset dataset_1_0 execution finished in 3.98 seconds
[{'image': array([[[ 71,  93,  81],
          [ 71,  93,  81],
          [ 71,  91,  79],
          ...,
          [ 99, 129, 137],
          [101, 131, 139],
          [102, 132, 140]],

         [[ 61,  81,  70],
          [ 61,  81,  70],
          [ 61,  81,  69],
          ...,
          [ 93, 123, 131],
          [ 96, 125, 133],
          [ 97, 127, 135]],

         [[ 51,  68,  58],
          [ 51,  68,  58],
          [ 50,  68,  56],
          ...,
          [ 82, 111, 117],
          [ 85, 112, 119],
          [ 86, 115, 121]],

         ...,

         [[ 83, 101, 103],
          [ 83, 101, 103],
          [ 84, 102, 106],
          ...,
          [ 94,  82,  56],
          [ 97,  85,  59],
          [ 99,  87,  61]],

         [[ 82, 100, 102],
          [ 82, 100, 102],
          [ 83, 101, 105],
          ...,
          [ 95,  83,  57],
          [ 98,  86,  60],
          [ 99,  87,  61]],

         [[ 85, 100, 103],
          [ 85, 100, 103],
          [ 83, 101, 103],
          ...,
          [ 95,  84,  56],
          [ 99,  88,  60],
          [100,  89,  61]]], dtype=uint8),
  'path': 'doggos-dataset/train/malamute/malamute_11814.jpg'}]
Ray Data 支持从云存储中的通用二进制文件到现代数据平台使用的结构化数据格式的广泛数据源,用于加载和保存。本示例从预备了数据集的公共 S3 存储桶读取数据。此 read 操作,与后续步骤中的 write 操作类似,都是分布式执行的。因此,Ray Data 会在整个集群中并行处理数据,而无需将数据全部加载到内存中,从而使数据加载具有可伸缩性和内存效率。
触发延迟执行:使用
take来触发执行,因为 Ray 具有延迟执行模式,可缩短执行时间和降低内存使用率。但是,此方法意味着您需要像 take、count、write 等操作来实际执行工作流 DAG。shuffle 策略:对数据集进行 shuffle,因为它们都按类别排序,所以在读取之前随机打乱输入文件的顺序。Ray Data 还提供了广泛的 shuffle 策略,例如本地 shuffle、每个 epoch 的 shuffle 等。
开发期间
materialize:使用materialize将数据集执行并物化到 Ray 的共享内存对象存储中。这样,您可以保存此时的检查点,未来的数据集操作可以从这里开始。您将不会从头开始重新运行数据集上的所有操作。此功能在开发过程中非常方便,尤其是在 Jupyter notebook 等有状态环境中,因为您可以从保存的检查点开始运行。ds = ds.map(...) ds = ds.materialize()
注意:仅在开发期间使用,并与小型数据集一起使用,因为它会将所有内容加载到内存中。
您还想为每个数据点添加类别。使用 include_paths 读取数据时,Ray Data 会将文件名与每个数据点一起保存。文件名包含类别标签,因此请将其添加到每个数据点的行中。使用 Ray Data 的 map 函数将函数应用于每一行。
def add_class(row):
    row["class"] = row["path"].rsplit("/", 3)[-2]
    return row
# Add class.
ds = ds.map(add_class)
❌ 传统的批量执行,例如,非流式处理(如没有流水线的 Spark、SageMaker Batch Transform)
将整个数据集读入内存或持久化中间格式。
然后才开始应用 .map、.filter 等转换。
更高的内存压力和启动延迟。
✅ Ray Data 流式执行
加载块(“blocks”)后立即开始处理。无需等待整个数据集加载。
减少内存占用(无 OOM)并加快首次输出速度。
通过减少空闲时间来提高资源利用率。
具有最小延迟的在线式推理管道。
注意:Ray Data 不是像 Flink 或 Kafka Streams 这样的实时流处理引擎。相反,它是具有流式执行的批量处理,这对于迭代式 ML 工作负载、ETL 管道以及训练或推理之前的预处理特别有用。通常,Ray 比 Spark 和 SageMaker Batch Transform 等解决方案有2-17 倍的吞吐量提升。
批量嵌入#
上一节使用一个函数将映射操作应用于数据集中的每一行。现在,您可以准备好从数据生成嵌入,并使用 Ray Data 的 map_batches 将操作应用于数据批次。操作形式是一个可调用对象,即一个函数或一个带有 __call__ 方法的类。
import numpy as np
from PIL import Image
import torch
from transformers import CLIPModel, CLIPProcessor
class EmbedImages(object):
    def __init__(self, model_id, device):
        # Load CLIP model and processor
        self.processor = CLIPProcessor.from_pretrained(model_id)
        self.model = CLIPModel.from_pretrained(model_id)
        self.model.to(device)
        self.device = device

    def __call__(self, batch):
        # Load and preprocess images
        images = [Image.fromarray(np.uint8(img)).convert("RGB") for img in batch["image"]]
        inputs = self.processor(images=images, return_tensors="pt", padding=True).to(self.device)

        # Generate embeddings
        with torch.inference_mode():
            batch["embedding"] = self.model.get_image_features(**inputs).cpu().numpy()

        return batch
与其为上述类的每个实例初始化相同的模型,不如使用 Ray 共享内存对象存储的引用。我们可以加载一次模型,将其存储在默认对象存储中,然后让我们的类的每个实例引用它。
model = load_model(...)
model_ref = ray.put(model)

class Foo:
    def __init__(self, model_ref):
        self.model = ray.get(model_ref)
        ...
# Generate batch embeddings
embeddings_ds = ds.map_batches(
    EmbedImages,
    fn_constructor_kwargs={
        "model_id": "openai/clip-vit-base-patch32",
        "device": "cuda",
    },  # class kwargs
    fn_kwargs={},  # __call__ kwargs
    compute=ray.data.ActorPoolStrategy(size=4),
    batch_size=64,
    num_gpus=1,
    accelerator_type="T4",
)
embeddings_ds = embeddings_ds.drop_columns(["image"])  # remove image column
Ray Data#
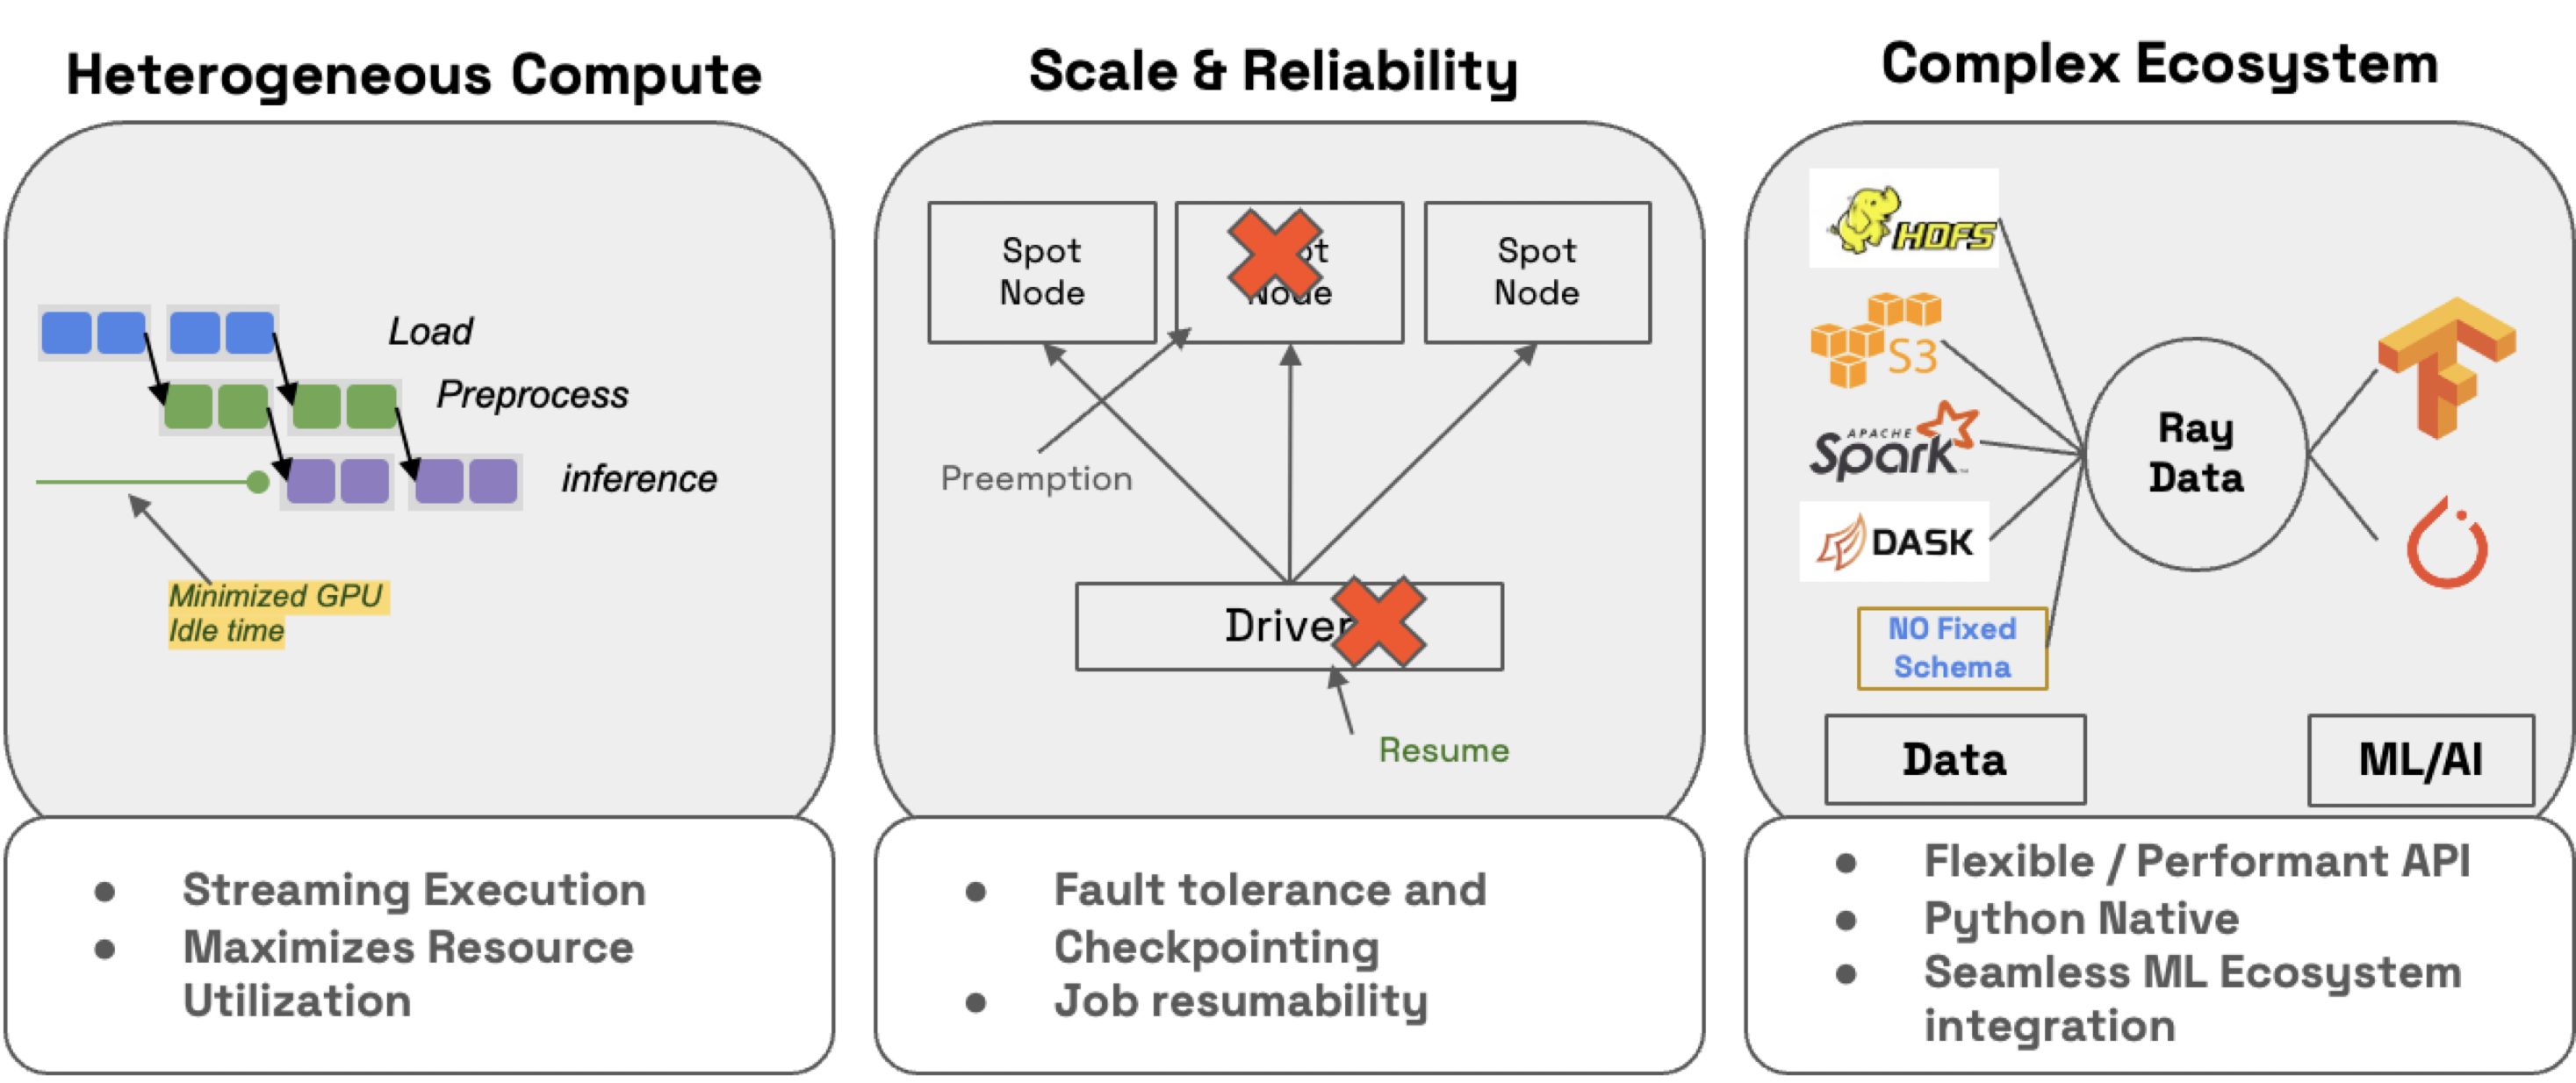
Ray Data 不仅可以轻松地分发工作负载,还可以确保它们:
效率:通过异构资源调度最小化 CPU/GPU 空闲时间。
可扩展性:流式执行处理 PB 级数据集,尤其是在处理 LLM 时。
可靠性:通过检查点进程,尤其是在使用按需回退在 Spot 实例上运行工作负载时。
灵活性:连接到任何源的数据,应用转换,并将结果保存到任何格式或位置,以供您的下一个工作负载使用。
🔥 RayTurbo Data 在 Ray Data 之上提供了更多功能:
加速元数据获取,以改进从大型数据集的读取(提前启动进程)。
优化自动缩放,例如 actor 池更快地扩展,在整个集群就绪之前启动作业等。
高可靠性,例如整个作业(包括 Spot 实例上的作业),如 Head 节点、集群、未捕获的异常等,都可以从检查点恢复。OSS Ray 只能从工作节点故障中恢复。
数据存储#
import shutil
# Save to artifact storage.
embeddings_path = os.path.join("/mnt/cluster_storage", "doggos/embeddings")
if os.path.exists(embeddings_path):
    shutil.rmtree(embeddings_path)  # clean up
embeddings_ds.write_parquet(embeddings_path)
2025-08-28 05:00:55,737	INFO logging.py:295 -- Registered dataset logger for dataset dataset_6_0
2025-08-28 05:00:55,756	INFO streaming_executor.py:159 -- Starting execution of Dataset dataset_6_0. Full logs are in /tmp/ray/session_2025-08-28_04-57-43_348032_12595/logs/ray-data
2025-08-28 05:00:55,757	INFO streaming_executor.py:160 -- Execution plan of Dataset dataset_6_0: InputDataBuffer[Input] -> TaskPoolMapOperator[ListFiles] -> TaskPoolMapOperator[ReadFiles] -> TaskPoolMapOperator[Map(add_class)] -> ActorPoolMapOperator[MapBatches(EmbedImages)] -> TaskPoolMapOperator[MapBatches(drop_columns)->Write]
{"asctime":"2025-08-28 05:00:55,808","levelname":"E","message":"Actor with class name: 'MapWorker(MapBatches(EmbedImages))' and ID: '1e923c76f6e2b92256b942a802000000' has constructor arguments in the object store and max_restarts > 0. If the arguments in the object store go out of scope or are lost, the actor restart will fail. See https://github.com/ray-project/ray/issues/53727 for more details.","filename":"core_worker.cc","lineno":2254}
(autoscaler +20s) Tip: use `ray status` to view detailed cluster status. To disable these messages, set RAY_SCHEDULER_EVENTS=0.
(autoscaler +20s) [autoscaler] [4xT4:48CPU-192GB] Attempting to add 1 node to the cluster (increasing from 0 to 1).
(autoscaler +25s) [autoscaler] [4xT4:48CPU-192GB|g4dn.12xlarge] [us-west-2a] [on-demand] Launched 1 instance.
2025-08-28 05:01:19,478 WARNING resource_manager.py:551 -- Cluster resources are not engough to run any task from ActorPoolMapOperator[MapBatches(EmbedImages)]. The job may hang forever unless the cluster scales up.
(autoscaler +1m10s) [autoscaler] Cluster upscaled to {56 CPU, 4 GPU}.
(MapWorker(MapBatches(EmbedImages)) pid=3337, ip=10.0.5.252) Using a slow image processor as `use_fast` is unset and a slow processor was saved with this model. `use_fast=True` will be the default behavior in v4.52, even if the model was saved with a slow processor. This will result in minor differences in outputs. You'll still be able to use a slow processor with `use_fast=False`.
2025-08-28 05:03:39,362	INFO streaming_executor.py:279 -- ✔️  Dataset dataset_6_0 execution finished in 163.60 seconds
2025-08-28 05:03:39,422	INFO dataset.py:4871 -- Data sink Parquet finished. 2880 rows and 5.8MB data written.
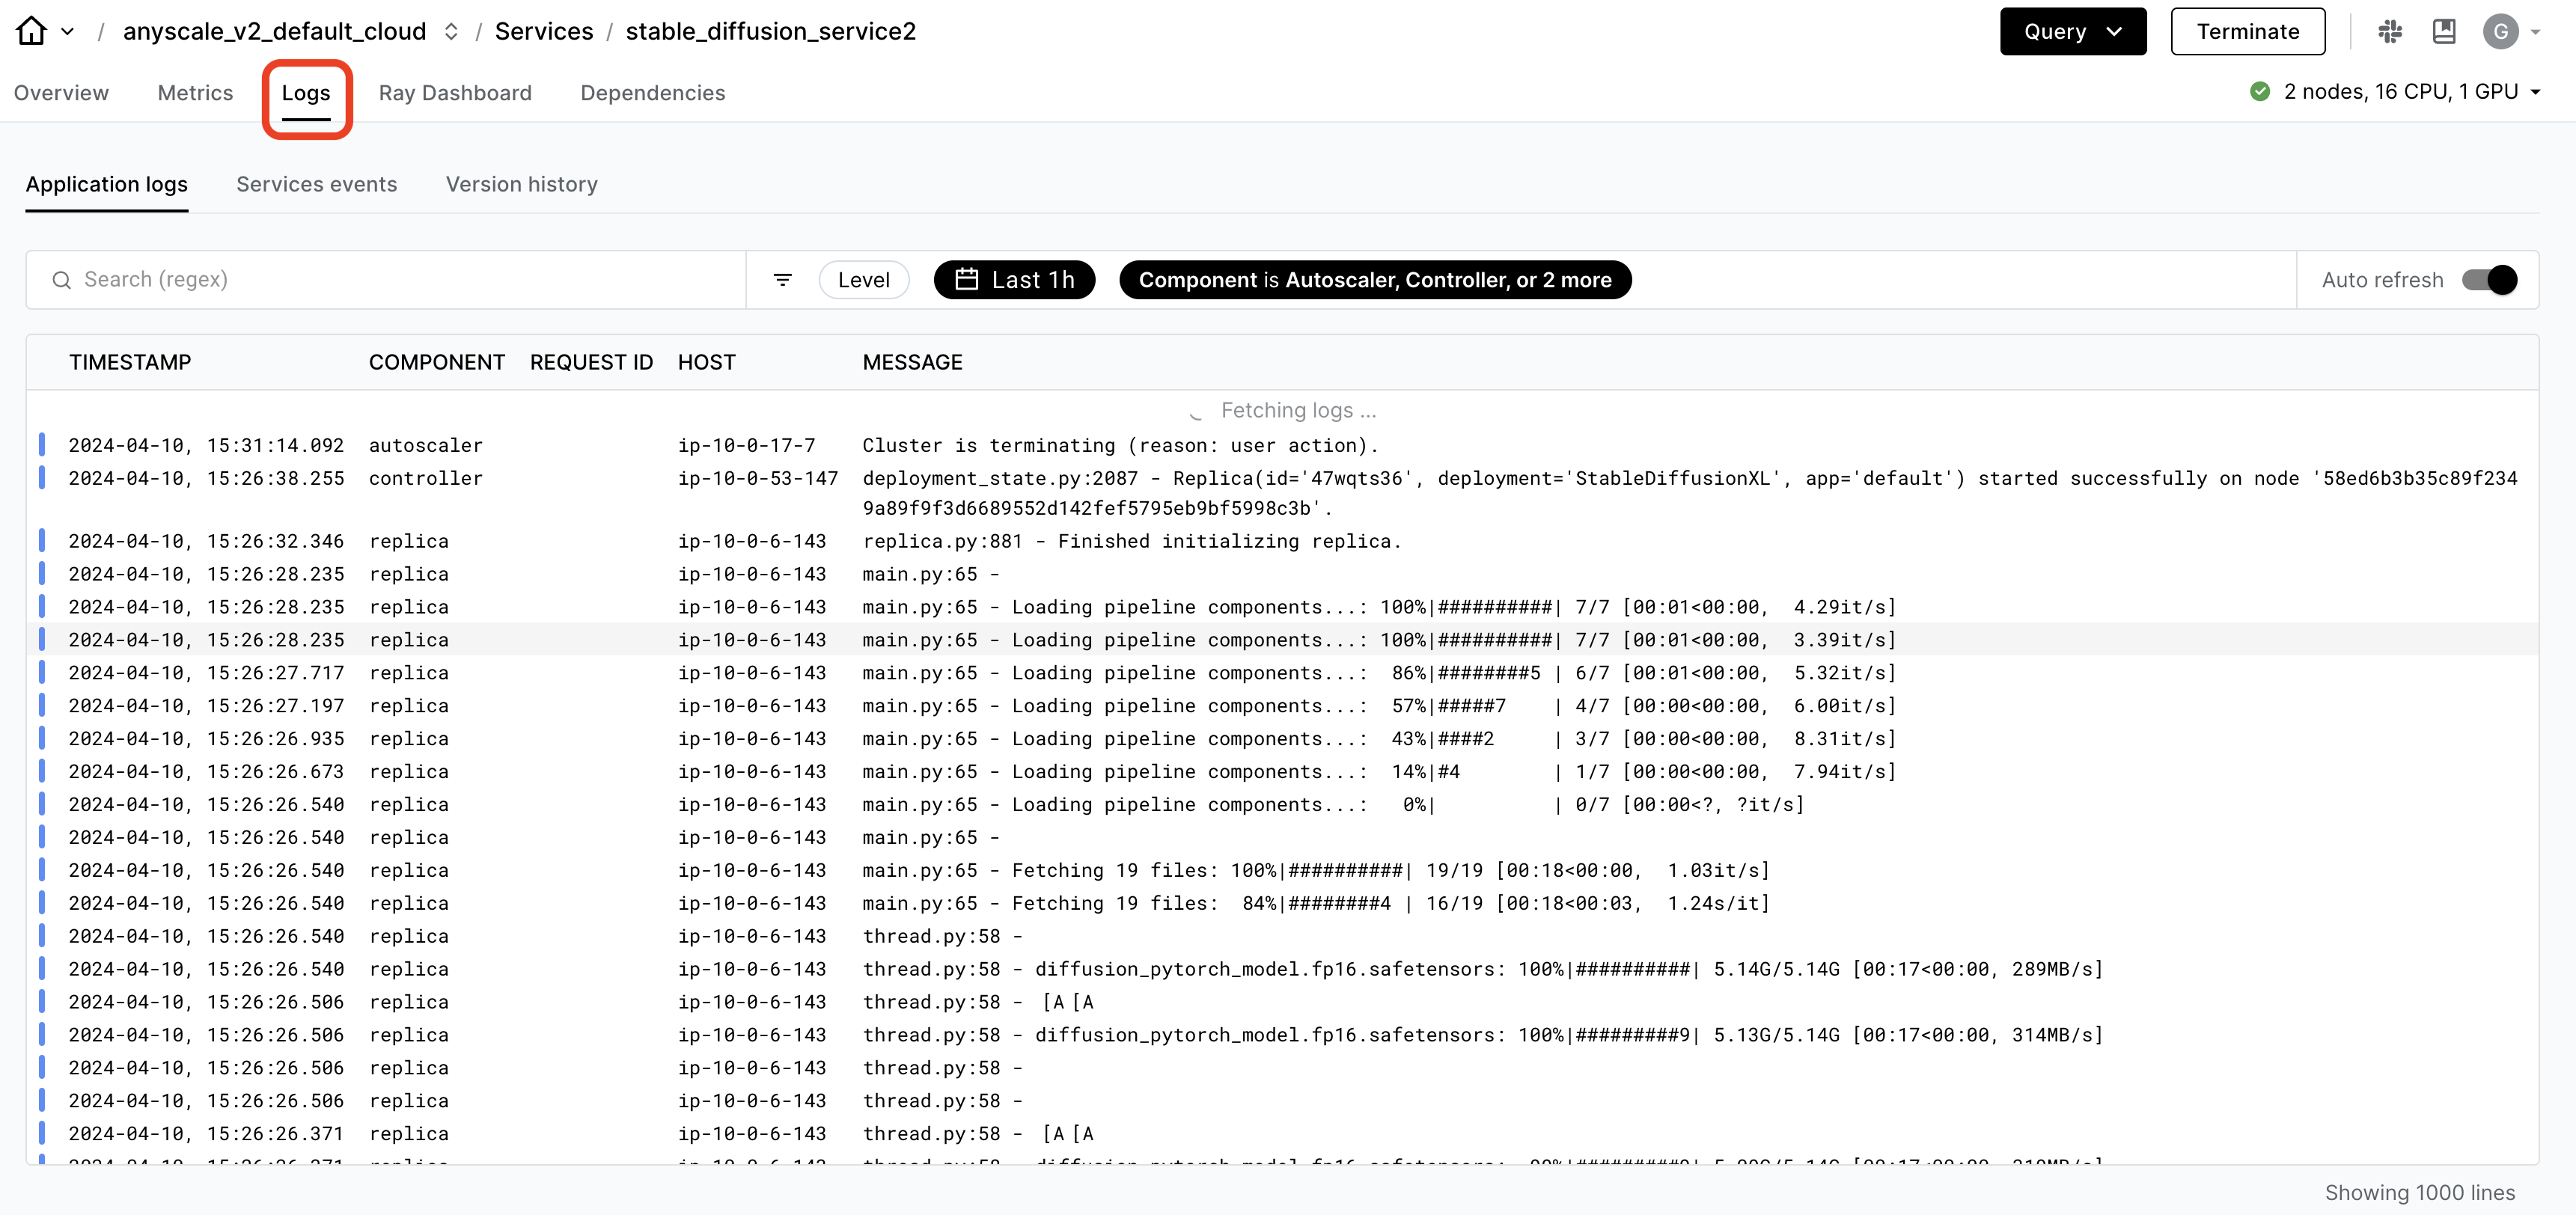
监控和调试#
在开发工作负载时,Ray 提供了日志和可观测性仪表板,您可以使用它们进行监控和调试。该仪表板包含许多不同的组件,例如:
集群中运行任务的内存、利用率等。集群
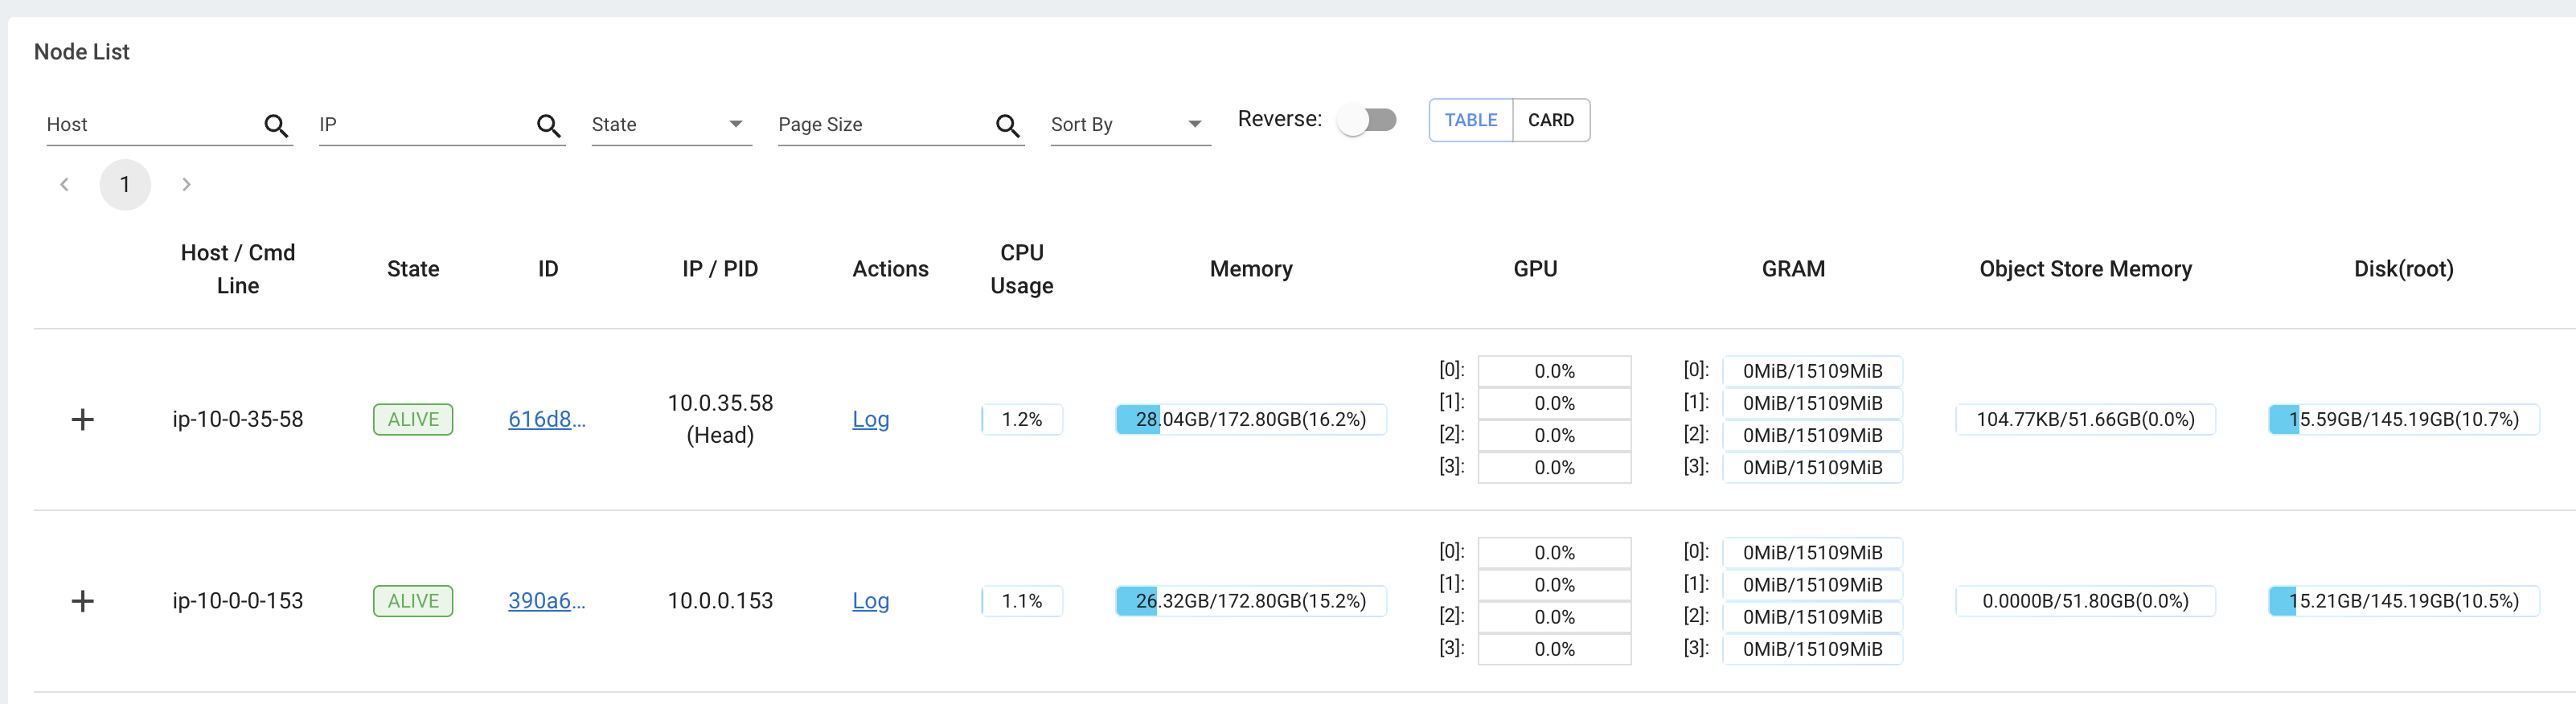
查看所有正在运行的任务、跨实例类型的利用率、自动缩放等视图。

🔥 虽然 OSS Ray 带有全面的可观测性套件,但 Anyscale 更进一步,使其更容易、更快速地监控和调试工作负载。
特定于 Ray 工作负载的仪表板,如 Data、Train 等,可以细分任务。

统一日志查看器,用于查看*所有*驱动程序和工作节点进程的日志。
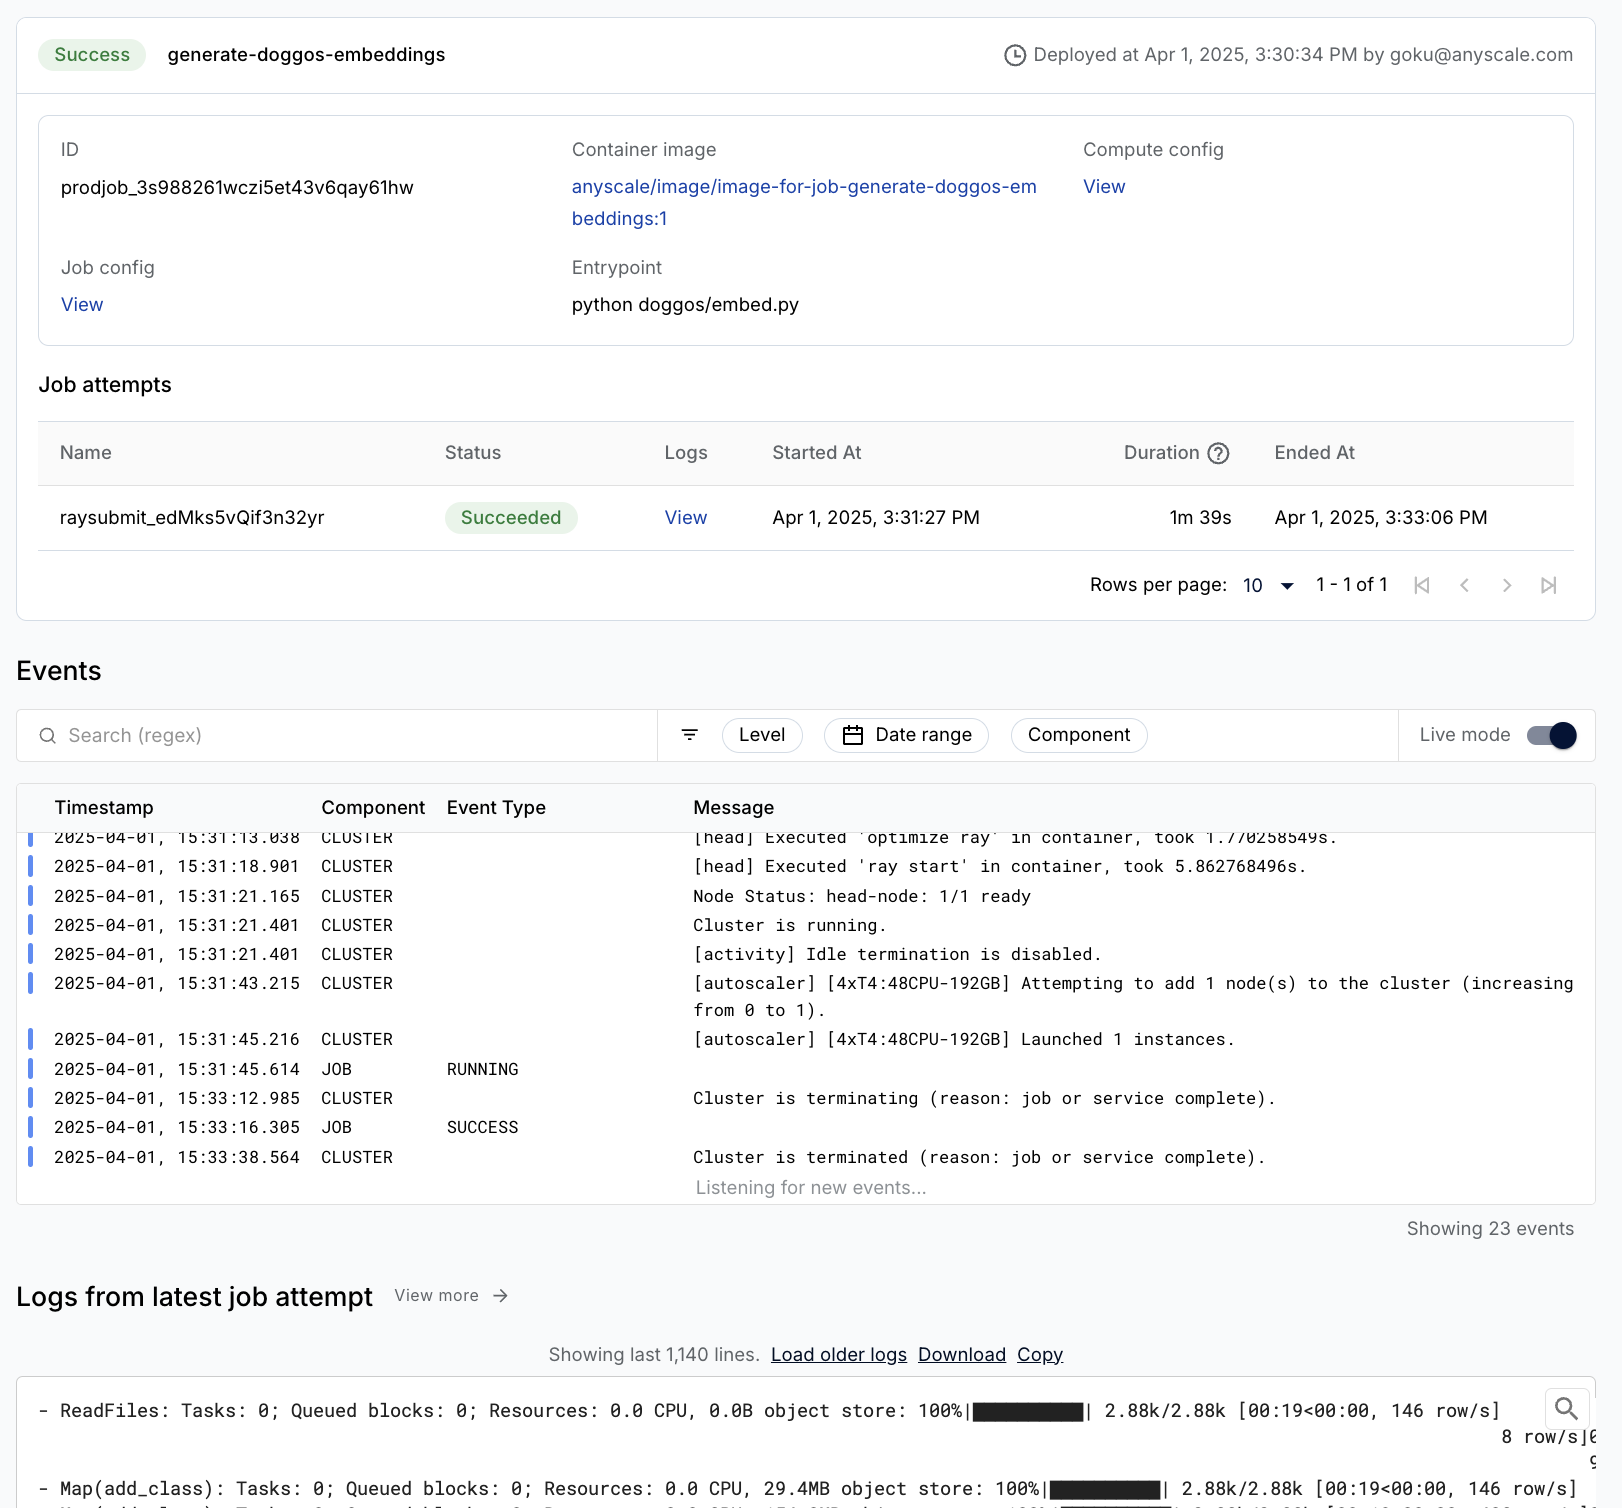
生产作业#
Anyscale Jobs(API 参考)允许您在生产环境中执行离散工作负载,例如批量推理、嵌入生成或模型微调。
将批量嵌入生成工作负载包装成 Anyscale 作业,提供要运行的主命令 python doggos/embed.py,以及其所需的适当计算和依赖项。还将工作目录设置为 default 目录,以便作业可以访问工作负载的所有文件。
注意:
此步骤使用
containerfile来定义依赖项,但您也可以轻松使用预构建的映像。当您从工作区启动时未指定计算,则配置将默认为工作区的计算配置。
当然,我们也可以从任何地方(不只是工作区内部)启动作业,在这些地方我们可以为作业指定要使用的计算配置和依赖项。了解更多关于如何创建和管理作业。
%%bash
# Production batch embedding generation job
anyscale job submit -f /home/ray/default/configs/generate_embeddings.yaml
Output
(anyscale +0.8s) Submitting job with config JobConfig(name='image-batch-embeddings', image_uri='anyscale/ray:2.48.0-slim-py312-cu128', compute_config=None, env_vars=None, py_modules=['/home/ray/default/doggos'], py_executable=None, cloud=None, project=None, ray_version=None, job_queue_config=None).
(anyscale +7.2s) Uploading local dir '/home/ray/default' to cloud storage.
(anyscale +7.9s) Uploading local dir '/home/ray/default/doggos' to cloud storage.
(anyscale +9.2s) Job 'image-batch-embeddings' submitted, ID: 'prodjob_7e1fsj9xzs2iryayj7hgbhifl8'.
(anyscale +9.2s) View the job in the UI: https://console.anyscale.com/jobs/prodjob_7e1fsj9xzs2iryayj7hgbhifl8
(anyscale +9.2s) Use `--wait` to wait for the job to run and stream logs.
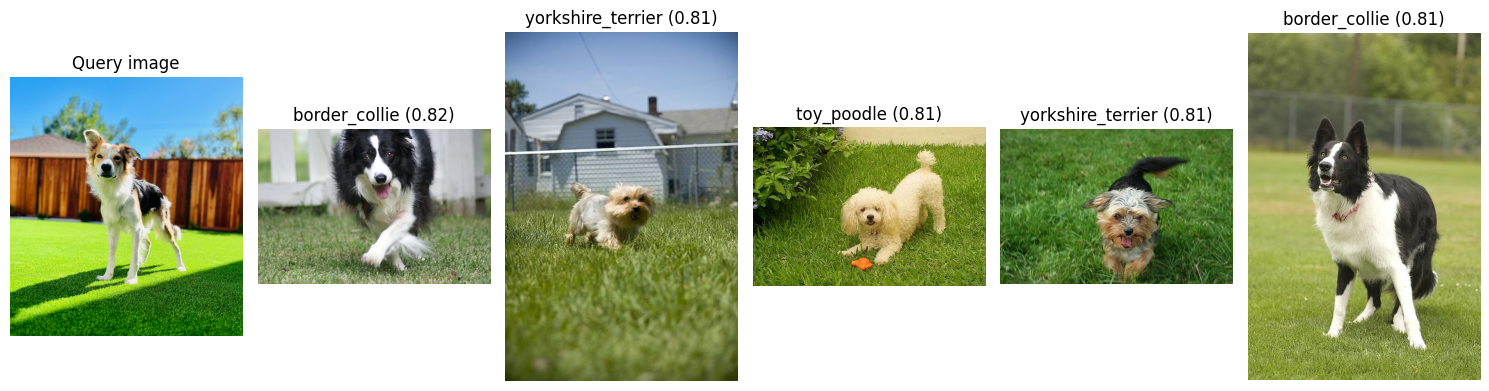
相似图像#
处理一张新图像,对其进行嵌入,然后根据与您刚刚为其计算了批量嵌入的更大图像数据集的嵌入相似性(余弦相似性),检索最相似的图像。
from io import BytesIO
from PIL import Image
import numpy as np
import requests
from doggos.embed import get_top_matches, display_top_matches
def url_to_array(url):
    return np.array(Image.open(
        BytesIO(requests.get(url).content)).convert("RGB"))
# Embed input image.
url = "https://doggos-dataset.s3.us-west-2.amazonaws.com/samara.png"
image = url_to_array(url=url)
embedding_generator = EmbedImages(model_id="openai/clip-vit-base-patch32", device="cpu")
embedding = embedding_generator({"image": [image]})["embedding"][0]
np.shape(embedding)
Using a slow image processor as `use_fast` is unset and a slow processor was saved with this model. `use_fast=True` will be the default behavior in v4.52, even if the model was saved with a slow processor. This will result in minor differences in outputs. You'll still be able to use a slow processor with `use_fast=False`.
(512,)
# Top matches by embedding similarity.
embeddings_ds = ray.data.read_parquet(embeddings_path)
top_matches = get_top_matches(embedding, embeddings_ds, n=5)
display_top_matches(url, top_matches)
/home/ray/anaconda3/lib/python3.12/site-packages/ray/data/_internal/datasource/parquet_datasource.py:750: FutureWarning: The default `file_extensions` for `read_parquet` will change from `None` to ['parquet'] after Ray 2.43, and your dataset contains files that don't match the new `file_extensions`. To maintain backwards compatibility, set `file_extensions=None` explicitly.
  warnings.warn(
2025-08-28 05:03:56,303	INFO logging.py:295 -- Registered dataset logger for dataset dataset_8_0
2025-08-28 05:03:56,308	INFO streaming_executor.py:159 -- Starting execution of Dataset dataset_8_0. Full logs are in /tmp/ray/session_2025-08-28_04-57-43_348032_12595/logs/ray-data
2025-08-28 05:03:56,309	INFO streaming_executor.py:160 -- Execution plan of Dataset dataset_8_0: InputDataBuffer[Input] -> TaskPoolMapOperator[ListFiles] -> TaskPoolMapOperator[ReadFiles]
2025-08-28 05:03:57,382 INFO streaming_executor.py:279 -- ✔️ Dataset dataset_8_0 execution finished in 1.07 seconds
(autoscaler +7m14s) [autoscaler] [4xT4:48CPU-192GB] Attempting to add 1 node to the cluster (increasing from 1 to 2).
(autoscaler +7m14s) [autoscaler] [4xT4:48CPU-192GB|g4dn.12xlarge] [us-west-2a] [on-demand] Launched 1 instance.
(autoscaler +8m0s) [autoscaler] Cluster upscaled to {104 CPU, 8 GPU}.
🚨 注意:使用笔记本菜单栏中的“🔄 Restart”按钮重置此笔记本。这样我们就可以释放此笔记本中使用的所有变量、实用程序等。