使用现有 Ray Serve 应用部署 MCP 网关#
本指南演示了如何使用单个 MCP 网关为现有的 Ray Serve 服务添加前端,无需修改分类器或翻译器的代码。本指南遵循此多应用部署模式:https://docs.rayai.org.cn/en/latest/serve/multi-app.html。
为什么在 Anyscale 上使用 MCP 网关?#
如果您已经在 Anyscale(或您自己的集群)上运行了 Ray Serve 服务,您可以直接在其前面部署一个 MCP 网关,而无需修改现有代码。只需编写一个新的 mcp_gateway.py 文件,重新生成 config.yaml,Anyscale 服务就会自动启动。
为每个 Serve 应用独立扩展:每个应用都保留其独立的自动伸缩、负载均衡、CPU/GPU 设置等。
一个统一的、可流式传输的 HTTP 端点(/mcp),可进行多路复用调用。
无需合并代码库:您的分类器仍然保留在
image_classifier.py中,翻译器保留在text_translator.py中;MCP 网关将部署在它们前面。
以下是说明 MCP 网关与 Ray Serve 和 Anyscale 服务架构的图示。

先决条件#
Ray [serve],包含在基础 Docker 镜像中。
MCP Python 库。
依赖项#
安装所需的 Python 包和 Podman。
pip install mcp==1.11.0 asyncio==3.4.3 pydantic==2.9.2
可选:用于 Ray Serve 部署的 Docker 镜像
您还可以使用此代码库中包含的 Dockerfile,在 Anyscale 上构建用于部署的 Docker 镜像。
注意:此 Docker 镜像仅用于部署 MCP 和 Ray Serve。
1. 集成现有 Ray Serve 应用#
假设您已经有两个 Ray Serve 服务:一个图像分类器和一个文本翻译器。这两个代码文件都位于 mcp-gateway-with-existing-ray-apps 文件夹中。
现在,创建一个名为 mcp_gateway.py 的新文件,它使用 FastMCP 在这些服务之间建立桥梁。
在该文件中,您可以获取图像分类器的句柄。
clf = serve.get_deployment_handle("image_classifier", app_name="image_classifier_app")
确保在您的 Serve 配置中,将部署命名为 image_classifier,将应用程序命名为 image_classifier_app。
类似地,您可以按如下方式获取文本翻译器的句柄:
tr = serve.get_deployment_handle("text_translator", app_name="text_translator_app")
确保在您的 Serve 配置中,将部署命名为 text_translator,将应用程序命名为 text_translator_app。
配置详情将在下一步中说明。
from contextlib import asynccontextmanager
import fastapi
from ray import serve
from mcp.server.fastmcp import FastMCP

# --------------------------------------------------------------------------
# 1.  Create FastMCP in stateless http (streamable) mode
# --------------------------------------------------------------------------
mcp = FastMCP("Image-N-Translate", stateless_http=True)

# --------------------------------------------------------------------------
# 2.  Register your tools BEFORE mounting the app
# --------------------------------------------------------------------------

@mcp.tool()
async def classify(image_url: str) -> str:
    """Return the top-1 label for an image URL."""
    clf = serve.get_deployment_handle("image_classifier", app_name="image_classifier_app")
    return await clf.classify.remote(image_url)

@mcp.tool()
async def translate(text: str) -> str:
    """Translate English → French."""
    tr  = serve.get_deployment_handle("text_translator", app_name="text_translator_app")
    return await tr.translate.remote(text)


# ----------------------------------------------------------------------------
# 3.  Build FastAPI app with lifespan to mount the FastMCP streamable HTTP app
# ----------------------------------------------------------------------------
@asynccontextmanager
async def lifespan(app: fastapi.FastAPI):
    # After startup, mount the streamable-http MCP app.
    app.mount("/", mcp.streamable_http_app())

    # Keep MCP’s session manager running for the lifetime of this process.
    async with mcp.session_manager.run():
        yield

api = fastapi.FastAPI(lifespan=lifespan)

# --------------------------------------------------------------------------
# 4.  Wrap in a Ray Serve deployment
# --------------------------------------------------------------------------
@serve.deployment(
    autoscaling_config={
        "min_replicas": 2,
        "max_replicas": 10,
        "target_ongoing_requests": 50,
    },
    ray_actor_options={
        "num_cpus": 0.5
    }
)
@serve.ingress(api)
class MCPGateway:

    def __init__(self):
        pass


# --------------------------------------------------------------------------
# 5.  Expose the Serve app graph
# --------------------------------------------------------------------------
app = MCPGateway.bind()
2. 编译配置文件#
转到包含这 3 个 Python 文件的 mcp-gateway-with-existing-ray-apps 目录,然后运行以下命令:
cd mcp-gateway-with-existing-ray-apps
serve build image_classifier:app text_translator:app mcp_gateway:app -o config_serve_temp.yaml
在 config_serve_temp.yaml 文件中,应用程序名称默认是自动生成的(例如,app1、app2 等)。
但是,如代码片段前面所述:clf = serve.get_deployment_handle("image_classifier", app_name="image_classifier_app")
`app_name` 必须与配置文件中指定的名称匹配。因此,您需要更新 YAML 文件的 applications 部分,如下所示:
applications:
  - name: image_classifier_app
    import_path: image_classifier:app
    route_prefix: /classify
    # …other settings…

  - name: text_translator_app
    import_path: text_translator:app
    route_prefix: /translate
    # …other settings…

  - name: mcp_gateway_app
    import_path: mcp_gateway:app
    route_prefix: /mcp_gateway
    # …other settings…
3. 在终端中使用 Ray Serve 运行服务#
我们在 mcp-gateway-with-existing-ray-apps/ 文件夹中提供了最终的 config_serve.yaml 文件,其中包含了之前的更改,只需运行:
serve run config_serve.yaml
4. 使用 Python 客户端进行测试#
服务将在 URL https://:8000 上启动,因为您在 mcp_gateway_app 上定义了 route_prefix: /mcp_gateway,因此 MCP 端点变为 https://:8000/mcp_gateway/mcp。
请注意,端点 URL 中添加了 “/mcp”,因为您在 mcp_gateway.py 中使用了 app.mount("/", mcp.streamable_http_app())。
import asyncio
from mcp.client.streamable_http import streamablehttp_client
from mcp import ClientSession

SAMPLE_IMAGE_URL = "https://doggos-dataset.s3.us-west-2.amazonaws.com/samara.png"
SAMPLE_TEXT      = "How are you?"
url = "https://:8000/mcp_gateway/mcp"

async def main():
    async with streamablehttp_client(url=url) as (read, write, _):
        async with ClientSession(read, write) as session:
            await session.initialize()

            # List available tools
            tools = await session.list_tools()
            print("Tools:")
            for t in tools.tools:
                print(f" • {t.name}: {t.description}")
            print()

            # Test calls
            tests = {
                "classify": {"image_url": SAMPLE_IMAGE_URL},
                "translate": {"text": SAMPLE_TEXT},
            }

            for t in tools.tools:
                if t.name in tests:
                    print(f"--- {t.name} ---")
                    res = await session.call_tool(name=t.name, arguments=tests[t.name])
                    for chunk in res.content:
                        print(chunk.text)
                    print()


# ──────── How to run in Jupyter Notebook ────────────────────────────
# await main()
# ────────────────────────────────────────────────────────────────────


# ──────── How to run as a standalone Python script ──────────────────
# import asyncio
#
# if __name__ == "__main__":
#     # Create and run the event loop
#     asyncio.run(main())
# ────────────────────────────────────────────────────────────────────
终止 Ray Serve:#
serve shutdown --yes
5. 使用 Anyscale 服务进行生产部署#
首先,将 config_serve.yaml 文件复制到一个名为 config_anyscale.yaml 的新文件中。然后,删除 proxy_location、http_options、grpc_options 和 logging_config 字段。Anyscale 服务不支持这些字段。您还可以添加一个值为 mcp-gateway-app-service 的 name 字段来指定服务名称。
对于生产部署,请使用 Anyscale 服务将 Ray Serve 应用部署到专用集群。Anyscale 可确保可伸缩性、容错性和负载均衡,使服务能够抵御节点故障、高流量和滚动更新。
使用以下命令部署服务
anyscale service deploy -f "config_anyscale.yaml"
6. 查询生产服务#
部署时,您会公开一个公共可访问的 IP 地址,您可以向其发送请求。
在上一单元格的输出中,复制您的 API_KEY 和 BASE_URL。例如,这些值看起来如下:
BASE_URL = “https://mcp-gateway-app-service-jgz99.cld-kvedzwag2qa8i5bj.s.anyscaleuserdata.com”
TOKEN = “CCq8xuiXup_tWcyo-CjfcdyMhiTAnCzQkuXChnmnzoc”
在以下 Python 请求对象中填写 BASE_URL 和 API_KEY 的占位符值
from mcp.client.streamable_http import streamablehttp_client
from mcp import ClientSession

BASE_URL = "https://mcp-gateway-app-service-jgz99.cld-kvedzwag2qa8i5bj.s.anyscaleuserdata.com" # Replace with your own URL
TOKEN = "CCq8xuiXup_tWcyo-CjfcdyMhiTAnCzQkuXChnmnzoc" # Replace with your own token
url = f"{BASE_URL}/mcp_gateway/mcp"

# # Common headers for auth
headers = {
    "Authorization": f"Bearer {TOKEN}"
}

async def main():
    async with streamablehttp_client(url=url, headers=headers) as (read, write, _):
        async with ClientSession(read, write) as session:
            await session.initialize()

            # List available tools
            tools = await session.list_tools()
            print("Tools:")
            for t in tools.tools:
                print(f" • {t.name}: {t.description}")
            print()

            # Test calls
            tests = {
                "classify": {"image_url": SAMPLE_IMAGE_URL},
                "translate": {"text": SAMPLE_TEXT},
            }

            for t in tools.tools:
                if t.name in tests:
                    print(f"--- {t.name} ---")
                    res = await session.call_tool(name=t.name, arguments=tests[t.name])
                    for chunk in res.content:
                        print(chunk.text)
                    print()

# ──────── How to run in Jupyter Notebook ────────────────────────────
# await main()
# ────────────────────────────────────────────────────────────────────


# ──────── How to run as a standalone Python script ──────────────────
# import asyncio
#
# if __name__ == "__main__":
#     # Create and run the event loop
#     asyncio.run(main())
# ────────────────────────────────────────────────────────────────────
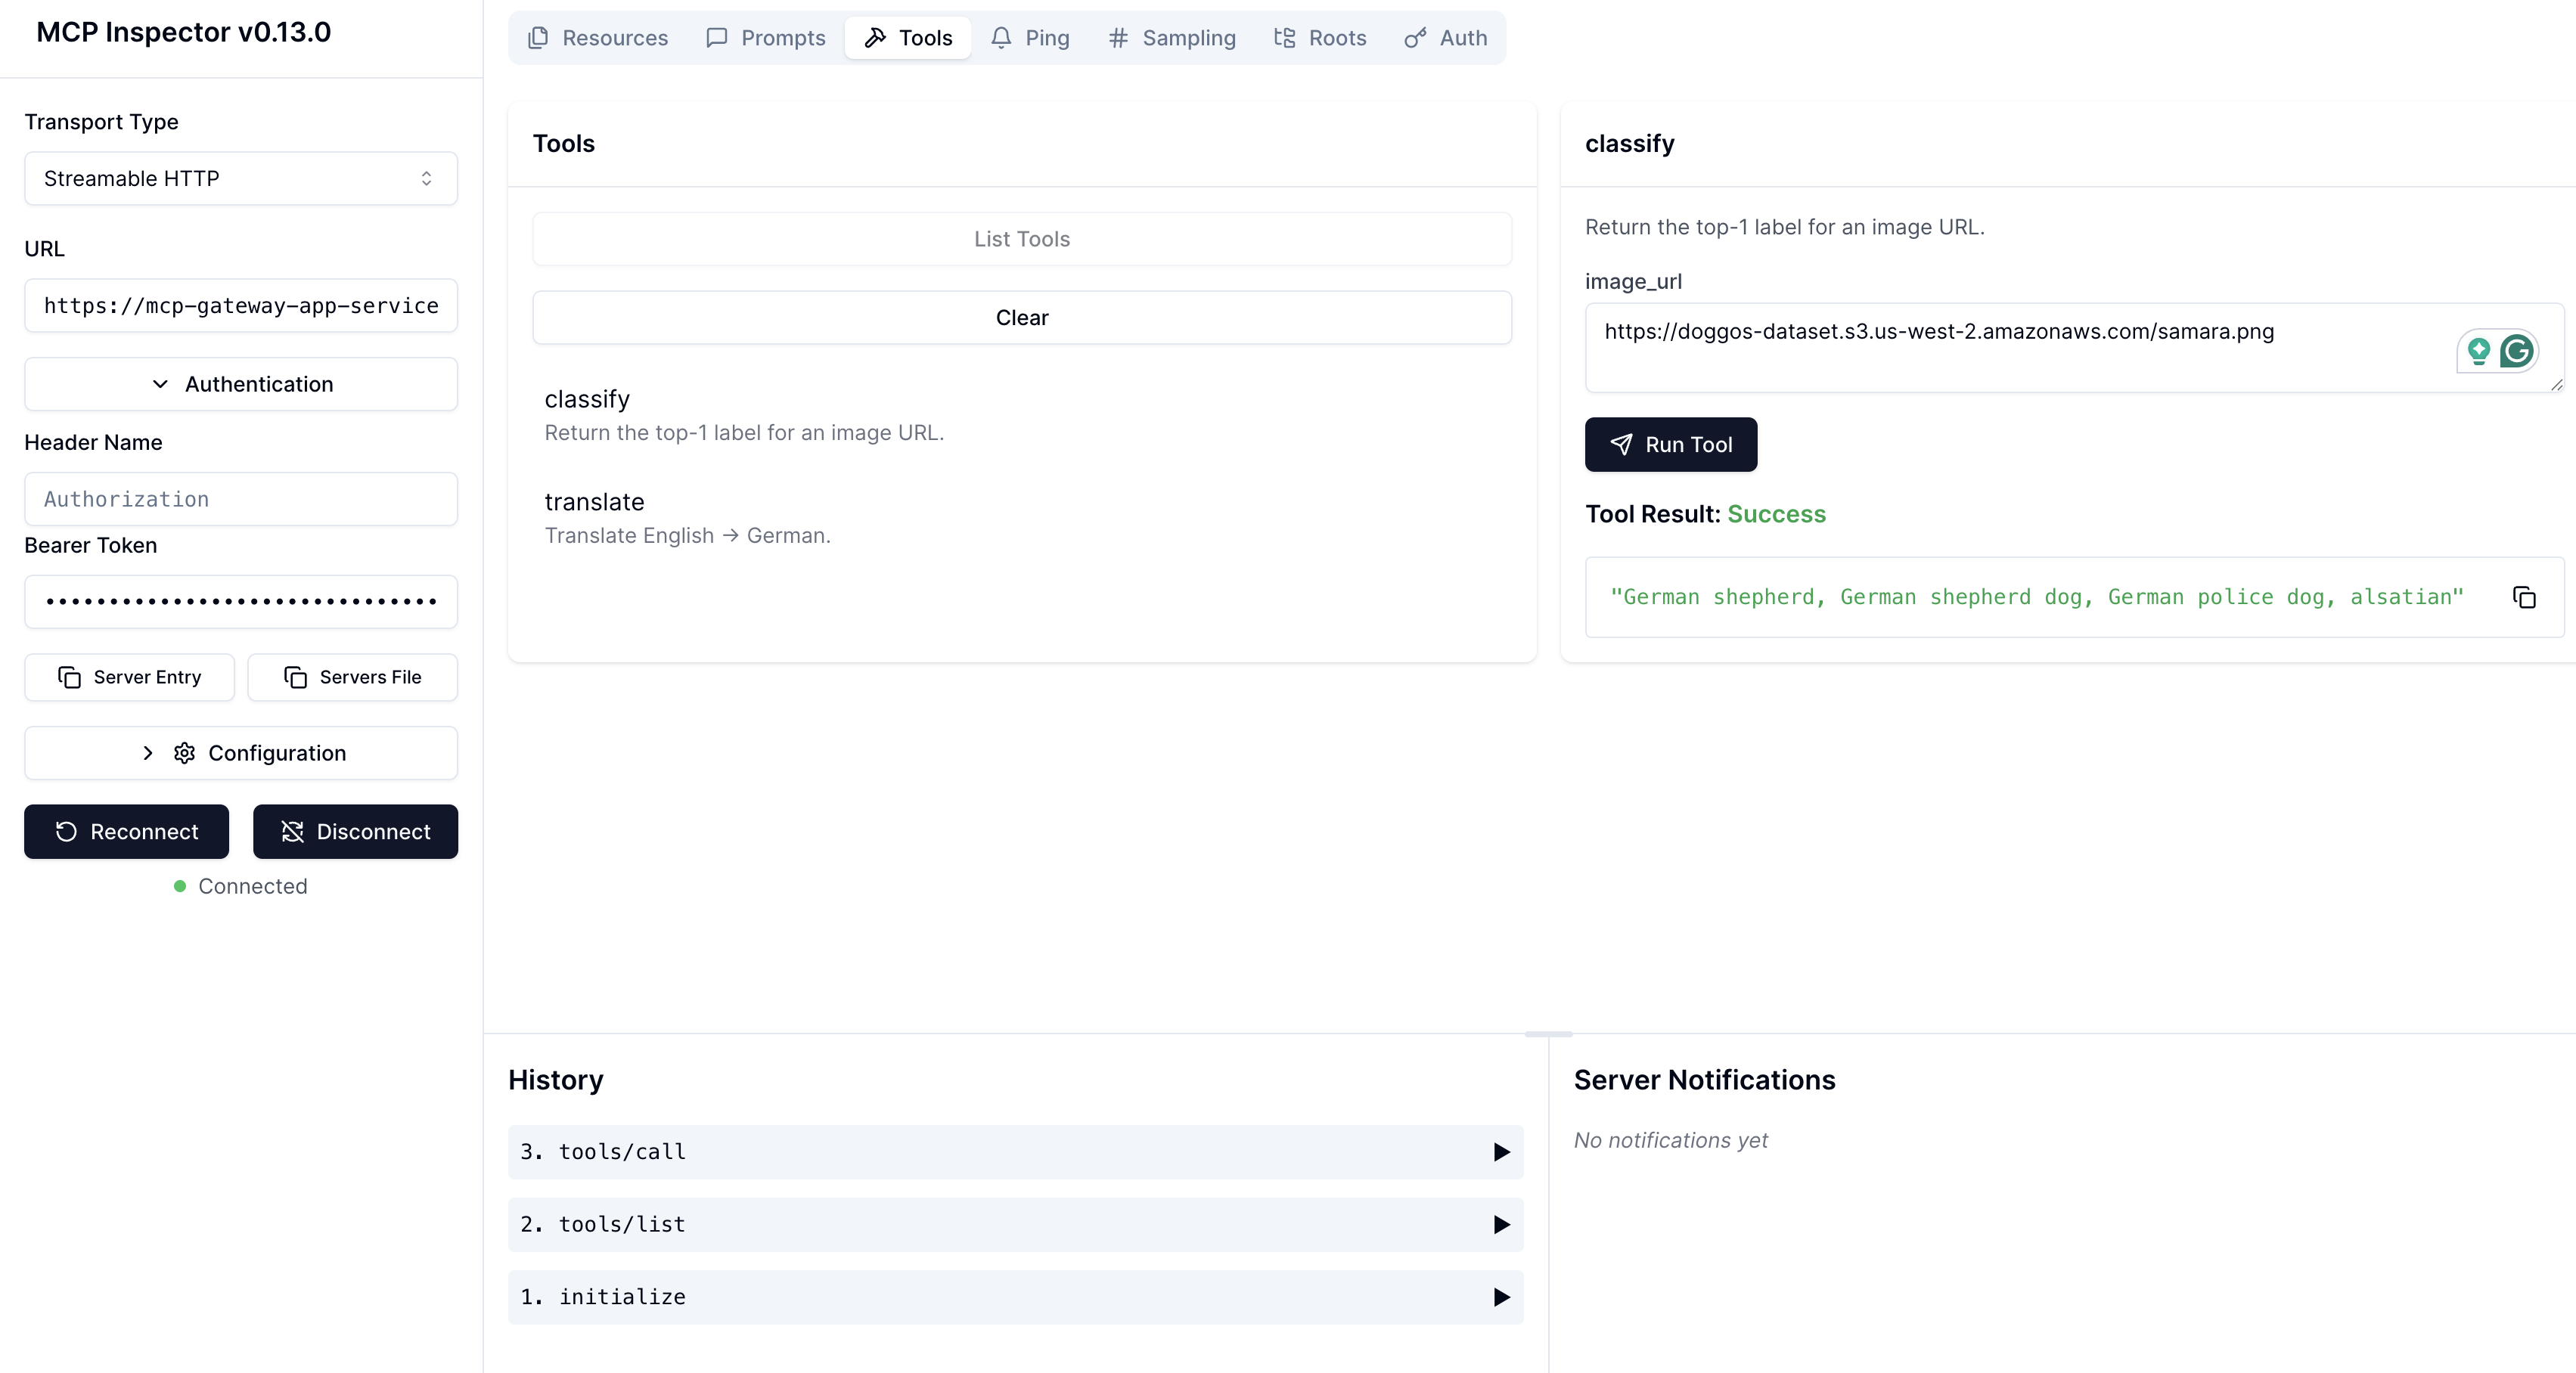
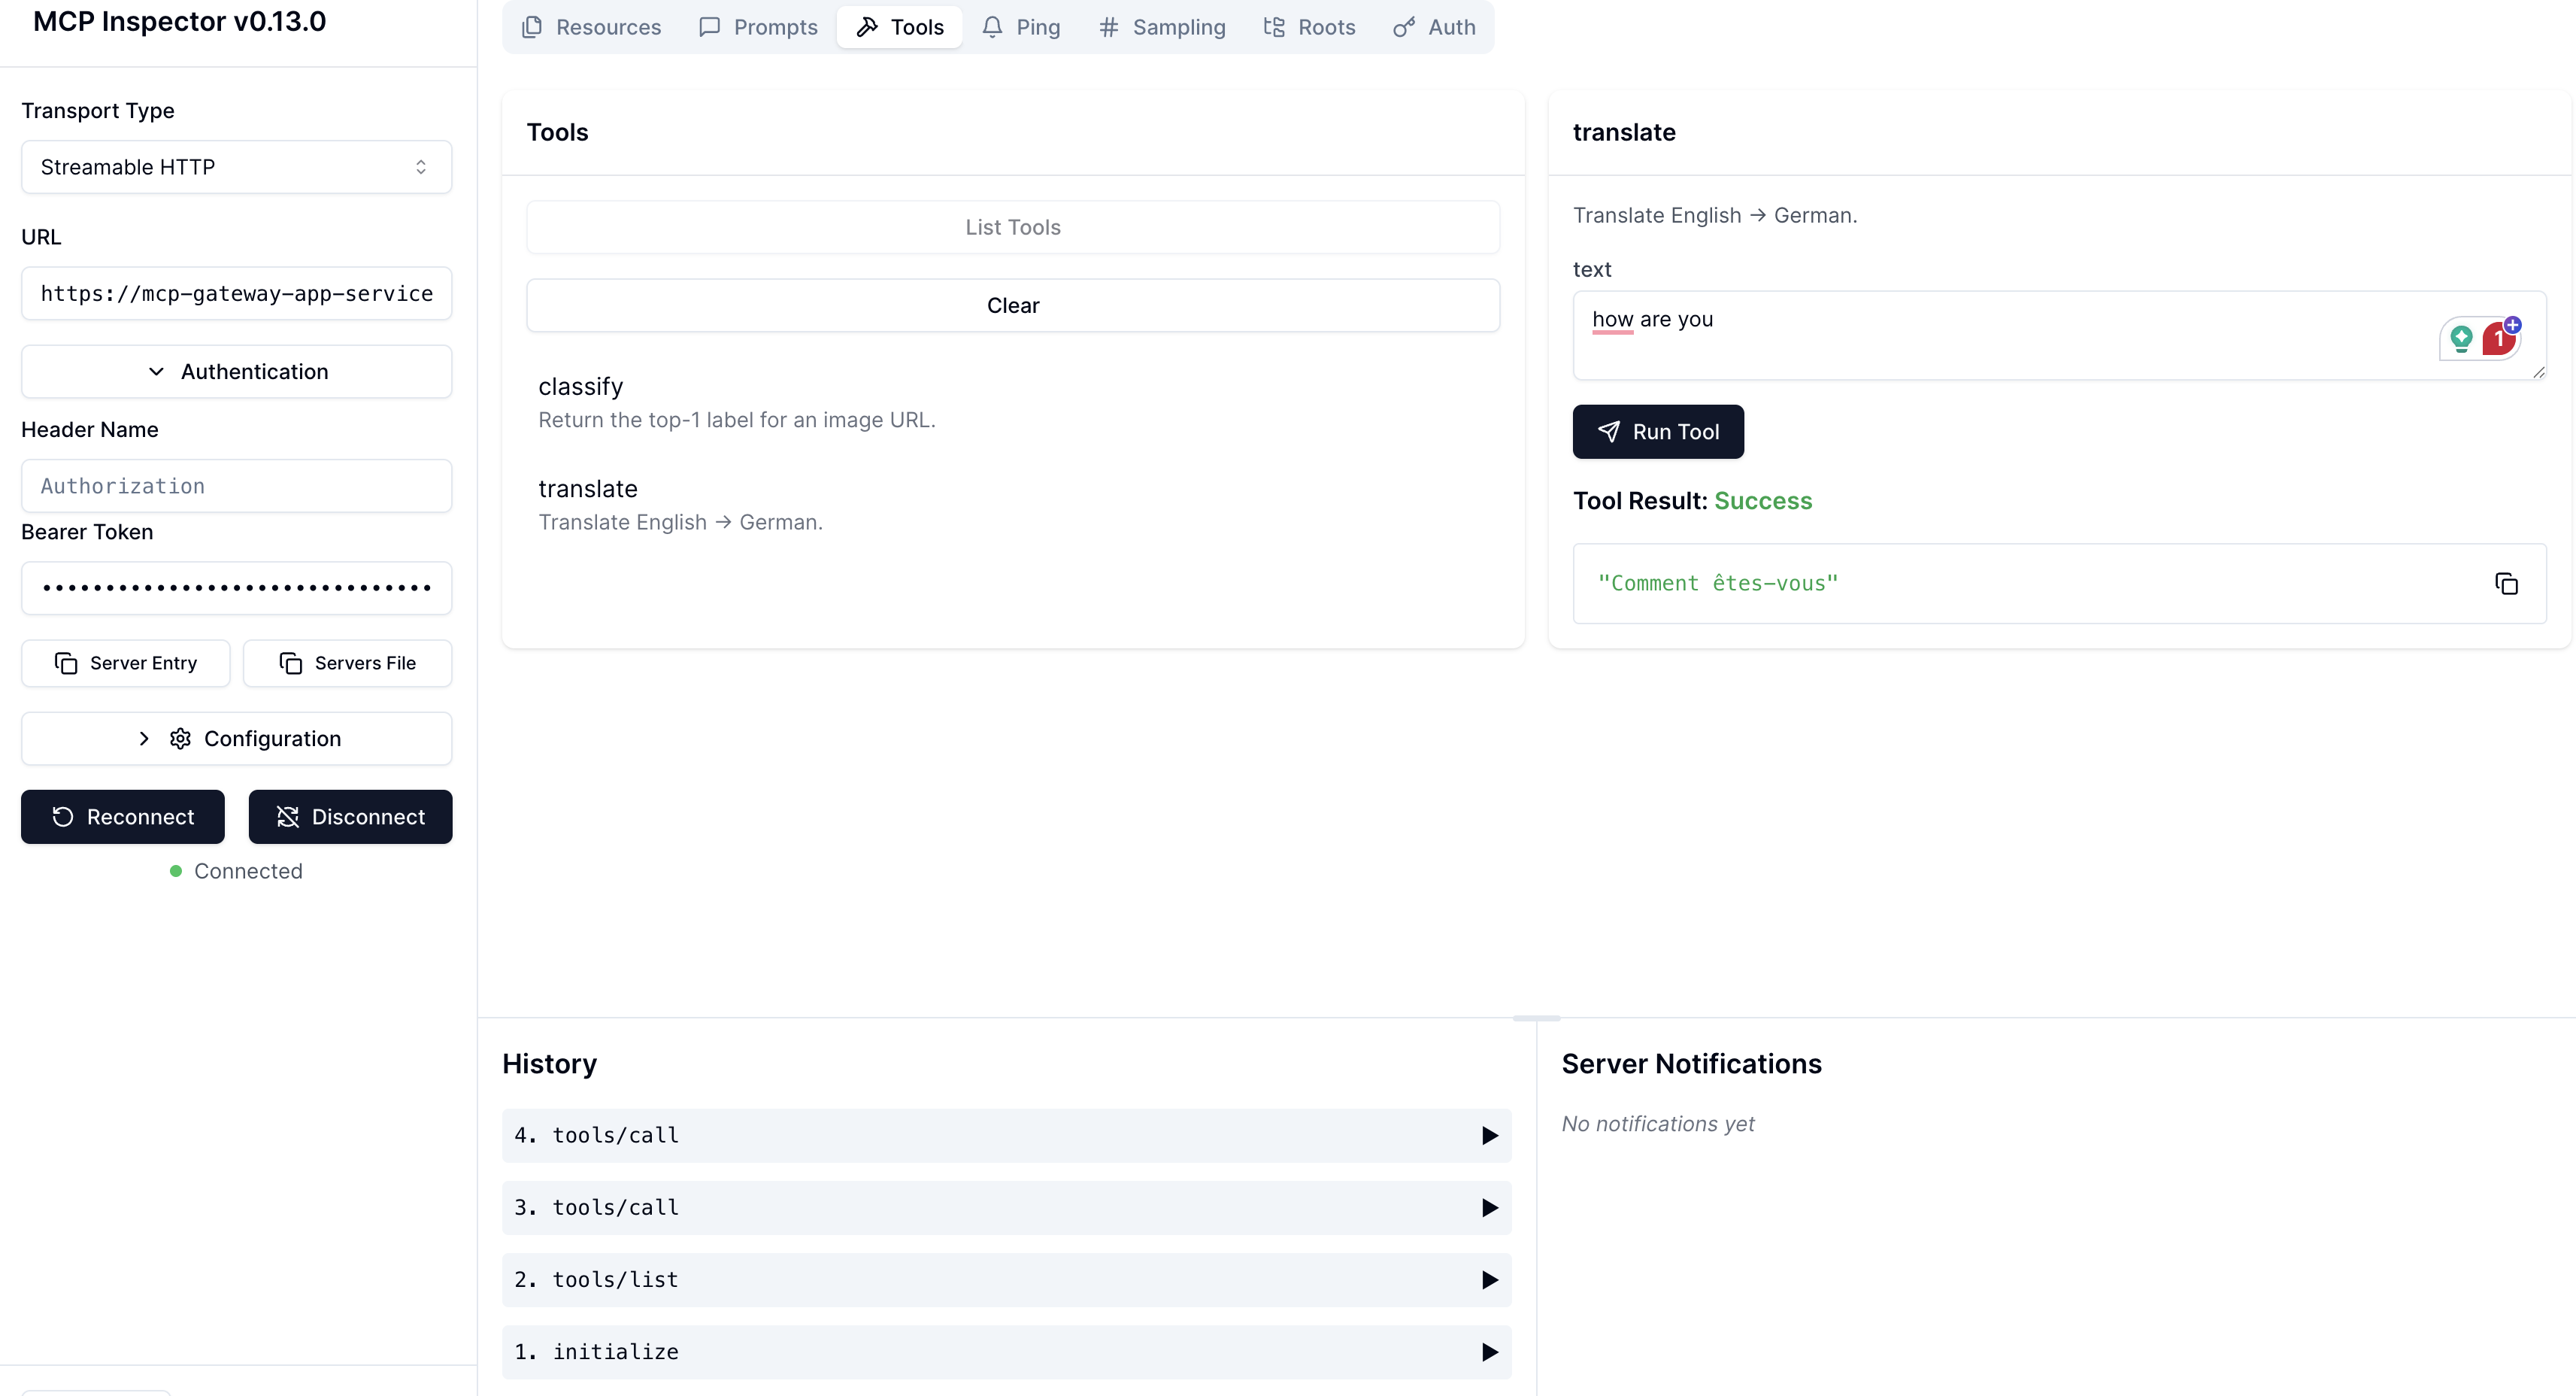
7. 使用 MCP Inspector 进行测试#
请按照 Notebook #1 中的说明在本地计算机上设置 MCP Inspector。
然后访问 http://127.0.0.1:6274/ 以查找 Inspector UI,然后输入以下信息:
Transport Type: Streamable HTTP
URL: https://mcp-gateway-app-service-jgz99.cld-kvedzwag2qa8i5bj.s.anyscaleuserdata.com/mcp_gateway/mcp
Bearer token = “CCq8xuiXup_tWcyo-CjfcdyMhiTAnCzQkuXChnmnzoc”
注意:请使用您自己的服务 URL 和 bearer token。
然后,您可以测试已与您的 Ray Serve 应用连接的以下远程 MCP 服务器。
图像分类器工具调用结果:#
文本翻译器工具调用结果:#
8. 终止 Anyscale 服务#
测试完服务后,您可以使用此命令关闭服务:
anyscale service terminate --name=mcp-gateway-app-service