使用 Ray Data 实现可扩展的 RAG 数据摄取和分页#
在我们之前的教程中,我们概述了 RAG 文档摄取的标准流程。
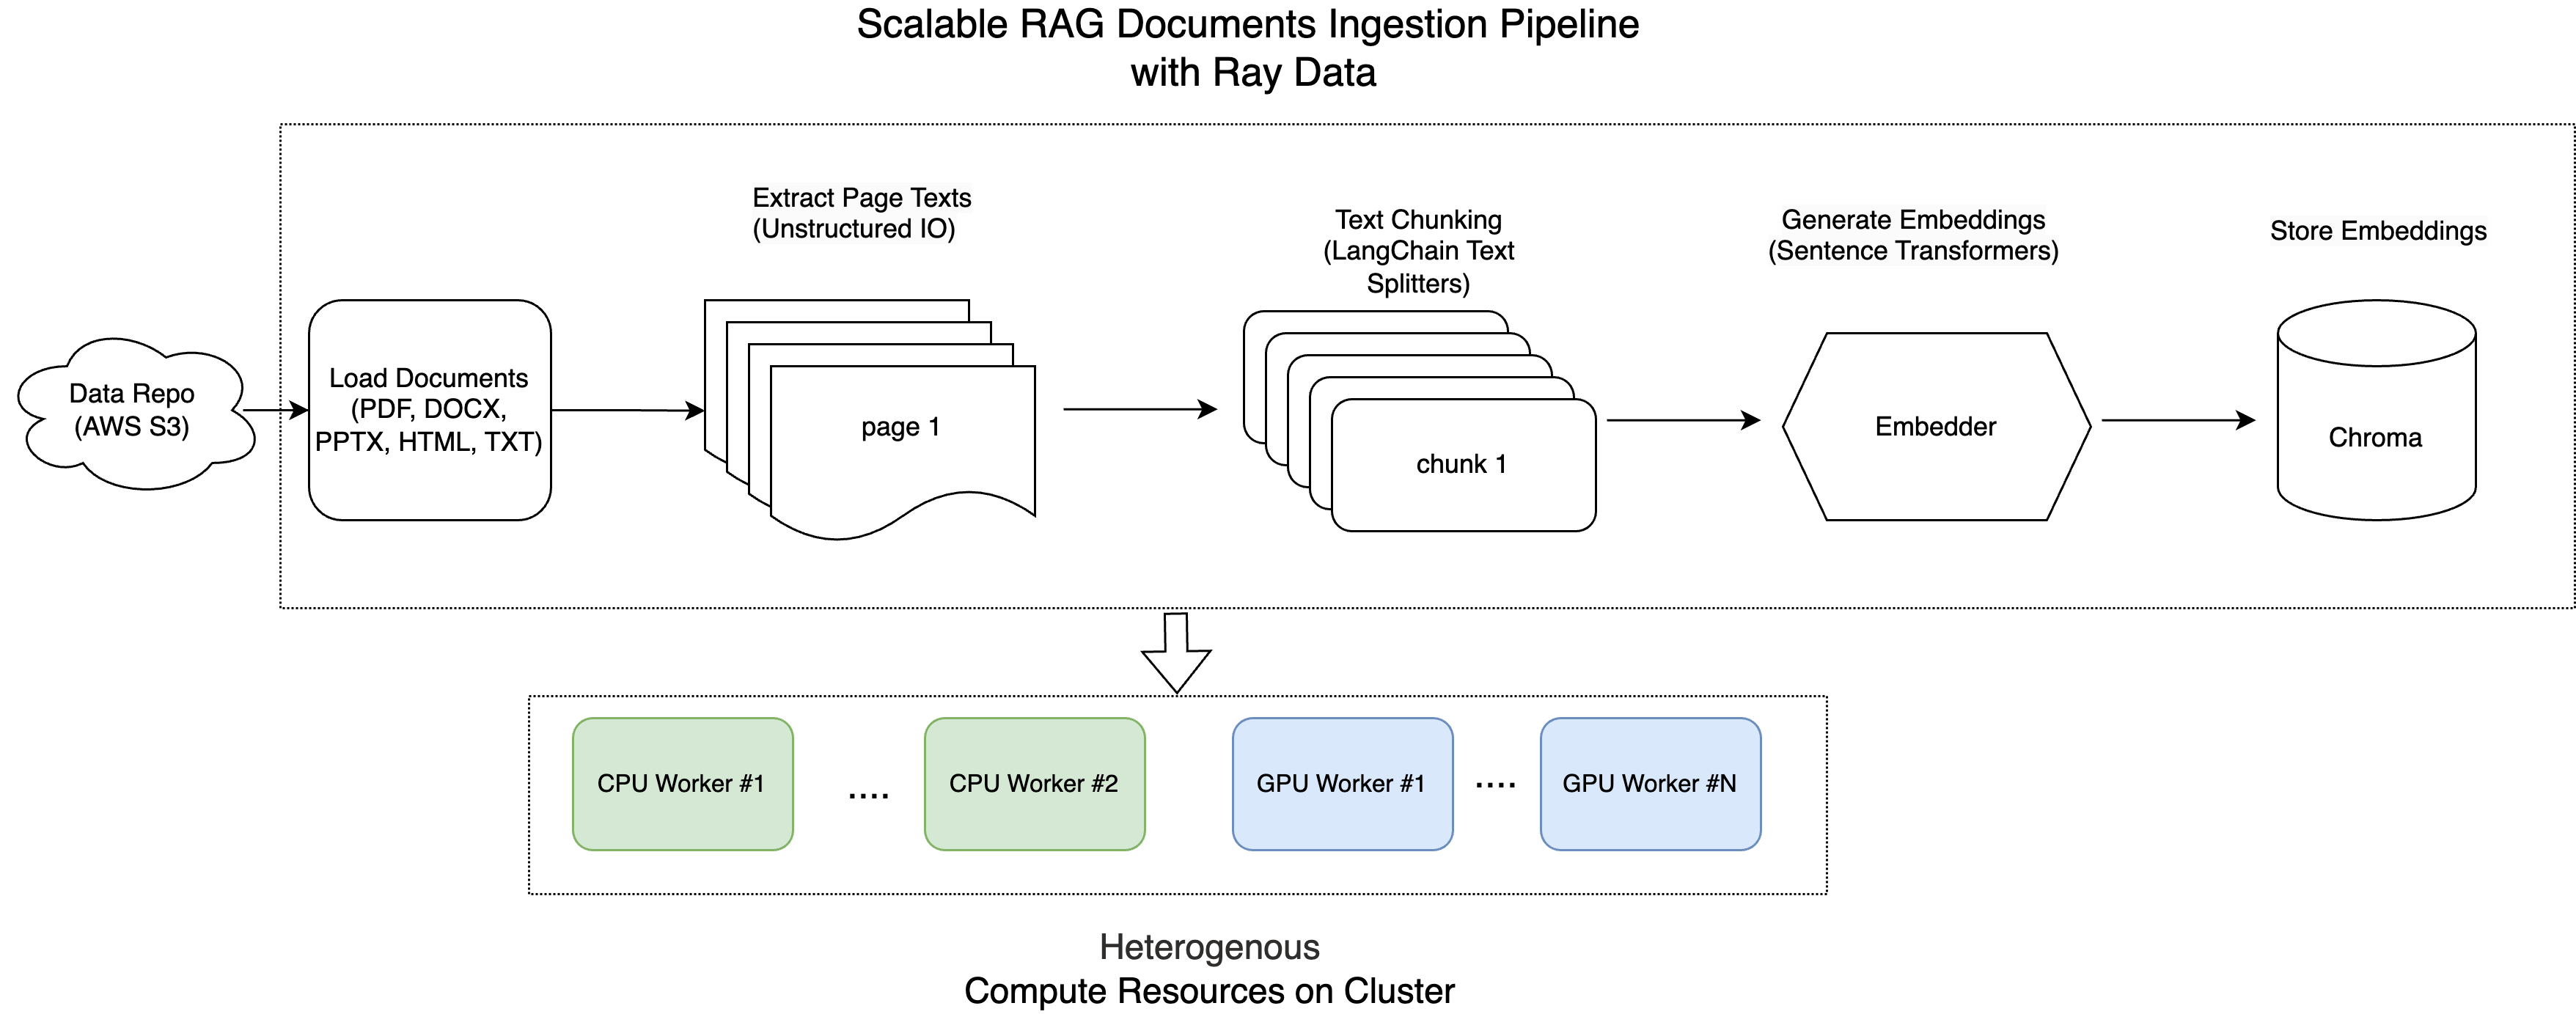
本教程将深入探讨如何利用 Ray 对文档进行高效处理、分块、嵌入和存储到向量数据库中,从而实现快速的嵌入相似性搜索。
Ray 能够并发处理大批量文件,是规模化管理海量非结构化数据的理想解决方案。
这是架构图
注意:本教程针对 Anyscale 平台进行了优化。在开源 Ray 上运行时,需要额外的配置。例如,您需要手动
- 配置您的 Ray 集群:设置您的多节点环境(包括主节点和工作节点),并管理资源分配(例如,自动伸缩、GPU/CPU 分配),而无需 Anyscale 的自动化。有关详细信息,请参阅 Ray 集群设置文档:https://docs.rayai.org.cn/en/latest/cluster/getting-started.html。
- 管理依赖项:在每个节点上安装和管理依赖项,因为您将无法使用 Anyscale 基于 Docker 的依赖项管理。请参阅 Ray 安装指南,了解在环境中安装和更新 Ray 的说明:https://docs.rayai.org.cn/en/latest/ray-core/handling-dependencies.html。
- 设置存储:配置您自己的分布式或共享存储系统(而不是依赖 Anyscale 的集成集群存储)。请查看 Ray 集群配置指南,了解有关设置共享存储解决方案的建议:https://docs.rayai.org.cn/en/latest/train/user-guides/persistent-storage.html。
从 S3 加载文档#
在此步骤中,我们从 AWS S3 存储桶中检索 100 个文档。我们利用 Ray Data,它能简化大规模数据集的高效处理。
我们使用函数 ray.data.read_binary_files 将 S3 存储桶中的所有文件读取为原始二进制数据。
此外,设置 include_paths=True 可以让我们跟踪每个文件的路径(例如,your-bucket-name/folder/example.pdf),这在后续步骤中非常有用。
import ray
import io
from pathlib import Path
from typing import Dict, List
from unstructured.partition.auto import partition
import chromadb
from sentence_transformers import SentenceTransformer
import torch
import numpy as np
import uuid
from langchain_text_splitters import (
    RecursiveCharacterTextSplitter,
    CharacterTextSplitter,
    NLTKTextSplitter,
)

SOURCE_DIRECTORY_S3="s3://anyscale-rag-application/100-docs/"
ds = ray.data.read_binary_files(SOURCE_DIRECTORY_S3, include_paths=True, concurrency=5)
ds.schema()
2025-04-28 14:02:42,918	INFO worker.py:1660 -- Connecting to existing Ray cluster at address: 10.0.41.124:6379...
2025-04-28 14:02:42,928	INFO worker.py:1843 -- Connected to Ray cluster. View the dashboard at https://session-xl5p5c8v2puhejgj5rjjn1g6ht.i.anyscaleuserdata.com
2025-04-28 14:02:42,942	INFO packaging.py:367 -- Pushing file package 'gcs://_ray_pkg_72f4a5291407a334fea98932ca96e79412931b97.zip' (4.94MiB) to Ray cluster...
2025-04-28 14:02:42,961	INFO packaging.py:380 -- Successfully pushed file package 'gcs://_ray_pkg_72f4a5291407a334fea98932ca96e79412931b97.zip'.
2025-04-28 14:02:43,060	INFO streaming_executor.py:108 -- Starting execution of Dataset. Full logs are in /tmp/ray/session_2025-04-28_12-58-27_336835_47308/logs/ray-data
2025-04-28 14:02:43,061	INFO streaming_executor.py:109 -- Execution plan of Dataset: InputDataBuffer[Input] -> TaskPoolMapOperator[ListFiles] -> TaskPoolMapOperator[ReadFiles]
Column  Type
------  ----
bytes   binary
path    string
可扩展的文档处理和分页#
从 S3 检索文件后,下一步是从每页提取文本。
S3 存储桶包含 100 个文档,总计超过 6000 页。其中大部分是来自此 github 仓库的示例 PDF:https://github.com/tpn/pdfs。这些 PDF 包括基于文本和基于图像的格式。此外,还有五个与 Anyscale 作业相关的文档,格式多样,包括 PDF、PPTX、HTML、TXT 和 DOCX。
注意:一些文档非常大,包含超过 900 页。
我们定义了一个函数,该函数使用 Unstructured 库进行解析,以加载和分区这些文档。有关更多详细信息,请参阅 Unstructured 文档:https://docs.unstructured.io/welcome
对于基于图像的 PDF,Unstructured 库使用 Tesseract OCR 引擎来处理和提取文本。
每个文档都从指定目录读取,并逐页处理。每页的文本与其相应的元数据一起分组,例如源文件、文件类型、页码和唯一文档 ID。
以下是执行此任务的函数
from pathlib import Path
import io
import uuid

def process_file(record: dict) -> dict:
    file_path = Path(record["path"])

    # Only process the following file extensions
    supported_extensions = {".pdf", ".docx", ".pptx", ".ppt", ".html", ".txt"}

    if file_path.suffix.lower() not in supported_extensions:
        # Not a supported file
        return {"pages": []}

    print(f"Processing file: {file_path}")

    try:
        with io.BytesIO(record["bytes"]) as stream:
            elements = partition(file=stream)  # This call may fail on some files

            # Generate a unique doc_id for this file
            doc_id = str(uuid.uuid4())

            # Group text by page
            page_texts = {}
            for el in elements:
                page_number = getattr(el.metadata, "page_number", 1) or 1
                if page_number not in page_texts:
                    page_texts[page_number] = []
                page_texts[page_number].append(str(el))

            # Combine text for each page
            pages = []
            for page_number, texts in page_texts.items():
                combined_text = " ".join(texts)
                pages.append({
                    "text": combined_text.strip(),
                    "source": str(file_path),
                    "page_number": page_number,
                    "doc_id": doc_id
                })

            return {"pages": pages}

    except Exception as e:
        # Handle files that cause errors during parsing
        print(f"Cannot process file {file_path}: {e}")
        return {"pages": []}


# Assuming `ds` is your dataset, apply the function
ds = ds.map(process_file, concurrency=8, num_cpus=1)
ds = ds.flat_map(lambda x: x["pages"])

print(ds)
2025-04-28 14:02:54,705	INFO streaming_executor.py:108 -- Starting execution of Dataset. Full logs are in /tmp/ray/session_2025-04-28_12-58-27_336835_47308/logs/ray-data
2025-04-28 14:02:54,706	INFO streaming_executor.py:109 -- Execution plan of Dataset: InputDataBuffer[Input] -> TaskPoolMapOperator[ListFiles] -> TaskPoolMapOperator[ReadFiles]
FlatMap(<lambda>)
+- Map(process_file)
   +- Dataset(num_rows=?, schema={bytes: binary, path: string})
文本处理流程#
此流程简化了从原始文本到结构化嵌入的转换
分块:将文本分解成更小的片段。
嵌入:将文本块转换为数值向量。
存储:将向量和元数据保存到 Chroma DB。
为了使用 Ray Data 构建文本处理流程,我们定义了三个类:Chunker、Embedder 和 ChromaWriter。
然后,我们利用 Ray Data 操作,如 map / flat_map 和 map_batches,无缝集成这些步骤。
有关更多详细信息,请查看:https://docs.rayai.org.cn/en/latest/data/api/doc/ray.data.Dataset.map_batches.html。
分块器#
Chunker 类负责使用多种方法之一将文档文本拆分成更小的块。根据指定的方法(固定或递归),它使用 LangChain TextSplitter 中的相应拆分器。每个块都有自己的唯一 chunk_id,同时保留原始的 doc_id、page_number 等。
class Chunker:
    def __init__(self, method: str = "recursive", chunk_size: int = 2048, chunk_overlap: int = 200):
        self.method = method
        if self.method == "fixed":
            splitter = CharacterTextSplitter(
                chunk_size=chunk_size, chunk_overlap=chunk_overlap ## here, the chunk size is number of chars, not tokens
            )
        elif self.method == "recursive":
            splitter = RecursiveCharacterTextSplitter(
                chunk_size=chunk_size, chunk_overlap=chunk_overlap ## here, the chunk size here is number of chars, not tokens
            )
        else:
            raise ValueError("Invalid chunking method")
        self.splitter = splitter

    def __call__(self, page: Dict) -> List[Dict]:
        chunks = []
        texts = self.splitter.split_text(page["text"])
        for chunk_index, text in enumerate(texts):
            chunks.append({
                "text": text,
                "source": page["source"],
                "page_number": page.get("page_number", 1),
                "chunk_id": str(uuid.uuid4()),
                "doc_id": page["doc_id"]
            })
        return chunks
嵌入器#
Embedder 使用 SentenceTransformer 模型将文本块转换为数值嵌入。
此类初始化 SentenceTransformer 模型(如果可用,则使用 CUDA),并定义一个可调用对象,该对象接收文本块的批次,将其编码为嵌入,并返回一个包含嵌入和元数据的字典。
class Embedder:
    def __init__(self, model_name: str = "intfloat/multilingual-e5-large-instruct"):
        self.model_name = model_name
        self.model = SentenceTransformer(
            self.model_name,
            device="cuda" if torch.cuda.is_available() else "cpu"
        )

    def __call__(self, batch: Dict) -> Dict:
        # Generate embeddings for the batch of text chunks
        embeddings = self.model.encode(batch["text"], convert_to_numpy=True)

        return {
            "embeddings": embeddings,
            "text": batch["text"],
            "source": batch["source"],
            "doc_id": batch["doc_id"],
            "page_number": batch["page_number"],
            "chunk_id": batch["chunk_id"],
        }
ChromaWriter#
ChromaWriter 负责将嵌入的向量以及元数据写入 Chroma 向量存储。
我们实现了两个特殊方法,__getstate__ 和 __setstate__,它们是 Python 序列化协议中的特殊钩子。
__getstate__:通过移除无法序列化的属性来准备对象进行序列化,确保只保存必要的状态。__setstate__:在反序列化后通过恢复其状态并重新初始化不可序列化组件来重建对象,以确保对象保持完全功能。
这两个函数将防止在使用 Ray Data 的批处理处理期间使用 map_batches 时出现类似 TypeError: cannot pickle 'weakref.ReferenceType' object 的错误。
class ChromaWriter:
    def __init__(self, collection_name: str, chroma_path: str):
        self.collection_name = collection_name
        self.chroma_path = chroma_path
        self._init_chroma_client()

    def _init_chroma_client(self):
        self.chroma_client = chromadb.PersistentClient(path=self.chroma_path)
        self.collection = self.chroma_client.get_or_create_collection(
            name=self.collection_name,
            metadata={"hnsw:space": "cosine"}
        )

    def __getstate__(self):
        """
        Exclude the unpickleable chroma_client and collection from the state.
        """
        state = self.__dict__.copy()
        state.pop("chroma_client", None)
        state.pop("collection", None)
        return state

    def __setstate__(self, state):
        """
        Restore the state and reinitialize the chroma client and collection.
        """
        self.__dict__.update(state)
        self._init_chroma_client()

    def __call__(self, batch: dict) -> dict:
        """
        Process a batch of documents by adding them to the Chroma collection.
        """
        # Prepare metadata for each entry in the batch
        metadatas = []
        for i in range(len(batch["chunk_id"])):
            metadata = {
                "source": batch["source"][i],
                "doc_id": batch["doc_id"][i],
                "page_number": int(batch["page_number"][i]),
                "chunk_id": batch["chunk_id"][i]
            }
            metadatas.append(metadata)

        embeddings = batch["embeddings"].tolist()
        documents = [text for text in batch["text"]]
        ids = [id for id in batch["chunk_id"]]

        # Add the embeddings, documents, ids, and metadata to the collection
        self.collection.add(
            embeddings=embeddings,
            documents=documents,
            ids=ids,
            metadatas=metadatas
        )
        return {}
设置文本处理流程#
最后,定义数据源和向量存储配置的常量。然后,构建 Ray 流程,该流程
分块文本。
生成嵌入。
将结果写入 Chroma DB。
# Constants for your data sources and vector store configuration
EMBEDDER_MODEL = "intfloat/multilingual-e5-large-instruct"
CHROMA_PATH = "/mnt/cluster_storage/vector_store"
CHROMA_COLLECTION_NAME = "anyscale_jobs_docs_embeddings"

# Build the processing pipeline using Ray Data API
processed_ds = (
    ds.flat_map(
        Chunker,
        fn_constructor_kwargs={"method": "recursive"},
        concurrency=5,
        num_cpus=1
    )
    .map_batches(
        Embedder,
        fn_constructor_kwargs={"model_name": EMBEDDER_MODEL},
        batch_size=800,
        concurrency=1,
        num_gpus=1
    )
    .map_batches(
        ChromaWriter,
        batch_size=500,
        concurrency=1,
        num_cpus=1,
        fn_constructor_kwargs={
            "collection_name": CHROMA_COLLECTION_NAME,
            "chroma_path": CHROMA_PATH
        }
    )
)
执行整个文本处理流程#
运行流程以处理所有文档
# Execute pipeline
processed_ds.take_all()
print("Data ingestion completed successfully!")
验证和搜索数据#
检查已存储的嵌入#
处理完成后,您可以验证 Chroma DB 中存储了多少向量。
import chromadb
CHROMA_PATH = "/mnt/cluster_storage/vector_store"
CHROMA_COLLECTION_NAME = "anyscale_jobs_docs_embeddings"

# Initialize the Chroma client and retrieve (or create) your collection
chroma_client = chromadb.PersistentClient(path=CHROMA_PATH)
collection = chroma_client.get_or_create_collection(name=CHROMA_COLLECTION_NAME)

# Show how many vectors are stored in the collection.
vector_count = collection.count()
print("Total number of vectors in the collection:", vector_count)
Total number of vectors in the collection: 9504
您还可以检查存储使用情况。
!ls -lh /mnt/cluster_storage/vector_store
total 106M
drwxr-xr-x 2 ray users 6.0K Apr 28 14:06 05e4ca13-4b3c-4db8-a68e-945320c94ef8
-rw-r--r-- 1 ray users 106M Apr 28 14:15 chroma.sqlite3
执行向量搜索#
现在数据已摄取,您可以搜索相关的文档块。例如,搜索“如何提交 Anyscale 作业”
from pprint import pprint


query_text = "how to submit anyscale jobs"

# Re-use the Embedder to generate the query embedding
embedder = Embedder()  # re-uses the same SentenceTransformer internally
query_batch = {"text": [query_text], "source": [""],"doc_id": [""],
"page_number": [""], "chunk_id": [""]}


query_result = embedder(query_batch)
# Since we passed a single query, extract the first embedding
query_embedding = query_result["embeddings"][0].tolist()

print("query_embedding is:", query_embedding)

# Query the collection for the top 3 most similar documents.
results = collection.query(
    query_embeddings=query_embedding,
    n_results=3,
    include=["documents", "metadatas", "distances"]
)

print("Query Results:")
pprint(results)
query_embedding is: [-0.0017044333508238196, 0.015340730547904968, 0.0016255583614110947, -0.030604546889662743, 0.011112975887954235, 0.006347003858536482, -0.01323129516094923, 0.04068616405129433, 0.03265380859375, -0.0014982214197516441, 0.03976968303322792, 0.03652549162507057, -0.017817512154579163, -0.0057686143554747105, -0.010639476589858532, 0.0015948776854202151, -0.0434483140707016, 0.027622589841485023, -0.013817636296153069, -0.024267688393592834, 0.04740871116518974, 0.006913214456290007, -0.02894500270485878, -0.050302654504776, -0.017056522890925407, -0.028964614495635033, -0.012868545949459076, -0.03471929952502251, -0.019390804693102837, -0.038162391632795334, -0.03007868491113186, 0.016964182257652283, -0.018217697739601135, -0.026014285162091255, -0.033512428402900696, 0.031858157366514206, 0.018111934885382652, 0.032804250717163086, -0.03364420682191849, 0.05894007906317711, -0.027891116216778755, 0.027099130675196648, 0.017965391278266907, -0.01843736693263054, -0.01634170487523079, 0.02663232944905758, 0.02401759661734104, 0.011334888637065887, -0.002637926721945405, 0.019891541451215744, 0.025486081838607788, 0.024663349613547325, -0.03427260369062424, -0.034540846943855286, -0.01635272428393364, 0.042982205748558044, -0.017152192071080208, 0.012299971655011177, -0.05886821821331978, 0.0031294154468923807, -0.0323667898774147, -0.012265153229236603, 0.0190261397510767, -0.0328933522105217, -0.024773752316832542, 0.03817155212163925, 0.03837907314300537, 0.05152209848165512, -0.03818998485803604, 0.014245550148189068, -0.018503814935684204, 0.02151079848408699, -0.05987134575843811, -0.03722551465034485, -0.03196915239095688, -0.029423493891954422, 0.06556124985218048, -0.03239507973194122, 0.047511618584394455, -0.0100001385435462, 0.06392595171928406, -0.006681195925921202, -0.009836470708251, -0.02463722601532936, 0.030461514368653297, 0.022324178367853165, 0.0353550985455513, 0.043026152998209, 0.025720849633216858, 0.024010831490159035, -0.005742025561630726, 0.04993380978703499, 0.0073404815047979355, -0.03368675336241722, -0.026316415518522263, -0.028695624321699142, 0.010165051557123661, 0.01581156626343727, -0.03476317971944809, -0.009476729668676853, -0.048053301870822906, -0.015077630057930946, 0.029387108981609344, 0.0010081013897433877, -0.020344043150544167, 0.005435415543615818, 0.01522719208151102, 0.03399081528186798, -0.05422602966427803, 0.005467638839036226, 0.002814559731632471, 0.020238429307937622, 0.0300801619887352, -0.007817949168384075, -0.015256216749548912, 0.030957713723182678, 0.002639776561409235, -0.016228996217250824, -0.016761096194386482, 0.041462648659944534, 0.05906527861952782, -0.005468756891787052, 0.0176047682762146, -0.04718853533267975, 0.060818079859018326, -0.04389018937945366, 0.006233314052224159, 0.05124808847904205, -0.02098112739622593, 0.015944087877869606, 0.02584873139858246, 0.04281257092952728, -0.037256333976984024, -0.03437976539134979, -0.020706767216324806, -0.03860943764448166, -0.03469686955213547, -0.03267113119363785, -0.0037895955611020327, 0.019575634971261024, -0.022484946995973587, 0.013962503522634506, 0.01732032559812069, -0.02344677411019802, -0.04273730516433716, -0.05264859274029732, -0.0074622537940740585, 0.036762773990631104, -0.010883408598601818, -0.00534720066934824, -0.013264037668704987, -0.0052240281365811825, -0.030645830556750298, 0.035882867872714996, 0.027263203635811806, -0.0398300401866436, 0.010113405995070934, 0.0464068204164505, -0.010013993829488754, 0.0026137465611100197, -0.03070969693362713, -0.008523067459464073, -0.04123217985033989, -0.024044612422585487, 0.015407804399728775, -0.010880604386329651, 0.005644532386213541, 0.012576055712997913, 0.030874578282237053, -0.018645526841282845, -0.03112548217177391, -0.05046553537249565, 0.03269476816058159, -0.039692774415016174, -0.014853988774120808, 0.04358026385307312, 0.035883828997612, 0.05743897706270218, 0.028144454583525658, -0.042429566383361816, 0.024788055568933487, 0.0622369758784771, 0.040198344737291336, -0.008949688635766506, -0.03282859921455383, 0.042413268238306046, 0.04197677597403526, 0.003963348921388388, 0.046553000807762146, 0.0256675872951746, 0.01650567352771759, 0.016707494854927063, 0.01888260990381241, 0.03771626576781273, -0.0116435457020998, 0.0487750843167305, 0.019383687525987625, 0.03278043493628502, -0.02489677630364895, -0.05018381029367447, -0.02076556347310543, 0.044713087379932404, -0.029930029064416885, -0.014448558911681175, 0.014284481294453144, -0.016862906515598297, -0.009961329400539398, -0.013273718766868114, 0.023328393697738647, -0.015422789379954338, -0.008725900202989578, -0.026659412309527397, 0.03480206057429314, 0.008406962268054485, -0.039850492030382156, -0.013732735998928547, -0.03142344206571579, 0.0018359279492869973, -0.002278923522680998, 0.020434707403182983, -0.007228996139019728, 0.027000581845641136, 0.00847232062369585, 0.039104048162698746, 0.04613262042403221, 0.038081906735897064, 0.04343753680586815, 0.030453352257609367, 0.06209538131952286, 0.0010513806482777, -0.007190041709691286, 0.014589409343898296, -0.050446346402168274, -0.02149198018014431, 0.00804041512310505, -0.026330547407269478, -0.054699599742889404, -0.04023607820272446, 0.027145884931087494, 0.009038384072482586, -0.033439334481954575, 0.012370959855616093, -0.019666196778416634, -0.016574950888752937, -0.044877249747514725, -0.037231944501399994, 0.023914095014333725, -0.00391073664650321, 0.019750120118260384, -0.04433750361204147, 0.017048919573426247, 0.0291057787835598, -0.030927296727895737, -0.026005273684859276, 0.032079000025987625, 0.030683664605021477, 0.017078334465622902, -0.011867214925587177, -0.022283609956502914, -0.029032498598098755, -0.019449381157755852, -0.018759993836283684, -0.017038049176335335, 0.04232180118560791, 0.029864992946386337, 0.02825905755162239, -0.031245004385709763, -0.045443467795848846, -0.013699032366275787, -0.025122707709670067, -0.056833114475011826, -0.026193758472800255, -0.015772633254528046, -0.03803209587931633, -0.0021224715746939182, -0.0004223970463499427, -0.009349027648568153, -0.03119785152375698, -0.002462700242176652, -0.013308735564351082, 0.03297137841582298, -0.0018160073086619377, 0.04747122526168823, -0.040508221834897995, -0.007043013349175453, -0.006493694614619017, 0.050613950937986374, -0.02363569475710392, 0.0025043266359716654, -0.012169846333563328, 0.017141224816441536, -0.01695449836552143, 0.0912569984793663, 0.01894710585474968, 0.029622280970215797, 0.026495780795812607, -0.0433337576687336, 0.01381806842982769, -0.033392999321222305, 0.0015257555060088634, -0.03723280876874924, -0.011390873230993748, 0.0390612855553627, 0.018032656982541084, -0.03665235638618469, -0.04815969616174698, 0.003242240287363529, 0.033880140632390976, -0.05631314963102341, 0.010612497106194496, -0.012797858566045761, 0.029596269130706787, 0.05966304615139961, -0.0539606437087059, -0.03072432056069374, -0.011985032819211483, -0.036313511431217194, 0.01985141448676586, -0.025780988857150078, 0.042005132883787155, -0.03248691186308861, -0.0010877529857680202, -0.027079496532678604, 0.042847007513046265, 0.038031063973903656, 0.027280379086732864, 0.024413028731942177, -0.05336395651102066, 0.013893887400627136, -0.012363510206341743, 0.02020018734037876, -0.020412158221006393, 0.030968928709626198, 0.06316608190536499, -0.03115215338766575, 0.0069338371977210045, -0.016847167164087296, 0.01182186882942915, 0.02395644411444664, -0.01838628761470318, 0.012292216531932354, 0.002891972428187728, -0.045235347002744675, -0.021195247769355774, 0.024748794734477997, -0.07196814566850662, 0.035846032202243805, -0.017300013452768326, 0.05245401710271835, 0.0306094978004694, -0.0029898991342633963, -0.06206433102488518, 0.019591882824897766, -0.005644015967845917, -0.028493523597717285, 0.03633035346865654, 0.024950210005044937, -0.05674431473016739, 0.03951096907258034, -0.029309473931789398, 0.008309468626976013, 0.019414881244301796, 0.043140169233083725, -0.02961607463657856, -0.012881818227469921, -0.025428803637623787, -0.007044609636068344, -0.016218483448028564, -0.034848377108573914, -0.03061637468636036, 0.02555607445538044, 0.02972916141152382, -0.02436484768986702, 0.00706903962418437, 0.015084745362401009, -0.025695281103253365, -0.07354087382555008, -0.01596185937523842, 0.016197778284549713, -0.038598544895648956, 0.01621452532708645, -0.03307541087269783, 0.027762120589613914, -0.033359937369823456, -0.014675676822662354, -0.061332955956459045, 0.13089381158351898, 0.014580716378986835, 0.07127268612384796, -0.024314487352967262, -0.01575116440653801, -0.006725810933858156, 0.00967719592154026, 0.03710419312119484, 0.0510849691927433, 0.03146777302026749, -0.008390345610678196, -0.009694856591522694, 0.011357187293469906, -0.009257537312805653, 0.055401574820280075, 0.03390068933367729, 0.012622878886759281, 0.05958056449890137, 0.03974117338657379, -0.023761453106999397, 0.05859077721834183, -0.03376632183790207, 0.03902296721935272, 0.015868505463004112, -0.04865744337439537, -0.03183649852871895, -0.023707464337348938, 0.054876264184713364, -0.028547117486596107, 0.03625475987792015, -0.010101070627570152, 0.0257352814078331, -0.036989226937294006, -0.013232729397714138, 0.00015312702453229576, 0.027737624943256378, 0.046918924897909164, -0.03895298391580582, 0.0644921362400055, -0.0272674597799778, -0.042032379657030106, -0.031785737723112106, -0.04473283141851425, 0.04463212564587593, -0.008143802173435688, 0.007376325316727161, 0.03692486137151718, -0.0343322791159153, 0.008801025338470936, 0.010802866891026497, 0.014433450996875763, -0.012546870857477188, -0.07056888192892075, -0.0427219532430172, -0.016245493665337563, -0.03686444088816643, -0.02869441732764244, -0.039786383509635925, 0.022300688549876213, 0.010995452292263508, 0.0543438084423542, -0.009142620489001274, -0.01467808522284031, -0.03898986056447029, 0.010869554243981838, 0.03386729210615158, -0.046032797545194626, -0.031040729954838753, -0.06771483272314072, -0.035442620515823364, -0.04171482473611832, -0.01855883002281189, -0.004853051155805588, 0.0036143993493169546, 0.018055103719234467, -0.0328722782433033, -0.012691497802734375, 0.04647849500179291, 0.027501653879880905, -0.017971647903323174, 0.019458582624793053, -0.015967492014169693, -0.03332424908876419, 0.037096183747053146, 0.04559498280286789, -0.008081362582743168, 0.00963857863098383, 0.0076453969813883305, -0.05572420731186867, 0.027177123352885246, 0.027933655306696892, 0.02292831614613533, 0.037513382732868195, 0.0356554239988327, 0.0258907750248909, -0.0009213731973432004, 0.03668377175927162, 0.020339345559477806, -0.033528804779052734, -0.01680414006114006, -0.029253516346216202, 0.0351327508687973, -0.009517787955701351, -0.038216352462768555, -0.038167234510183334, -0.056616220623254776, 0.04456785321235657, 0.041293300688266754, 0.06322620064020157, -0.0006922323955222964, 0.008832365274429321, 0.01151403971016407, 0.026359548792243004, -0.026338230818510056, 0.01690375618636608, 0.03283494710922241, 0.048546746373176575, -0.028419654816389084, 0.03151451051235199, 0.02320488542318344, -0.027646897360682487, 0.05858249589800835, -0.02136688306927681, 0.059684254229068756, -0.007917141541838646, 0.01869901269674301, -0.008635678328573704, -0.005768714938312769, 0.03407862409949303, 0.01316927932202816, 0.020789753645658493, -0.028157873079180717, -0.013137003406882286, 0.016213782131671906, 0.011342354118824005, -0.00664183497428894, 0.09307308495044708, -0.005567471496760845, -0.006409807130694389, 0.06864866614341736, -0.005672682076692581, 0.02799185737967491, -0.02985338866710663, 0.01568346656858921, 0.018060430884361267, 0.012528183870017529, -0.018813632428646088, -0.042184703052043915, -0.040021102875471115, -0.027148185297846794, 0.025415893644094467, -0.008626732043921947, -0.004896585829555988, 0.03557717055082321, -0.0008608876378275454, -0.0690780058503151, 0.015648210421204567, 0.02732417732477188, 0.013863625936210155, -0.04525025561451912, -0.031575318425893784, 0.003983910195529461, -0.006693525239825249, 0.07569355517625809, -0.00049587432295084, 0.013464261777698994, -0.03286905214190483, 0.029604757204651833, 0.031204786151647568, 0.004629467148333788, -0.04558716341853142, -0.0056640757247805595, 0.00962319690734148, 0.03307335451245308, 0.02851584553718567, -0.023425268009305, -0.029943086206912994, 0.02255013957619667, -0.024138139560818672, 0.005545550957322121, 0.009419426321983337, 0.0336574986577034, 0.00023612409131601453, -0.049040161073207855, -0.027474230155348778, 0.011315740644931793, -0.02021382935345173, -0.008044681511819363, -0.014802608639001846, 0.006514310371130705, -0.019815780222415924, 0.09170760214328766, 0.011425063014030457, 0.03681270033121109, -0.03419629484415054, -0.003672234946861863, 0.013403049670159817, 0.011890222318470478, -0.03576162829995155, -0.02330285683274269, -0.0543934628367424, -0.04133880138397217, -0.01628713868558407, -0.008787814527750015, 0.009366042912006378, -0.0005449014133773744, 0.02063332125544548, 0.016049731522798538, 0.019458625465631485, 0.04757072031497955, -0.015594822354614735, -0.060091231018304825, 0.01133355125784874, 0.017660614103078842, 0.019212797284126282, 0.013590590097010136, 0.038093797862529755, 0.02815341204404831, 0.028414735570549965, -0.023488983511924744, 0.012319816276431084, -0.00047066115075722337, 0.01868717186152935, -0.036274004727602005, -0.033950261771678925, -0.020875707268714905, 0.019927114248275757, 0.035926610231399536, 0.009078343398869038, -0.05074160546064377, 0.008818220347166061, -0.01023869588971138, -0.01731785759329796, -0.036442164331674576, -0.04312974587082863, -0.009667632170021534, 0.05298415943980217, 0.03193206340074539, 0.025649409741163254, -0.031381551176309586, 0.02999705821275711, -0.028790760785341263, 0.033448878675699234, 0.0061376565136015415, -0.005448381882160902, -0.007474950514733791, -0.05199151486158371, -0.012132402509450912, 0.034204259514808655, 0.033896636217832565, 0.03600741922855377, -0.04871731624007225, 0.058144375681877136, 0.061452608555555344, -0.004195577930659056, -0.05966177210211754, -0.020840346813201904, -0.025946181267499924, -0.03942812234163284, -0.04199151322245598, 0.01591418869793415, -0.023051884025335312, -0.06621309369802475, -0.019746949896216393, -0.05987405404448509, 0.022684138268232346, 0.05012274533510208, -0.03488142043352127, -0.022011537104845047, -0.017729107290506363, 0.04618712514638901, -0.033679161220788956, -0.04001175984740257, -0.03253648802638054, 0.0648810938000679, 0.010133601725101471, -0.03048214502632618, -0.023434191942214966, -0.02253095991909504, -0.01457043644040823, -0.033018022775650024, 0.038205813616514206, 0.011277696117758751, -0.006386240478605032, 0.04123494029045105, 0.05699911713600159, -0.021386465057730675, 0.02947378344833851, -0.00099299440626055, -0.025615140795707703, -0.027010871097445488, 0.01437537930905819, -0.03397161141037941, 0.04578002169728279, -0.048392895609140396, -0.04892484471201897, -0.03178221359848976, -0.022888196632266045, 0.0017671266105026007, -0.002498274901881814, 0.05659943446516991, -0.010768800973892212, -0.017868973314762115, -0.014061687514185905, -0.04904519394040108, 0.0069731795229017735, -0.03483046591281891, 0.026942752301692963, 0.03612532094120979, 0.023376043885946274, -0.03149286285042763, -0.04219592735171318, -0.04105276241898537, 0.04215417057275772, -0.009230236522853374, 0.018649281933903694, 0.0479084737598896, -0.0227041058242321, -0.01939510554075241, 0.01899676024913788, -0.03213908150792122, -0.024753902107477188, -0.023098280653357506, 0.011884351260960102, 0.02749639004468918, 0.02203178219497204, 0.01722075045108795, 0.047985758632421494, 0.03967298939824104, -0.007153017912060022, 0.016343962401151657, -0.006023453548550606, -0.02147611416876316, -0.01641281507909298, -0.044176552444696426, -0.02288011647760868, -0.020692238584160805, -0.03104683756828308, -0.031383246183395386, -0.04766382277011871, 0.003503289306536317, 0.026980625465512276, 0.05037697032094002, -0.05185655504465103, 0.04256725311279297, 0.0334542915225029, -0.012966683134436607, 0.015548926778137684, -0.03581433743238449, -0.019645193591713905, -0.01898912899196148, 0.021133432164788246, -0.035436585545539856, 0.019344620406627655, -0.023747418075799942, 0.00195789965800941, -0.04132469370961189, 0.02791735716164112, -0.0010364027693867683, -0.01773720234632492, 0.026049207895994186, -0.009895794093608856, 0.03756847232580185, -0.059150464832782745, -0.04102392494678497, 0.013989738188683987, -0.02250680886209011, 0.010245769284665585, -0.0533575639128685, 0.01294182799756527, -0.02865751087665558, -0.02942807413637638, -0.054100487381219864, -0.01543619018048048, -0.03962239250540733, 0.03985816612839699, -0.03884558007121086, 0.03233646601438522, 0.0318894237279892, 0.01231172401458025, 0.0026936782523989677, -0.06244589760899544, -0.036145083606243134, -0.010916568338871002, 0.01699504256248474, -0.019509993493556976, -0.02315325289964676, 0.013565151020884514, 0.055860668420791626, 0.06198074296116829, -0.025109918788075447, 0.06541083008050919, -0.02515120431780815, 0.03133813664317131, -0.06018310785293579, 0.019454646855592728, 0.017095303162932396, -0.03624347224831581, -0.004697475582361221, -0.03200698643922806, -0.04372557997703552, 0.034418731927871704, -0.0234319306910038, -0.02423599548637867, 0.011852256953716278, 0.01914963871240616, 0.001011299784295261, -0.00022285623708739877, -0.021172374486923218, 0.03559175506234169, 0.025872109457850456, -0.003789915470406413, -0.0054677799344062805, 0.0021376959048211575, 0.013349461369216442, 0.0013487424002960324, -0.01150850672274828, 0.00763621786609292, 0.02275010198354721, -0.022604413330554962, 0.06707531213760376, 0.01796068623661995, -0.009869953617453575, -0.06384202837944031, -0.0012255217880010605, -0.026510639116168022, 0.010348884388804436, 0.040971867740154266, -0.011947045102715492, 0.02885584533214569, -0.03679749369621277, -0.025803521275520325, -0.04271320998668671, -0.020250504836440086, -0.042596351355314255, 0.010360700078308582, -0.029237577691674232, 0.026279527693986893, -0.0333806611597538, 0.03068752959370613, 0.009941295720636845, -0.05414701625704765, 0.029773002490401268, -0.0421329066157341, -0.007204929832369089, -0.03907979279756546, 0.01286621205508709, 0.01709138974547386, 0.040786854922771454, 0.028591860085725784, 0.030510596930980682, -0.025976411998271942, 0.01816749945282936, 0.04685559496283531, 0.018668724223971367, 0.00036327820271253586, -0.035657238215208054, -0.0349179171025753, -0.012798231095075607, -0.0219953041523695, -0.05985487625002861, -0.003736356971785426, -0.01377832144498825, 0.03564545512199402, 0.014979351311922073, -0.030453277751803398, 0.013601167127490044, 0.02030562236905098, 0.048900630325078964, -0.016893936321139336, -0.022798150777816772, 0.0069866785779595375, 0.022983014583587646, 0.008472373709082603, -0.04020964726805687, -0.026616347953677177, 0.008266858756542206, -0.008834855630993843, -0.0022410419769585133, -0.002022738568484783, 0.02995617501437664, -0.026777323335409164, -0.03492509573698044, 0.013297587633132935, -0.044967811554670334, -0.014708561822772026, 0.01638755574822426, -0.011156574822962284, 0.029426109045743942, -0.008907896466553211, -0.03566150367259979, 0.02120908908545971, 0.023368772119283676, 0.0062236059457063675, -0.015765998512506485, -0.0009919777512550354, 0.029967816546559334, 0.022443493828177452, -0.004102623090147972, -0.02345634251832962, 0.011239948682487011, -0.016533121466636658, 0.05570512264966965, -0.01472586952149868, -0.023736679926514626, -0.01014378946274519, -0.02242455631494522, 0.007439885288476944, -0.050820548087358475, 0.01942319981753826, 0.021200498566031456, 0.015171702951192856, -0.013910386711359024, 0.004315561149269342, -0.004248043522238731, -0.03398817405104637, 0.011426505632698536, -0.03330310061573982, 0.0004319232248235494, -0.04122410714626312, 0.0538618266582489, -0.024987323209643364, 0.031327616423368454, -0.03548893332481384, 0.04548430070281029, -0.024724513292312622, 0.04585164412856102, 0.036973897367715836, -0.017718033865094185, 0.012332984246313572, -0.021518588066101074, 0.095649354159832, -0.037253208458423615, 0.023295894265174866, -0.030283866450190544, -0.02865234762430191, -0.05020039156079292, -0.05874237045645714, -0.030774598941206932, 0.021260177716612816, -0.043869685381650925, -0.04259518161416054, 0.004324574954807758, -0.02269619144499302, -0.012906469404697418, -0.01969132199883461, -0.036221109330654144, 0.03326469659805298, 0.024400176480412483, 0.008553731255233288, 0.012942079454660416, -0.00035052941530011594, 0.014260172843933105, -0.011236203834414482, -0.022718366235494614, 0.020148327574133873, -0.011534187011420727, 0.011191903613507748, -0.015834666788578033, -0.04756885766983032, 0.034319765865802765, 0.025067081674933434, -0.014401848427951336, -0.019284462556242943, 0.0020997137762606144, 0.03493019938468933, -0.04212891682982445, 0.028350595384836197, 0.016897931694984436, 0.03695550933480263, 0.03158620372414589, 0.02099749445915222, 0.03853508085012436, 0.03659674525260925, -0.0205826573073864, 0.007803248707205057, 0.013432370498776436, 0.03179183229804039, 0.028135942295193672, 0.02292611077427864, 0.01551111415028572, 0.024445772171020508, -0.032156843692064285, 0.0373876690864563, -0.02231718599796295, 0.028720680624246597, -0.03980066254734993, 0.04367588460445404, 0.03635234013199806, -0.05087778717279434, -0.007753531914204359, 0.027839420363307, -0.029695408418774605, 0.016798561438918114, 0.010046812705695629, -0.019390542060136795, 0.03448142856359482, -0.025212321430444717, -0.04837900027632713, 0.006282150279730558, -0.024391725659370422, 0.02982492186129093, -0.04502410069108009, 0.023494739085435867, 0.033655621111392975, -0.01156108919531107, 0.0030127265490591526, 0.04232468828558922, 0.05815703794360161, 0.04381013661623001, 0.03959716483950615, 0.004714375361800194, -0.004788051825016737, 0.02271854132413864, 0.021665893495082855, 0.023793816566467285, -0.02748478390276432, -0.022468961775302887, -0.017704900354146957, 0.027327608317136765, -0.029138736426830292, 0.05333259701728821, -0.024853598326444626, 0.0018590958788990974, 0.04342428594827652, 0.02322746440768242, 0.013941129669547081, 0.038764383643865585, -0.038011353462934494, -0.019702676683664322, 0.00842189323157072, -0.03472618758678436, -0.0015764766139909625, 0.03994413837790489, 0.018061403185129166, -0.03711117431521416, -0.04556513950228691, 0.007100711110979319]
Query Results:
{'data': None,
 'distances': [[0.18700510263442993, 0.18982568383216858, 0.19173364341259003]],
 'documents': [['Create and manage jobs Submitting a job\u200b To submit your '
                'job to Anyscale, use the Python SDK or CLI and pass in any '
                'additional options or configurations for the job. By default, '
                'Anyscale uses your workspace or cloud to provision a cluster '
                'to run your job. You can define a custom cluster through a '
                'compute config or specify an existing cluster. Once '
                'submitted, Anyscale runs the job as specified in the '
                'entrypoint command, which is typically a Ray Job. If the run '
                "doesn't succeed, the job restarts using the same entrypoint "
                'up to the number of max_retries. CLI Python SDK anyscale job '
                'submit --name=my-job \\\n'
                '  --working-dir=. --max-retries=5 \\\n'
                '  --image-uri="anyscale/image/IMAGE_NAME:VERSION" \\\n'
                '  --compute-config=COMPUTE_CONFIG_NAME \\\n'
                '  -- python main.py With the CLI, you can either specify an '
                'existing compute config with '
                '--compute-config=COMPUTE_CONFIG_NAME or define a new one in a '
                'job YAML. For more information on submitting jobs with the '
                'CLI, see the reference docs. import anyscale\n'
                'from anyscale.job.models import JobConfig\n'
                '\n'
                'config = JobConfig(\n'
                '  name="my-job",\n'
                '  entrypoint="python main.py",\n'
                '  working_dir=".",\n'
                '  max_retries=5,\n'
                '  image_uri="anyscale/image/IMAGE_NAME:VERSION",\n'
                '  compute_config="COMPUTE_CONFIG_NAME"\n'
                ')',
                '2/12/25, 9:48 AM Create and manage jobs | Anyscale Docs '
                'Create and manage jobs Submitting a job To submit your job to '
                'Anyscale, use the Python SDK or CLI and pass in any '
                'additional options or configurations for the job. By default, '
                'Anyscale uses your workspace or cloud to provision a cluster '
                'to run your job. You can define a custom cluster through a '
                'compute config or specify an existing cluster. Once '
                'submitted, Anyscale runs the job as specified in the '
                'entrypoint command, which is typically a Ray Job. If the run '
                "doesn't succeed, the job restarts using the same entrypoint "
                'up to the number of max_retries . CLI Python SDK anyscale job '
                'submit --name=my-job \\ --working-dir=. --max-retries=5 \\ '
                '--image-uri="anyscale/image/IMAGE_NAME:VERSION" \\ '
                '--compute-config=COMPUTE_CONFIG_NAME \\ -- python main.py '
                'With the CLI, you can either specify an existing compute '
                'config with --compute- config=COMPUTE_CONFIG_NAME or define a '
                'new one in a job YAML. For more information on submitting '
                'jobs with the CLI, see the reference docs. TIP For '
                'large-scale, compute-intensive jobs, avoid scheduling Ray '
                'tasks onto the head node because it manages cluster-level '
                'orchestration. To do that, set the CPU resource on the head '
                'node to 0 in your compute config. Ask AI '
                'https://docs.anyscale.com/platform/jobs/manage-jobs 1/5',
                '2/12/25, 9:48 AM Jobs | Anyscale Docs Jobs Run discrete '
                'workloads in production such as batch inference, bulk '
                'embeddings generation, or model fine-tuning. Anyscale Jobs '
                'allow you to submit applications developed on workspaces to a '
                'standalone Ray cluster for execution. Built for production '
                'and designed to fit into your CI/CD pipeline, jobs ensure '
                'scalable and reliable performance. How does it work? # When '
                'you’re ready to promote an app to production, submit a job '
                'from the workspace using anyscale job submit . Anyscale Jobs '
                'have the following features: Scalability: Rapid scaling to '
                'thousands of cloud instances, adjusting computing resources '
                'to match application demand. Fault tolerance: Retries for '
                'failures and automatic rescheduling to an alternative cluster '
                'for unexpected failures like running out of memory. '
                'Monitoring and observability: Persistent dashboards that '
                'allow you to observe tasks in real time and email alerts upon '
                'successf ul job completion. Get started 1. Sign in or sign up '
                'for an account. 2. Select the Intro to Jobs example. 3. '
                'Select Launch. This example runs in a Workspace. See '
                'Workspaces for background information. 4. Follow the notebook '
                'or view it in the docs. 5. Terminate the Workspace when '
                "you're done. Ask AI https://docs.anyscale.com/platform/jobs/ "
                '1/2 2/12/25, 9:48 AM Jobs | Anyscale Docs '
                'https://docs.anyscale.com/platform/jobs/ 2/2']],
 'embeddings': None,
 'ids': [['d313cd7a-2835-49e4-80de-666a3e2f98df',
          '6f1ad3db-92cc-4582-b800-3ed44b5b99f7',
          '5cbd13dd-45af-4dd4-a8e4-2bd1ef12ec33']],
 'included': [<IncludeEnum.distances: 'distances'>,
              <IncludeEnum.documents: 'documents'>,
              <IncludeEnum.metadatas: 'metadatas'>],
 'metadatas': [[{'chunk_id': 'd313cd7a-2835-49e4-80de-666a3e2f98df',
                 'doc_id': 'b62b2ee6-f4f8-4d1c-a63f-4dc7415f9f69',
                 'page_number': 1,
                 'source': 'anyscale-rag-application/100-docs/Job_schedules.html'},
                {'chunk_id': '6f1ad3db-92cc-4582-b800-3ed44b5b99f7',
                 'doc_id': '81b7cde5-74f1-4bd6-8397-352b62d22cec',
                 'page_number': 1,
                 'source': 'anyscale-rag-application/100-docs/Create_and_manage_jobs.pdf'},
                {'chunk_id': '5cbd13dd-45af-4dd4-a8e4-2bd1ef12ec33',
                 'doc_id': '618d723d-f9e5-4ec4-ab54-238ebe74c692',
                 'page_number': 1,
                 'source': 'anyscale-rag-application/100-docs/Jobs.txt'}]],
 'uris': None}
重新格式化搜索结果#
之前 Chroma 的查询结果难以阅读。在此,我们改进格式以提高可读性,使结果更加用户友好。
from pprint import pprint
def reformat(chroma_results: dict) -> list:
    """
    Reformat chroma db results to a list of search items containing:
    - chunk_id
    - chunk_index
    - doc_id
    - page_number
    - source
    - text (from documents)
    - distance
    - score

    Parameters:
        chroma_results (dict): The raw results from the Chroma DB query.

    Returns:
        list: A list of dictionaries with the desired keys.
    """
    reformatted = []

    # Get the lists from the results. They are expected to be lists of lists.
    metadatas = chroma_results.get("metadatas", [])
    documents = chroma_results.get("documents", [])
    distances = chroma_results.get("distances", [])

    # Loop over each group (each inner list represents one set of matches)
    chunk_index = 1
    for meta_group, doc_group, distance_group in zip(metadatas, documents, distances):
        # Iterate over each item in the inner lists
        for meta, text, distance in zip(meta_group, doc_group, distance_group):
            item = {
                "chunk_index": chunk_index,
                "chunk_id": meta.get("chunk_id"),
                "doc_id": meta.get("doc_id"),
                "page_number": meta.get("page_number"),
                "source": meta.get("source"),
                "text": text,
                "distance": distance,
                "score": 1 - distance
            }
            reformatted.append(item)
            chunk_index += 1

    return reformatted


print("refromat Results:")
pprint(reformat(results))
refromat Results:
[{'chunk_id': 'd313cd7a-2835-49e4-80de-666a3e2f98df',
  'chunk_index': 1,
  'distance': 0.18700510263442993,
  'doc_id': 'b62b2ee6-f4f8-4d1c-a63f-4dc7415f9f69',
  'page_number': 1,
  'score': 0.8129948973655701,
  'source': 'anyscale-rag-application/100-docs/Job_schedules.html',
  'text': 'Create and manage jobs Submitting a job\u200b To submit your job to '
          'Anyscale, use the Python SDK or CLI and pass in any additional '
          'options or configurations for the job. By default, Anyscale uses '
          'your workspace or cloud to provision a cluster to run your job. You '
          'can define a custom cluster through a compute config or specify an '
          'existing cluster. Once submitted, Anyscale runs the job as '
          'specified in the entrypoint command, which is typically a Ray Job. '
          "If the run doesn't succeed, the job restarts using the same "
          'entrypoint up to the number of max_retries. CLI Python SDK anyscale '
          'job submit --name=my-job \\\n'
          '  --working-dir=. --max-retries=5 \\\n'
          '  --image-uri="anyscale/image/IMAGE_NAME:VERSION" \\\n'
          '  --compute-config=COMPUTE_CONFIG_NAME \\\n'
          '  -- python main.py With the CLI, you can either specify an '
          'existing compute config with --compute-config=COMPUTE_CONFIG_NAME '
          'or define a new one in a job YAML. For more information on '
          'submitting jobs with the CLI, see the reference docs. import '
          'anyscale\n'
          'from anyscale.job.models import JobConfig\n'
          '\n'
          'config = JobConfig(\n'
          '  name="my-job",\n'
          '  entrypoint="python main.py",\n'
          '  working_dir=".",\n'
          '  max_retries=5,\n'
          '  image_uri="anyscale/image/IMAGE_NAME:VERSION",\n'
          '  compute_config="COMPUTE_CONFIG_NAME"\n'
          ')'},
 {'chunk_id': '6f1ad3db-92cc-4582-b800-3ed44b5b99f7',
  'chunk_index': 2,
  'distance': 0.18982568383216858,
  'doc_id': '81b7cde5-74f1-4bd6-8397-352b62d22cec',
  'page_number': 1,
  'score': 0.8101743161678314,
  'source': 'anyscale-rag-application/100-docs/Create_and_manage_jobs.pdf',
  'text': '2/12/25, 9:48 AM Create and manage jobs | Anyscale Docs Create and '
          'manage jobs Submitting a job To submit your job to Anyscale, use '
          'the Python SDK or CLI and pass in any additional options or '
          'configurations for the job. By default, Anyscale uses your '
          'workspace or cloud to provision a cluster to run your job. You can '
          'define a custom cluster through a compute config or specify an '
          'existing cluster. Once submitted, Anyscale runs the job as '
          'specified in the entrypoint command, which is typically a Ray Job. '
          "If the run doesn't succeed, the job restarts using the same "
          'entrypoint up to the number of max_retries . CLI Python SDK '
          'anyscale job submit --name=my-job \\ --working-dir=. '
          '--max-retries=5 \\ --image-uri="anyscale/image/IMAGE_NAME:VERSION" '
          '\\ --compute-config=COMPUTE_CONFIG_NAME \\ -- python main.py With '
          'the CLI, you can either specify an existing compute config with '
          '--compute- config=COMPUTE_CONFIG_NAME or define a new one in a job '
          'YAML. For more information on submitting jobs with the CLI, see the '
          'reference docs. TIP For large-scale, compute-intensive jobs, avoid '
          'scheduling Ray tasks onto the head node because it manages '
          'cluster-level orchestration. To do that, set the CPU resource on '
          'the head node to 0 in your compute config. Ask AI '
          'https://docs.anyscale.com/platform/jobs/manage-jobs 1/5'},
 {'chunk_id': '5cbd13dd-45af-4dd4-a8e4-2bd1ef12ec33',
  'chunk_index': 3,
  'distance': 0.19173364341259003,
  'doc_id': '618d723d-f9e5-4ec4-ab54-238ebe74c692',
  'page_number': 1,
  'score': 0.80826635658741,
  'source': 'anyscale-rag-application/100-docs/Jobs.txt',
  'text': '2/12/25, 9:48 AM Jobs | Anyscale Docs Jobs Run discrete workloads '
          'in production such as batch inference, bulk embeddings generation, '
          'or model fine-tuning. Anyscale Jobs allow you to submit '
          'applications developed on workspaces to a standalone Ray cluster '
          'for execution. Built for production and designed to fit into your '
          'CI/CD pipeline, jobs ensure scalable and reliable performance. How '
          'does it work? # When you’re ready to promote an app to production, '
          'submit a job from the workspace using anyscale job submit . '
          'Anyscale Jobs have the following features: Scalability: Rapid '
          'scaling to thousands of cloud instances, adjusting computing '
          'resources to match application demand. Fault tolerance: Retries for '
          'failures and automatic rescheduling to an alternative cluster for '
          'unexpected failures like running out of memory. Monitoring and '
          'observability: Persistent dashboards that allow you to observe '
          'tasks in real time and email alerts upon successf ul job '
          'completion. Get started 1. Sign in or sign up for an account. 2. '
          'Select the Intro to Jobs example. 3. Select Launch. This example '
          'runs in a Workspace. See Workspaces for background information. 4. '
          'Follow the notebook or view it in the docs. 5. Terminate the '
          "Workspace when you're done. Ask AI "
          'https://docs.anyscale.com/platform/jobs/ 1/2 2/12/25, 9:48 AM Jobs '
          '| Anyscale Docs https://docs.anyscale.com/platform/jobs/ 2/2'}]
(autoscaler +16m48s) Tip: use `ray status` to view detailed cluster status. To disable these messages, set RAY_SCHEDULER_EVENTS=0.
(autoscaler +16m48s) [autoscaler] [4xA10G:48CPU-192GB] Attempting to add 1 node(s) to the cluster (increasing from 0 to 1).
(autoscaler +16m53s) [autoscaler] [4xA10G:48CPU-192GB] Launched 1 instances.
(autoscaler +17m53s) [autoscaler] Cluster upscaled to {60 CPU, 5 GPU}.
(autoscaler +21m33s) [autoscaler] Downscaling node i-0cb70f496c5966174 (node IP: 10.0.53.5) due to node idle termination.
(autoscaler +21m33s) [autoscaler] Cluster resized to {12 CPU, 1 GPU}.
(autoscaler +21m38s) [autoscaler] Cluster upscaled to {60 CPU, 5 GPU}.
(autoscaler +34m3s) [autoscaler] Downscaling node i-0cb70f496c5966174 (node IP: 10.0.53.5) due to node idle termination.
(autoscaler +34m3s) [autoscaler] Cluster resized to {12 CPU, 1 GPU}.
(autoscaler +37m8s) [autoscaler] [4xA10G:48CPU-192GB] Attempting to add 1 node(s) to the cluster (increasing from 0 to 1).
(autoscaler +37m13s) [autoscaler] [4xA10G:48CPU-192GB] Launched 1 instances.
(autoscaler +38m8s) [autoscaler] Cluster upscaled to {60 CPU, 5 GPU}.
(autoscaler +52m28s) [autoscaler] Downscaling node i-0fa50a0e4f892e7be (node IP: 10.0.10.57) due to node idle termination.
(autoscaler +52m28s) [autoscaler] Cluster resized to {12 CPU, 1 GPU}.
(autoscaler +55m28s) [autoscaler] Downscaling node i-027d8d6d4c4471230 (node IP: 10.0.37.194) due to node idle termination.
(autoscaler +55m28s) [autoscaler] Cluster resized to {8 CPU, 0 GPU}.
观察结果#
通过向量搜索检索到的文本块与用户的查询“如何提交 Anyscale 作业?”非常吻合。此外,前三个块显示出相对较高的相似度得分。考虑到我们已经摄取了 100 个文档——超过 6000 页——其中大部分内容无关紧要,这一点令人印象深刻。尽管内容量很大,系统仍然成功检索到了相关信息。
总结#
使用 Ray Data,您可以并行摄取和处理大量文档。本教程演示了如何
从 S3 检索文档
使用 Ray 提取和分区文本
将文本转换为嵌入并存储在向量数据库中
对文档数据执行快速相似性搜索
这个可扩展的流程非常适合管理非结构化数据并实现快速、准确的文档检索。