使用 Ray Serve 以 Streamable HTTP 模式部署自定义 MCP#
本教程将引导您使用 Ray Serve 和 FastAPI 以 Streamable HTTP 模式部署天气 MCP 服务器,然后使用简单的 Python 客户端和 MCP Inspector 进行测试。
MCP 支持三种传输方式
stdio:通过 stdin/stdout 使用换行符分隔的 JSON 的本地子进程。零配置,但仅适用于本地客户端。
SSE(旧版,已弃用):HTTP+Server-Sent 事件,现已弃用,取而代之的是统一的 HTTP 传输。
Streamable HTTP:一个单一的 HTTP 端点,处理客户端→服务器 POST 请求和服务器→客户端 GET/SSE 流。
stdio 模式下的 MCP 适用于本地或个人使用,而 Streamable HTTP 则将**远程 MCP 服务器**投入实际应用,用于企业和生产目的。您还可以将 Claude APP 与远程 MCP 服务器集成。
在 Anyscale 上将 MCP 与 Ray Serve 集成到 Streamable HTTP 模式#
以下架构图说明了自定义 MCP 与 Ray Serve 和 Anyscale Service 的集成。
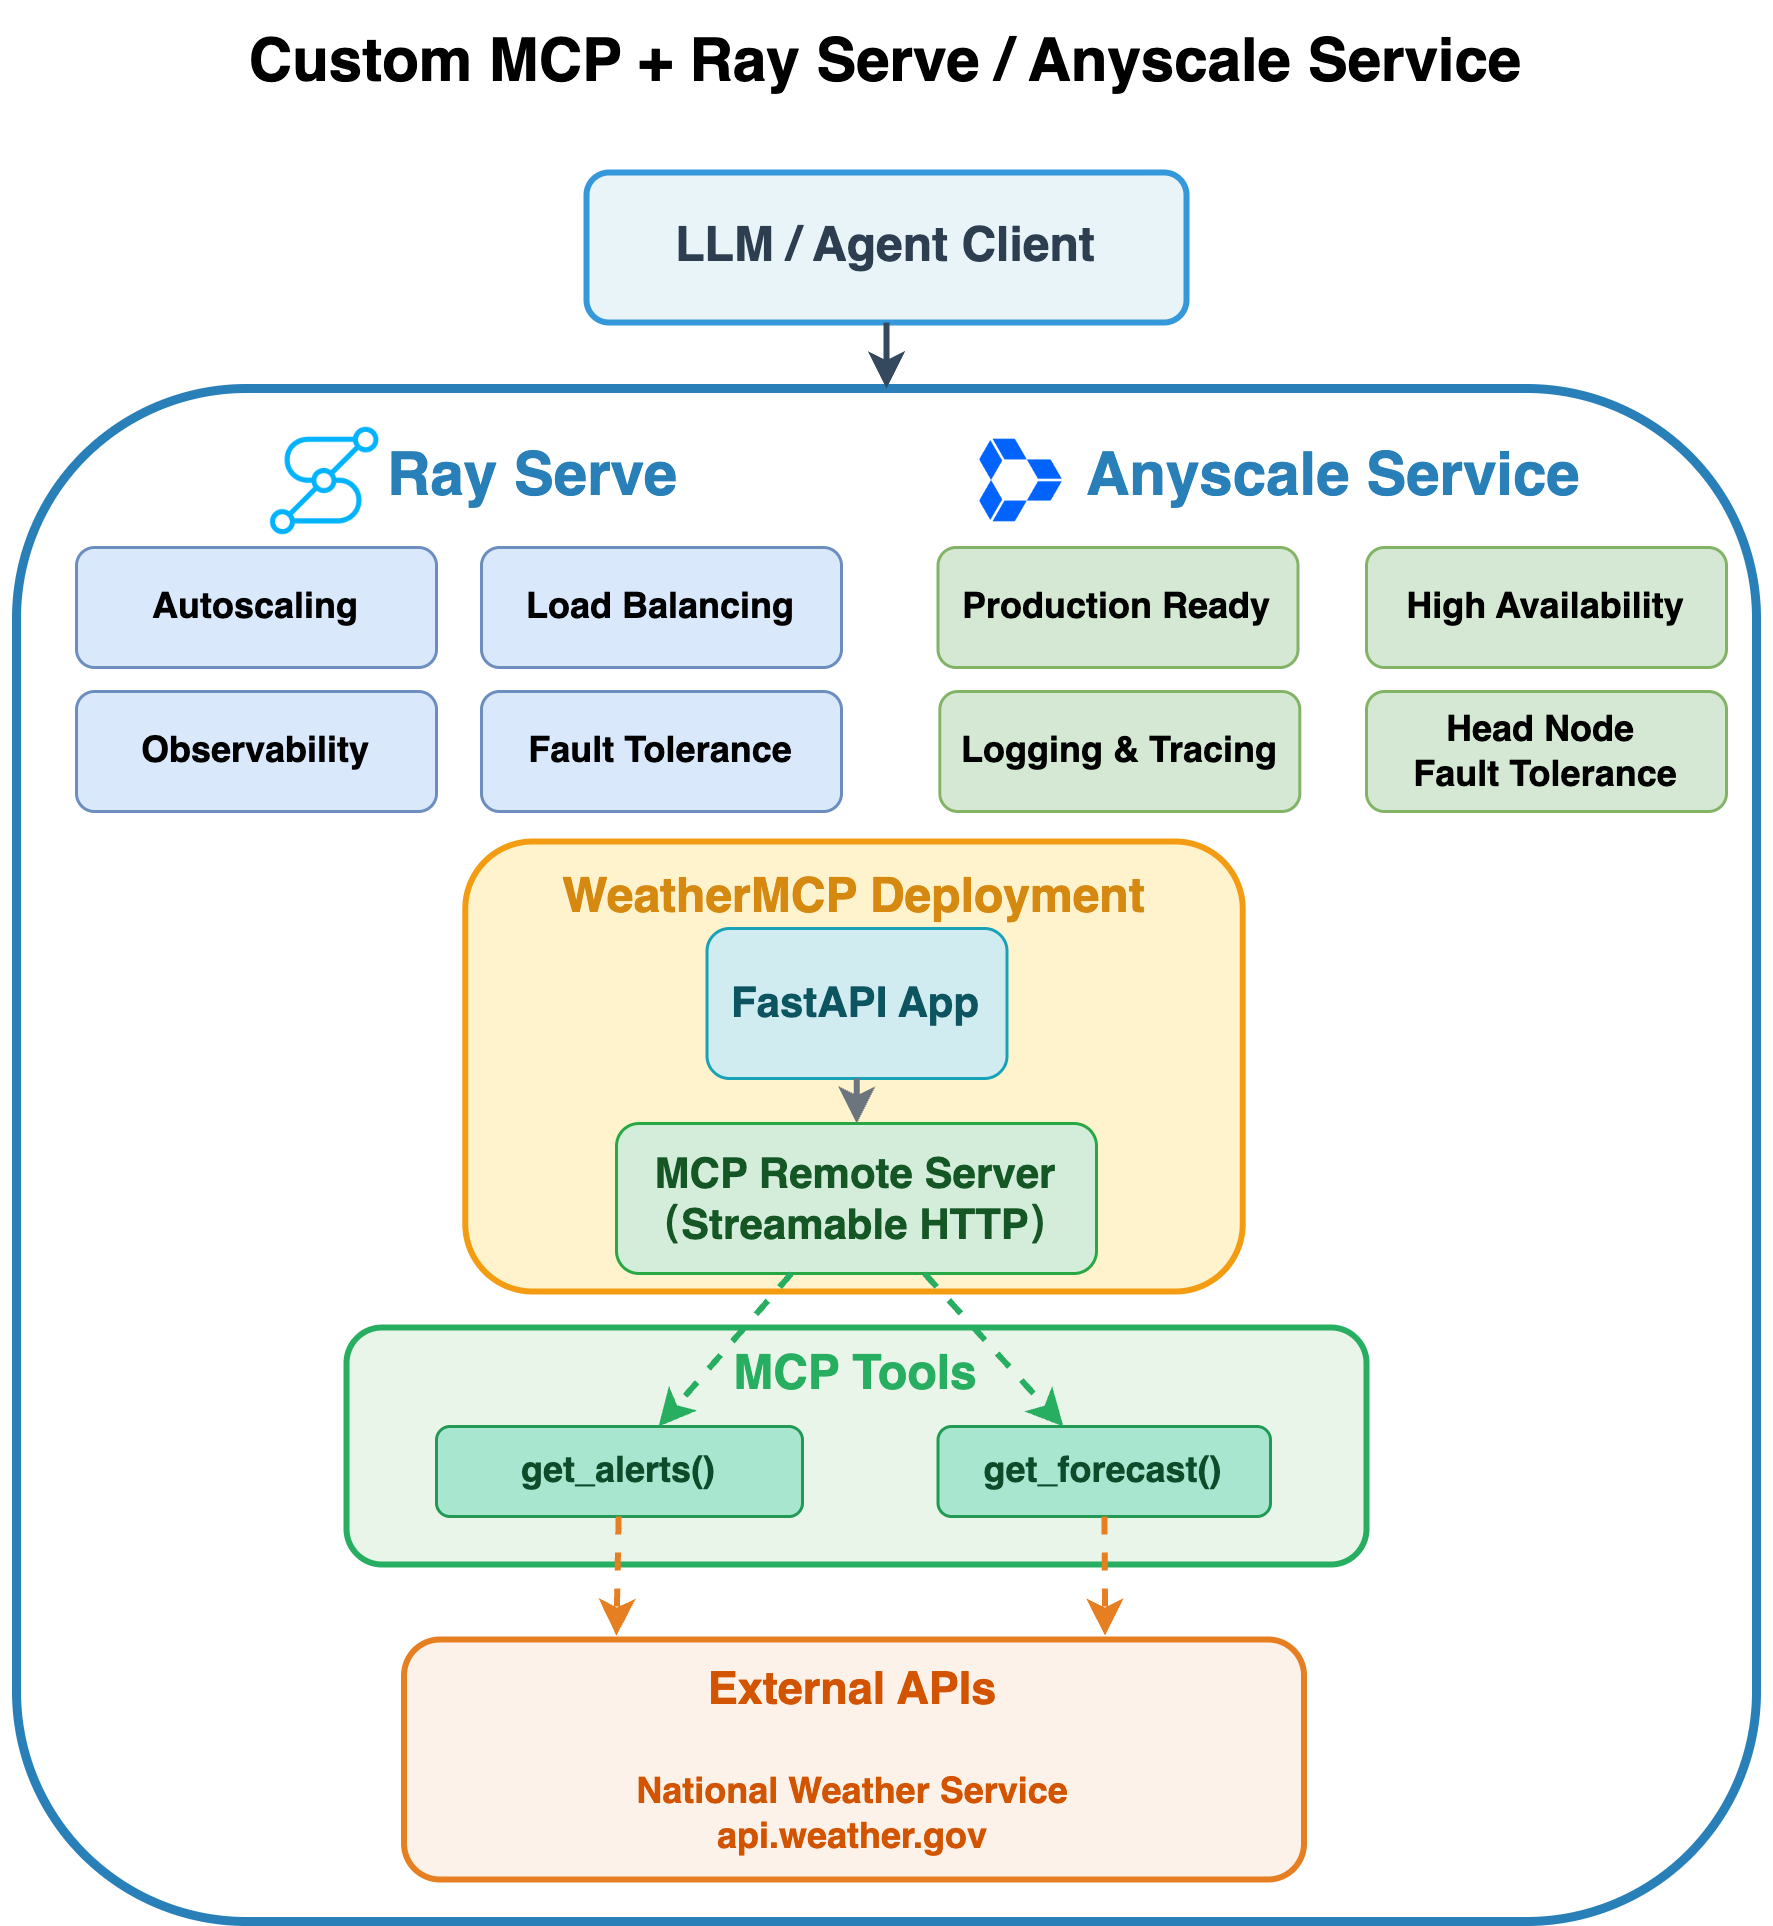
将 MCP 与 Ray Serve 集成到 Anyscale 的 Streamable HTTP 模式可提供全面的可伸缩性和生产级功能,为您的 AI 服务提供两个互补的功能层。
Ray Serve 的功能
自动伸缩:Ray Serve 根据流量需求自动调整副本数量,确保您的服务能够处理增加的负载,同时在高峰使用时段保持响应能力。
负载均衡:Ray Serve 智能地将传入的请求分发到可用副本,防止任何单个实例过载并保持一致的性能。
可观测性:内置的监控功能可提供对服务性能的可见性,包括请求指标、资源利用率和系统运行状况指示器。
容错性:Ray Serve 通过重新启动失败的组件并将请求重新分发到健康的副本,自动检测和恢复故障,确保服务的持续可用性。
组合:通过将多个部署编排到单个管道中来构建复杂服务,使您能够无缝地链接预处理、模型推理、后处理和自定义逻辑。
Anyscale Service 的额外优势
生产就绪:Anyscale 提供企业级的基础设施管理和自动化部署,使您的 MCP 服务能够应对实际生产流量。
高可用性:高级的可用区感知调度机制和零停机滚动更新,以确保您的服务保持高可用性。
主节点容错:通过托管的主节点冗余提供额外的弹性,防止 Ray 集群协调层中出现单点故障。
这种组合确保您的 MCP 服务能够以企业级的可靠性运行,同时优化资源效率和成本效益。
先决条件#
Ray [Serve],已包含在基础 Docker 镜像中
MCP Python 库。
依赖项#
安装所需的 Python 包和 Podman
pip install mcp==1.11.0 asyncio==3.4.3 pydantic==2.9.2
替代方案:用于 Ray Serve 部署的 Docker 镜像
您还可以使用此代码仓库中的 Dockerfile 构建 Docker 镜像以在 Anyscale 上进行部署。
注意:此 Docker 镜像仅用于部署带有 Ray Serve 的 MCP。
1. 创建部署脚本#
此脚本使用 FastAPI、FastMCP 和 Ray Serve 设置一个可伸缩的天气警报和预报服务。
它定义了两个异步工具——get_alerts 和 get_forecast——这些工具从国家气象局检索数据,遵循教程:https://modelcontextprotocol.net.cn/quickstart/server。
使用配置为 Streamable HTTP 模式的 FastAPI 应用程序来公开这些工具,以支持实时双向通信。
默认情况下,这将自动创建一个'/mcp'端点:app.mount("/", mcp.streamable_http_app())。
最后,使用 Ray Serve 部署整个应用程序,实现动态自动伸缩和分布式推理,当您使用serve run启动它时。
重要提示:#
Ray Serve 目前仅支持 MCP 中的**无状态 HTTP 模式**。由于每个副本不共享会话状态,因此启用**stateless_http=True**可以防止在运行多个副本时出现“找不到会话”错误。
mcp = FastMCP("weather", stateless_http=True)
# Save the following code as `weather_mcp_ray.py`.
from typing import Any
import httpx
from fastapi import FastAPI
from mcp.server.fastmcp import FastMCP
import ray
from ray import serve
from contextlib import asynccontextmanager

# Constants.
NWS_API_BASE = "https://api.weather.gov"
USER_AGENT = "weather-app/1.0"

# Helper functions.
async def make_nws_request(url: str) -> dict[str, Any] | None:
    headers = {"User-Agent": USER_AGENT, "Accept": "application/geo+json"}
    async with httpx.AsyncClient(timeout=30.0) as client:
        try:
            resp = await client.get(url, headers=headers)
            resp.raise_for_status()
            return resp.json()
        except Exception:
            return None


def format_alert(feature: dict) -> str:
    props = feature["properties"]
    return (
        f"Event: {props.get('event', 'Unknown')}\n"
        f"Area: {props.get('areaDesc', 'Unknown')}\n"
        f"Severity: {props.get('severity', 'Unknown')}\n"
        f"Description: {props.get('description', 'No description available')}\n"
        f"Instructions: {props.get('instruction', 'No specific instructions provided')}"
    )

# Instantiate FastMCP and register tools via decorators.
mcp = FastMCP("weather", stateless_http=True)

@mcp.tool()
async def get_alerts(state: str) -> str:
    """Fetch active alerts for a given state code (e.g., 'CA')."""
    url = f"{NWS_API_BASE}/alerts/active/area/{state}"
    data = await make_nws_request(url)
    if not data or "features" not in data:
        return "Unable to fetch alerts or no alerts found."
    features = data["features"]
    if not features:
        return "No active alerts for this state."
    return "\n---\n".join(format_alert(f) for f in features)

@mcp.tool()
async def get_forecast(latitude: float, longitude: float) -> str:
    """Fetch a 5-period weather forecast for given lat/lon."""
    points_url = f"{NWS_API_BASE}/points/{latitude},{longitude}"
    points_data = await make_nws_request(points_url)
    if not points_data or "properties" not in points_data:
        return "Unable to fetch forecast data for this location."

    forecast_url = points_data["properties"].get("forecast")
    if not forecast_url:
        return "No forecast URL found for this location."

    forecast_data = await make_nws_request(forecast_url)
    if not forecast_data or "properties" not in forecast_data:
        return "Unable to fetch detailed forecast."

    periods = forecast_data["properties"].get("periods", [])
    if not periods:
        return "No forecast periods available."

    parts: list[str] = []
    for p in periods[:5]:
        parts.append(
            f"{p['name']}:\nTemperature: {p['temperature']}°{p['temperatureUnit']}\n" +
            f"Wind: {p['windSpeed']} {p['windDirection']}\n" +
            f"Forecast: {p['detailedForecast']}"
        )
    return "\n---\n".join(parts)

## FastAPI app and Ray Serve setup.
@asynccontextmanager
async def lifespan(app: FastAPI):
    # 1) Mount the MCP app.
    app.mount("/", mcp.streamable_http_app())

    # 2) Enter the session_manager's context.
    async with mcp.session_manager.run():
        yield

fastapi_app = FastAPI(lifespan=lifespan)

@serve.deployment(
    autoscaling_config={
        "min_replicas": 1,
        "max_replicas": 20,
        "target_ongoing_requests": 5
        },
    ray_actor_options={"num_cpus": 0.2}
)
@serve.ingress(fastapi_app)
class WeatherMCP:
    def __init__(self):
        pass


# Ray Serve entry point.
app = WeatherMCP.bind()
2. 在终端中运行 Ray Serve#
serve run weather_mcp_ray:app
3. 使用 Python 客户端进行测试#
import asyncio
import httpx
from mcp.client.streamable_http import streamablehttp_client
from mcp import ClientSession

BASE_URL = "https://:8000"
STREAM_URL = f"{BASE_URL}/mcp"

async def main() -> None:
    async with streamablehttp_client(STREAM_URL) as (r, w, _):
        async with ClientSession(r, w) as session:
            await session.initialize()

            tools = await session.list_tools()
            print("Available tools:")
            for t in tools.tools:
                print(f"  • {t.name}: {t.description}")
            print()

            alerts = await session.call_tool(
                name="get_alerts", arguments={"state": "CA"}
            )
            print("=== Active Alerts for CA ===")
            print(alerts.content[0].text)
            print()

            forecast = await session.call_tool(
                name="get_forecast",
                arguments={"latitude": 34.05, "longitude": -118.24},
            )
            print("=== 5-Period Forecast for LA ===")
            print(forecast.content[0].text)
            print()


# ──────── How to run in Jupyter Notebook ────────────────────────────
# await main()
# ────────────────────────────────────────────────────────────────────


# ──────── How to run as a standalone Python script ──────────────────
# import asyncio
#
# if __name__ == "__main__":
#     # Create and run the event loop
#     asyncio.run(main())
# ────────────────────────────────────────────────────────────────────
终止 Ray Serve:#
serve shutdown --yes
4. 使用 Anyscale Service 进行生产部署#
对于生产部署,请使用 Anyscale Service 将 Ray Serve 应用程序部署到专用集群,而无需修改代码。Anyscale 可确保可伸缩性、容错性和负载均衡,使服务能够抵抗节点故障、高流量和滚动更新。
使用以下命令部署服务
anyscale service deploy weather_mcp_ray:app --name=weather_mcp_service
5. 查询生产服务#
部署时,您会公开一个公共可访问的 IP 地址,您可以向其发送请求。
在上一单元格的输出中,复制您的 API_KEY 和 BASE_URL。例如,这些值看起来如下:
BASE_URL = “https://multi-mcp-tool-service-jgz99.cld-kvedzwag2qa8i5bj.s.anyscaleuserdata.com”
TOKEN = “z3RIKzZwHDF9sV60o7M48WsOY1Z50dsXDrWRbxHYtPQ”
在以下 Python 请求对象中填写 BASE_URL 和 API_KEY 的占位符值
import asyncio
import httpx
from mcp.client.streamable_http import streamablehttp_client
from mcp import ClientSession

BASE_URL = "https://weather-mcp-service-jgz99.cld-kvedzwag2qa8i5bj.s.anyscaleuserdata.com" # Replace with your own URL
TOKEN = "SonDp89sqyElLcVX1SLcMu1qeVfqyVOpfKjL7D0vjrM" # Replace with your token
STREAM_URL = f"{BASE_URL}/mcp"

# # Common headers for auth.
headers = {
    "Authorization": f"Bearer {TOKEN}"
}

async def main() -> None:

    # Pass the headers into the HTTP client so the server sees a valid JSON-RPC + SSE handshake.
    async with streamablehttp_client(STREAM_URL, headers=headers) as (r, w, _):
        async with ClientSession(r, w) as session:
            # This now sends the JSON-RPC "initialize" under the hood.
            await session.initialize()

            tools = await session.list_tools()
            print("Available tools:")
            for t in tools.tools:
                print(f"  • {t.name}: {t.description}")
            print()

            alerts = await session.call_tool(
                name="get_alerts", arguments={"state": "CA"}
            )
            print("=== Active Alerts for CA ===")
            print(alerts.content[0].text)
            print()

            forecast = await session.call_tool(
                name="get_forecast",
                arguments={"latitude": 34.05, "longitude": -118.24},
            )
            print("=== 5-Period Forecast for LA ===")
            print(forecast.content[0].text)
            print()

# ──────── How to run in Jupyter Notebook ────────────────────────────
# await main()
# ────────────────────────────────────────────────────────────────────


# ──────── How to run as a standalone Python script ──────────────────
# import asyncio
#
# if __name__ == "__main__":
#     # Create and run the event loop
#     asyncio.run(main())
# ────────────────────────────────────────────────────────────────────
6. 使用 MCP Inspector 测试服务#
MCP Inspector 是用于测试和调试 MCP 服务器的开发人员工具:https://github.com/modelcontextprotocol/inspector。
在您的本地计算机上#
安装 Node.js 和 NPM:https://node.org.cn/en/download
启动 MCP Inspector。确保您的 MCP Inspector 版本为 = 0.16.1
npx -y @modelcontextprotocol/inspector@0.16.1
您应该会看到消息:🔍 MCP Inspector is up and running at http://127.0.0.1:6274。
然后打开链接“http://127.0.0.1:6274”并进行以下配置:
Transport Type: Streamable HTTP
URL: https://weather-mcp-service-jgz99.cld-kvedzwag2qa8i5bj.s.anyscaleuserdata.com/mcp
Bearer Token: SonDp89sqyElLcVX1SLcMu1qeVfqyVOpfKjL7D0vjrM
注意:
请在 URL 中包含“/mcp”,否则连接将失败。
MCP Inspector 启动并运行后,您会收到类似以下的消息:“https://:6274/?MCP_PROXY_AUTH_TOKEN=f8c738c6788295b7d71831ac89f64faea2659af8b4f460038b4c6156ee8e72fd” 您还需要在 MCP Inspector 中输入 Proxy Session Token。否则,您将遇到“Proxy Authentication Required”错误。
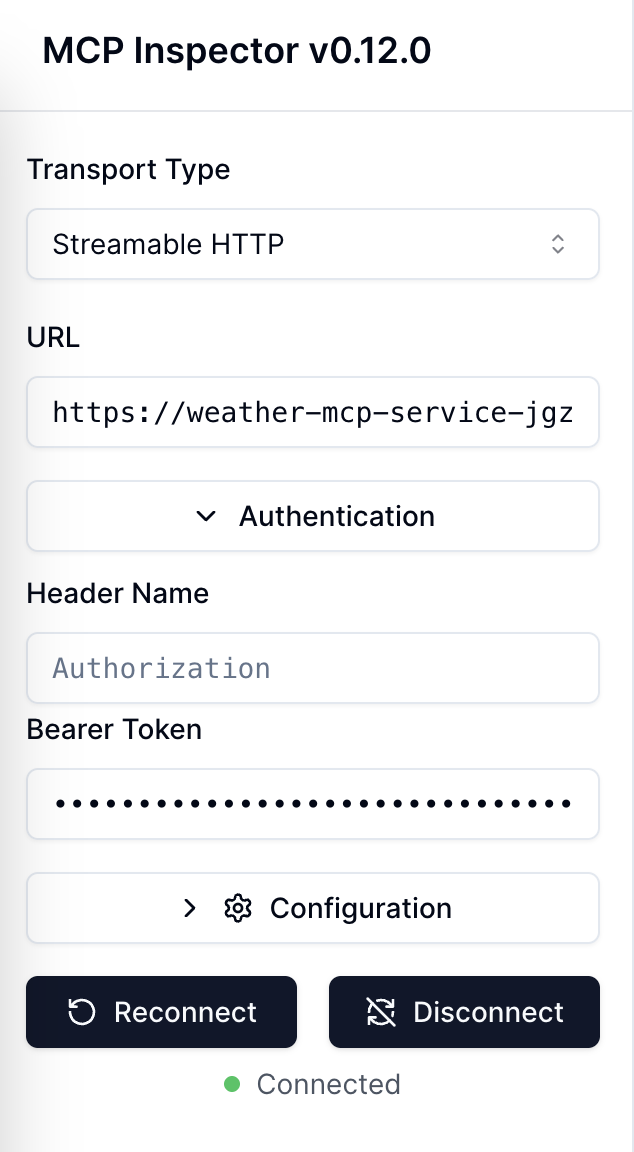
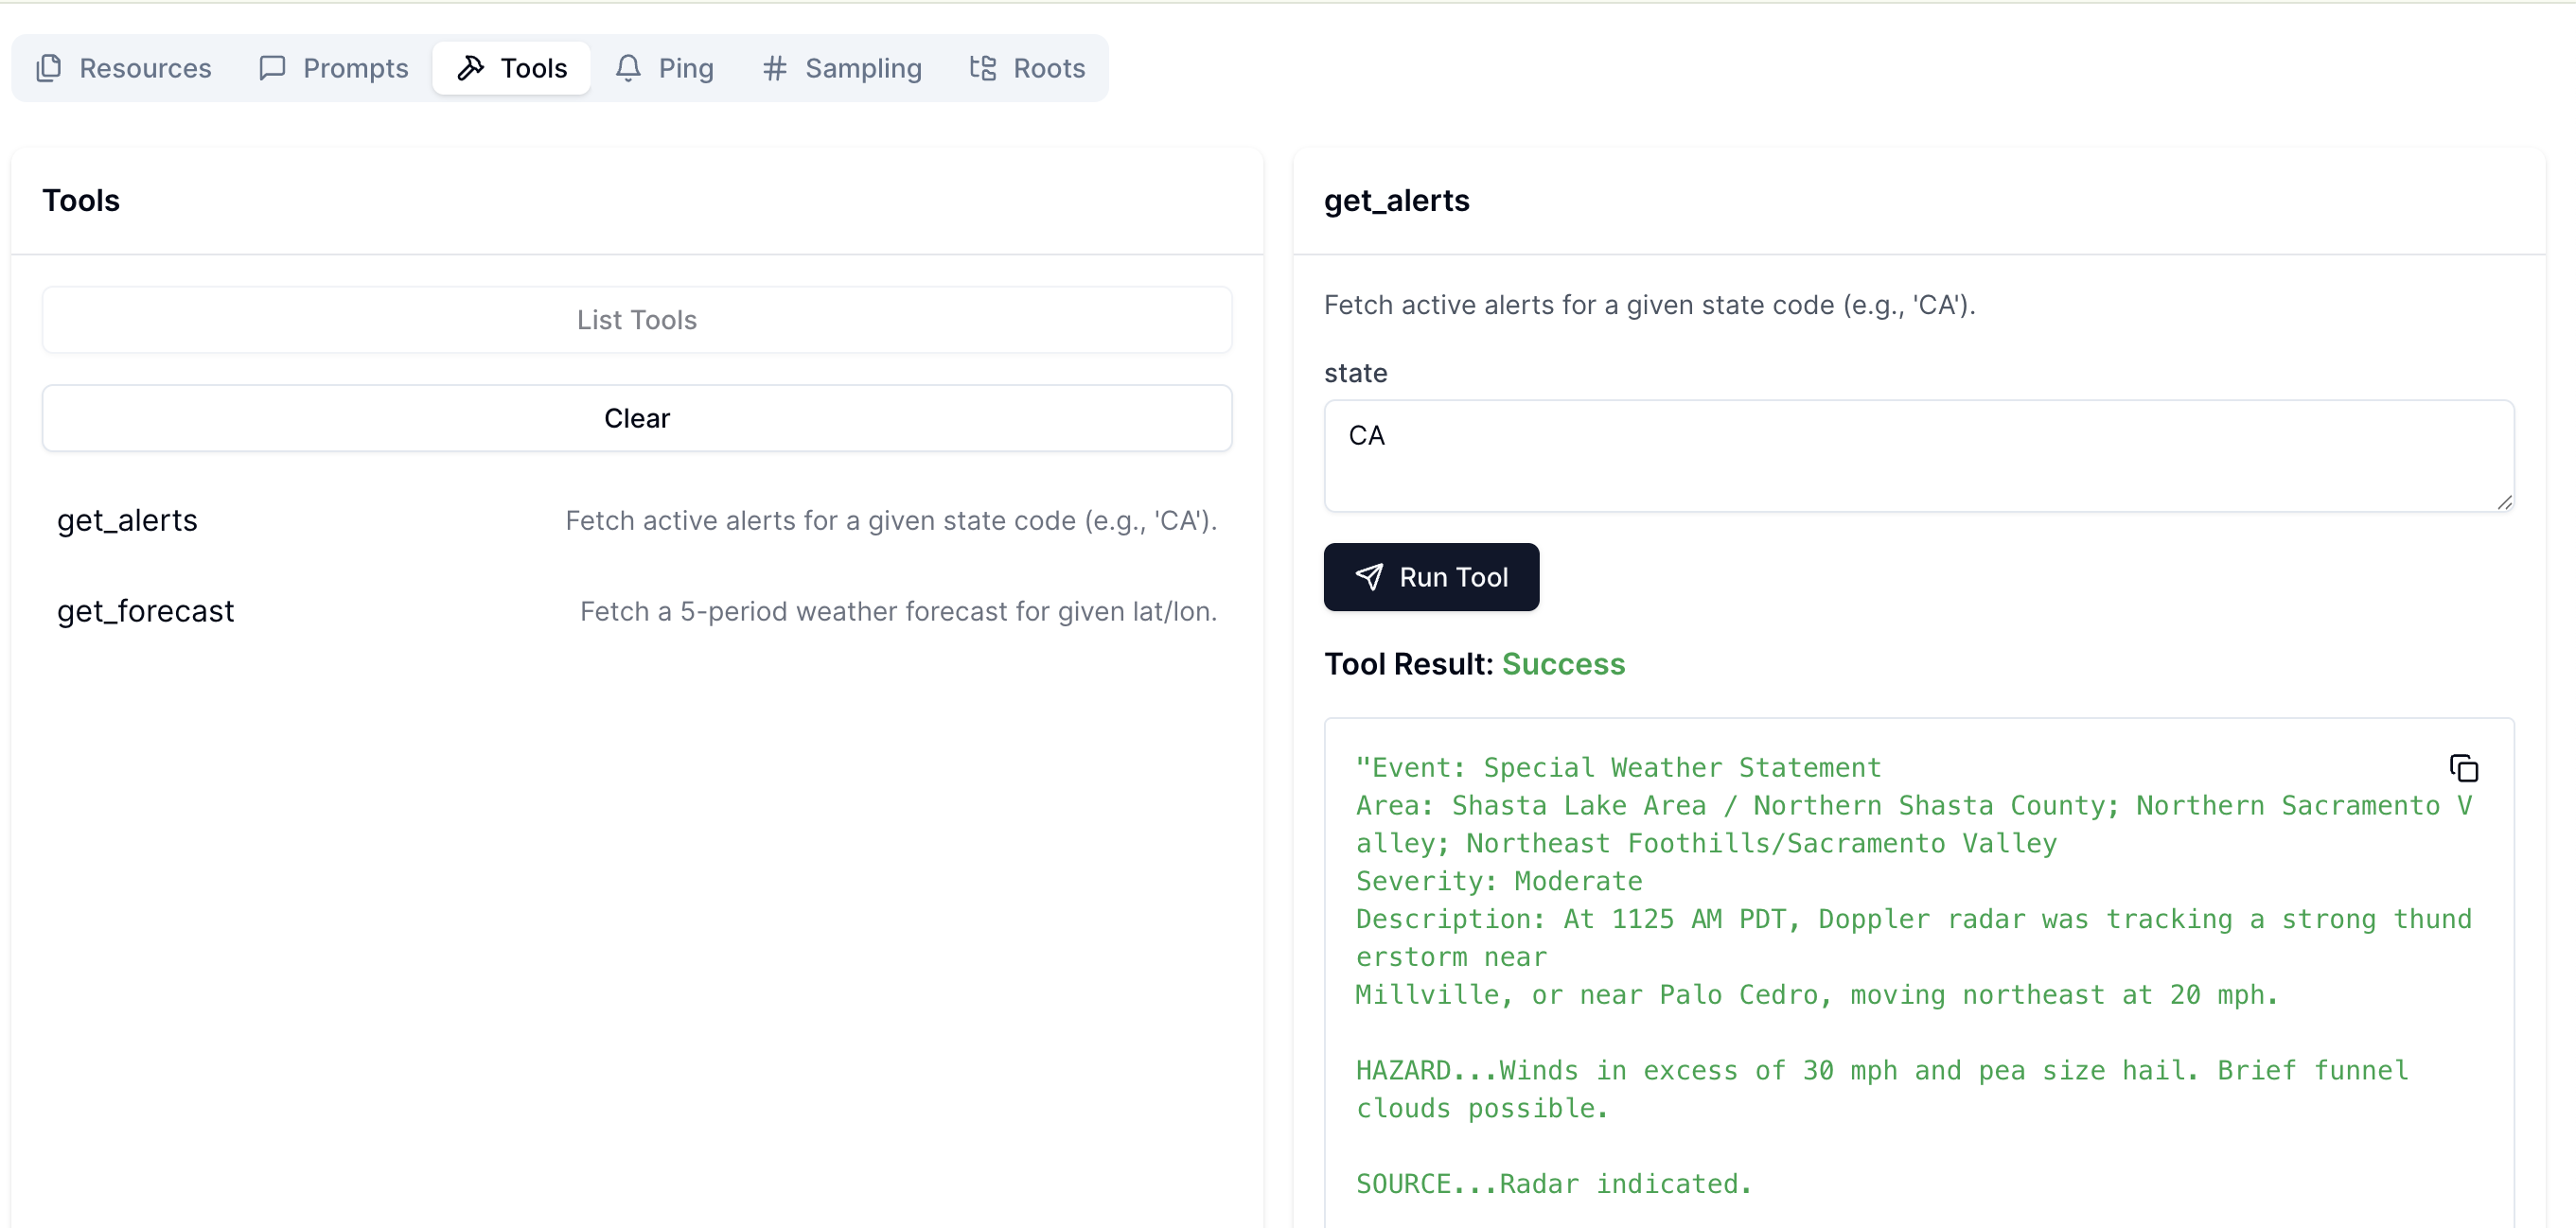
您可以看到它已连接。然后,转到Tools并单击List Tools,以查看可用的两个工具。
之后,您可以选择一个工具并进行测试。单击Run Tool后,您将看到Tool Result。
7. 终止 Anyscale Service#
测试完服务后,您可以使用此命令关闭服务。
anyscale service terminate --name=weather_mcp_service
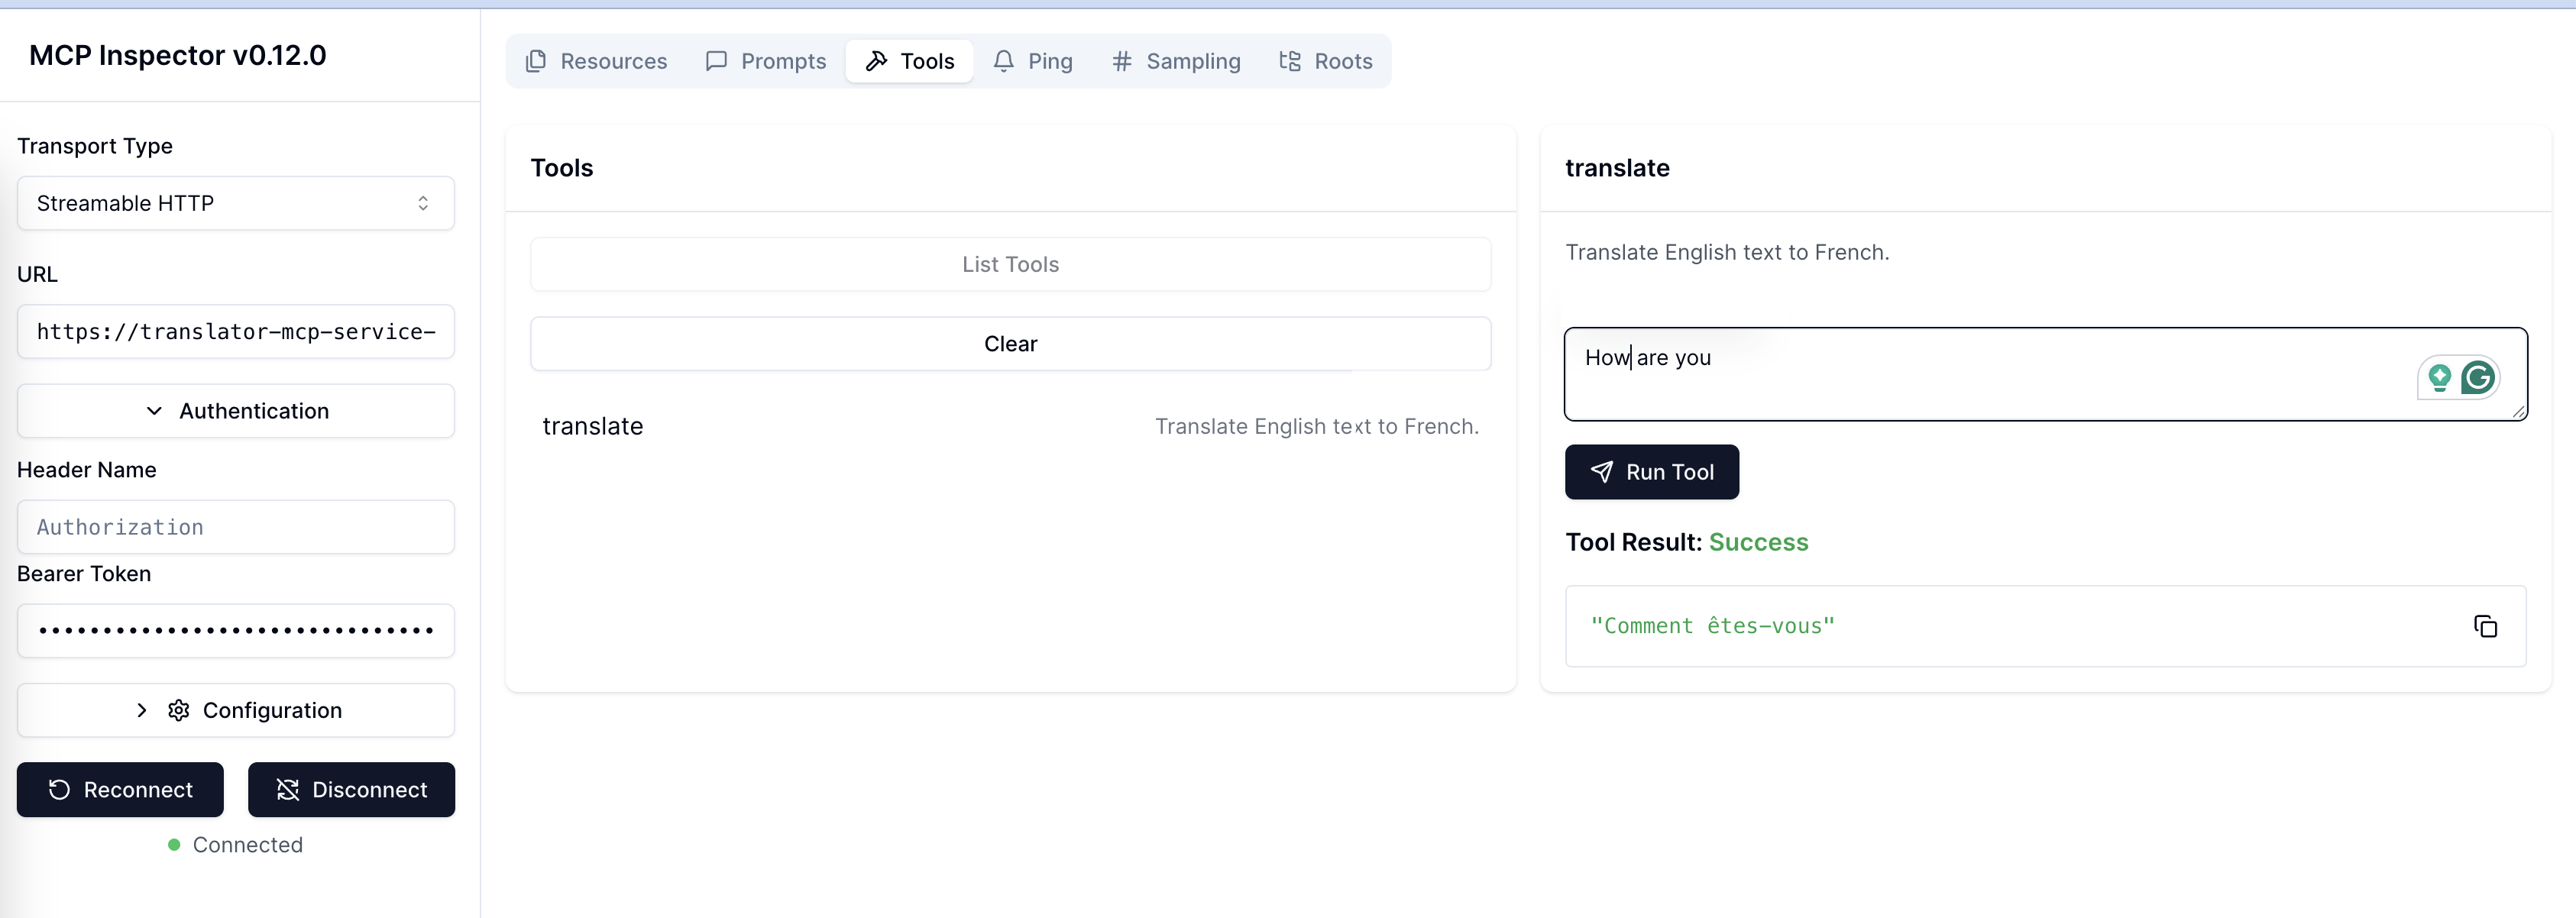
8. 尝试使用 Ray Serve 的 GPU 翻译器 MCP 示例#
运行以下代码,以使用分数 GPU 部署您自己的服务,并通过 MCP Inspector 进行验证。
以下是来自translator_mcp_ray.py的代码。
import asyncio
from fastapi import FastAPI
from mcp.server.fastmcp import FastMCP
from contextlib import asynccontextmanager
from ray import serve
from transformers import pipeline

# ---------------------------------------------------------------------
# 1. FastMCP business logic for translation
# ---------------------------------------------------------------------
mcp = FastMCP("translator", stateless_http=True)

# Pre-load the translation model (English → French).
translator_pipeline = pipeline("translation_en_to_fr", model="t5-small")

@mcp.tool()
async def translate(text: str) -> str:
    """Translate English text to French."""
    loop = asyncio.get_event_loop()
    # Offload the sync pipeline call to a thread to avoid blocking the event loop.
    result = await loop.run_in_executor(None, translator_pipeline, text)
    return result[0]["translation_text"]


## FastAPI app and Ray Serve setup.
@asynccontextmanager
async def lifespan(app: FastAPI):
    # 1) Mount the MCP app.
    app.mount("/", mcp.streamable_http_app())

    # 2) Enter the session_manager's context.
    async with mcp.session_manager.run():
        yield

fastapi_app = FastAPI(lifespan=lifespan)

@serve.deployment(
    autoscaling_config={
        "min_replicas": 2,
        "max_replicas": 20,
        "target_ongoing_requests": 10
    },
    ray_actor_options={"num_gpus": 0.5,
    'runtime_env':{
        "pip": [
            "transformers",
            "torch"
        ]
    }}
)
@serve.ingress(fastapi_app)
class TranslatorMCP:
    def __init__(self):
        pass


# Ray Serve entry point.
app = TranslatorMCP.bind()
如果成功,您将看到类似于下图的Tool Result。