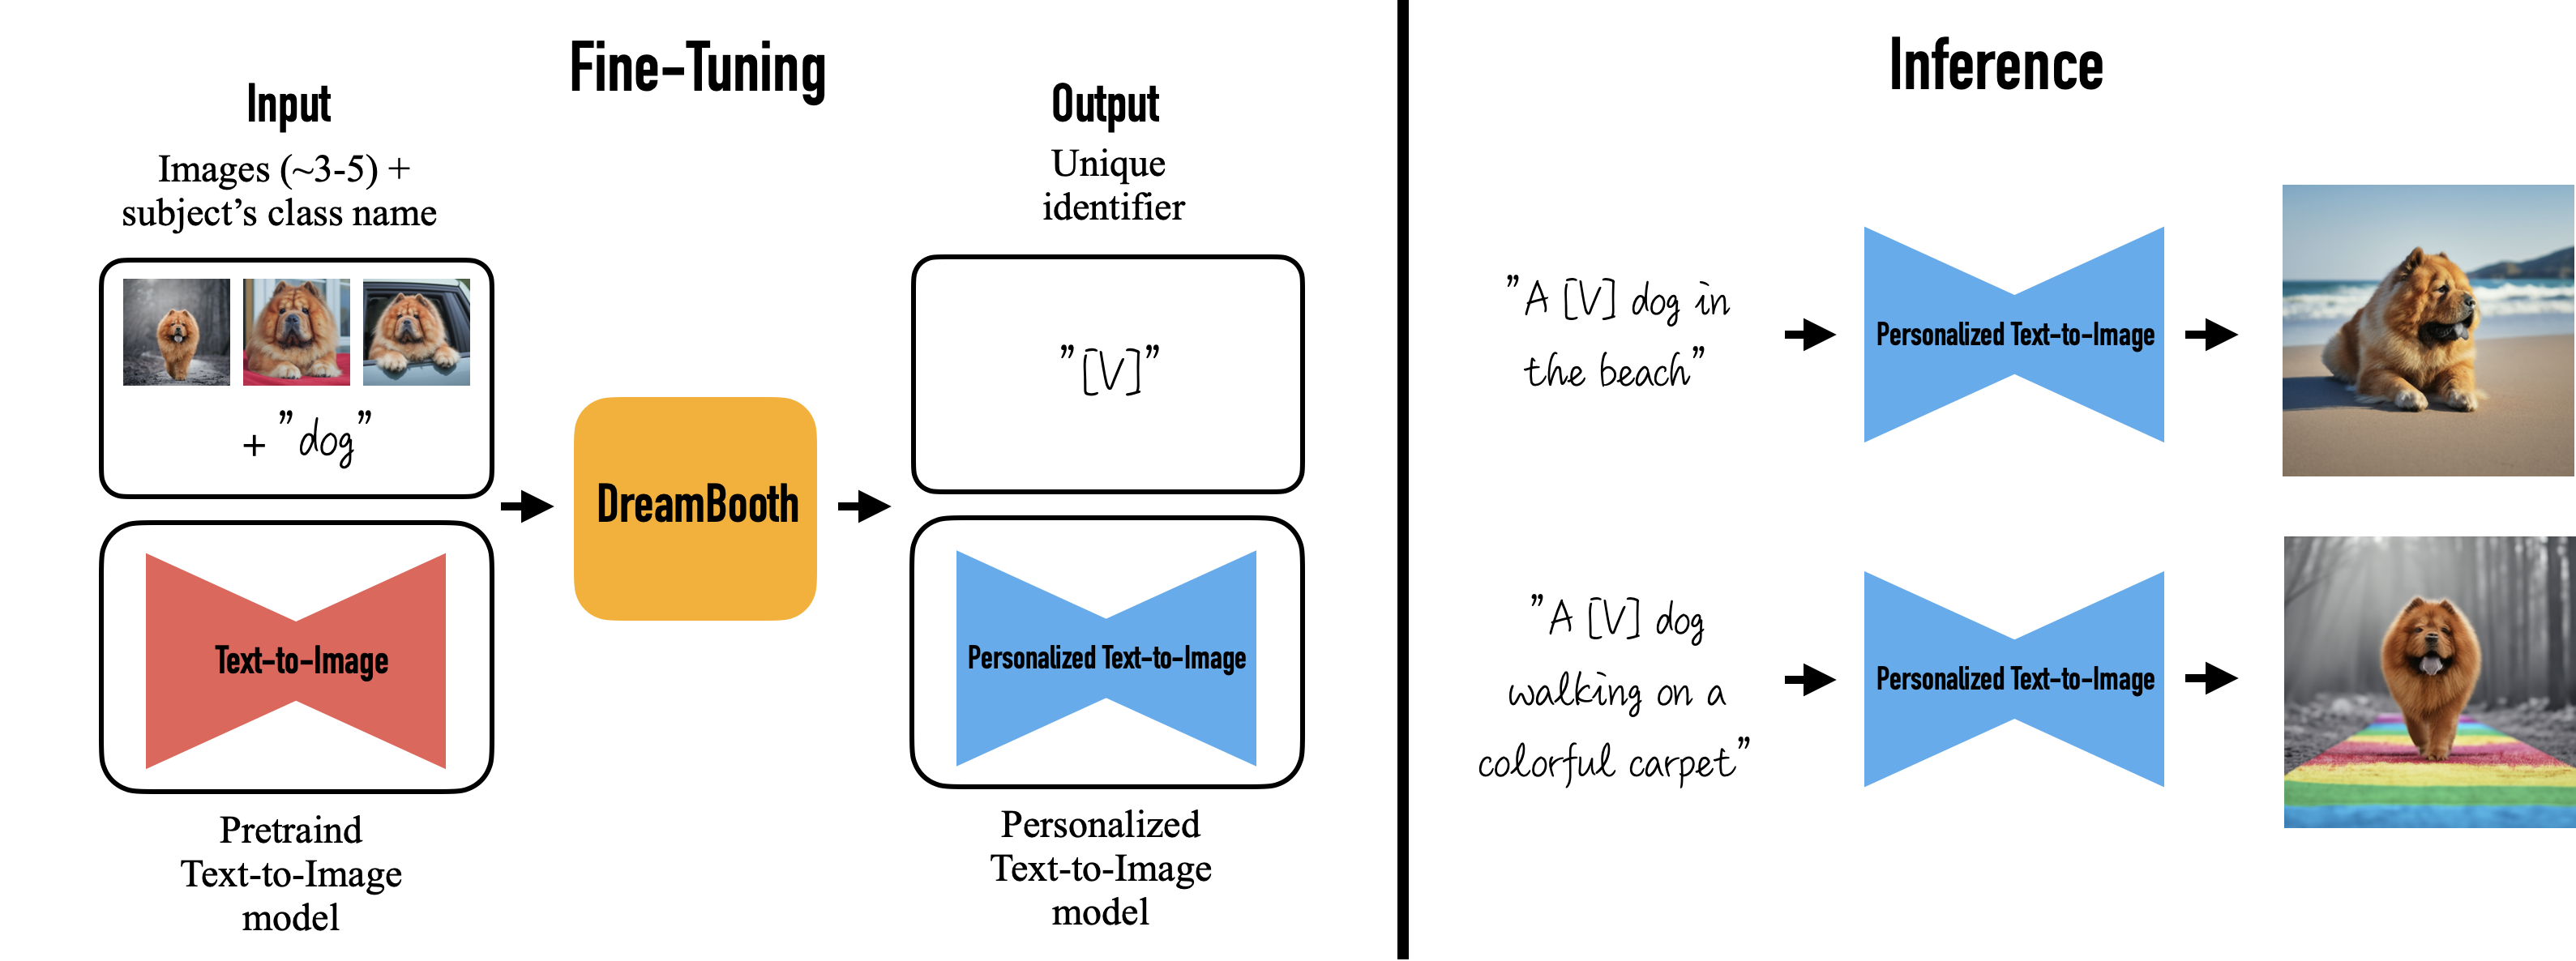
使用 DreamBooth 和 Ray Train 微调 Stable Diffusion#

这是一个中级示例,展示了如何使用 Ray Train 对 Stable Diffusion 模型进行 DreamBooth 微调。它演示了如何在 Ray Train 中将 Ray Data 与 PyTorch Lightning 结合使用。
有关此微调方法实现的功能的更多详细信息,请参阅原始 DreamBooth 项目主页。
本示例基于此 Hugging Face 🤗 教程。请参阅 Hugging Face 教程以获取有关超参数的有用解释和建议。 将此示例改编到 Ray Train 后,您可以轻松地将微调扩展到任意数量的分布式训练工作器。
计算要求
由于模型尺寸较大,您需要一台至少配备 1 个 A10G GPU 的机器。
每个训练工作器使用 1 个 GPU。您可以使用多个 GPU 或工作器来利用数据并行训练来加速训练时间。
本示例微调 Stable Diffusion 过程中使用的 text_encoder 和 unet 模型,同时考虑了先验保留损失。
在 ray-project/ray 找到完整的代码仓库
工作原理#
本示例使用 Ray Data 进行数据加载,使用 Ray Train 进行分布式训练。
数据加载#
使用 Ray Data 进行数据加载。代码包含三个有趣的部分。
首先,使用 ray.data.read_images() 加载两个数据集
instance_dataset = read_images(args.instance_images_dir)
class_dataset = read_images(args.class_images_dir)
然后,对生成这些图像的提示进行标记化
tokenizer = AutoTokenizer.from_pretrained(
    pretrained_model_name_or_path=args.model_dir,
    subfolder="tokenizer",
)

def _tokenize(prompt):
    return tokenizer(
        prompt,
        truncation=True,
        padding="max_length",
        max_length=tokenizer.model_max_length,
        return_tensors="pt",
    ).input_ids.numpy()

# Get the token ids for both prompts.
class_prompt_ids = _tokenize(args.class_prompt)[0]
instance_prompt_ids = _tokenize(args.instance_prompt)[0]
最后,对图像应用 torchvision 预处理管道
transform = transforms.Compose(
    [
        transforms.ToTensor(),
        transforms.Resize(
            image_resolution,
            interpolation=transforms.InterpolationMode.BILINEAR,
            antialias=True,
        ),
        transforms.RandomCrop(image_resolution),
        # use the appropriate mean and std for your dataset
        transforms.Normalize([0.5], [0.5]),
    ]
)

def transform_image(
    batch: Dict[str, np.ndarray], output_column_name: str
) -> Dict[str, np.ndarray]:
    transformed_tensors = [transform(image).numpy() for image in batch["image"]]
    batch[output_column_name] = transformed_tensors
    return batch
在最后一步中应用所有这三个部分
# For each dataset:
# - perform image preprocessing
# - drop the original image column
# - add a new column with the tokenized prompts
instance_dataset = (
    instance_dataset.map_batches(
        transform_image, fn_kwargs={"output_column_name": "instance_image"}
    )
    .drop_columns(["image"])
    .add_column(
        "instance_prompt_ids", lambda df: pd.Series([instance_prompt_ids] * len(df))
    )
)
分布式训练#
训练代码的核心部分是训练函数。此函数接受一个包含超参数的配置字典。然后它定义了一个常规的 PyTorch 训练循环。
您只需要在少数几个位置与 Ray Train API 交互,如下面代码片段中的行内注释所示。
请记住,您想对所有模型进行数据并行训练。
使用
session.get_dataset_shard("train")`加载每个工作器的数据分片使用
train_dataset.iter_torch_batches()`迭代数据集使用
session.report(results)`将结果报告给 Ray Train
代码经过压缩以求简洁。完整代码有更详细的注释。
def train_fn(config):

    # Load pre-trained models.
    (
        text_encoder,
        noise_scheduler,
        vae,
        unet,
        unet_trainable_parameters,
        text_trainable_parameters,
    ) = load_models(config)

    text_encoder = train.torch.prepare_model(text_encoder)
    unet = train.torch.prepare_model(unet)
    # manually move to device as `prepare_model` can't be used on
    # non-training models.
    vae = vae.to(train.torch.get_device())

    # Use the regular AdamW optimizer to work with bfloat16 weights.
    optimizer = torch.optim.AdamW(
        itertools.chain(unet_trainable_parameters, text_trainable_parameters),
        lr=config["lr"],
    )

    train_dataset = train.get_dataset_shard("train")

    # Train!
    num_train_epochs = config["num_epochs"]

    print(f"Running {num_train_epochs} epochs.")

    global_step = 0
    for _ in range(num_train_epochs):
        if global_step >= config["max_train_steps"]:
            print(f"Stopping training after reaching {global_step} steps...")
            break

        for _, batch in enumerate(
            train_dataset.iter_torch_batches(
                batch_size=config["train_batch_size"],
                device=train.torch.get_device(),
            )
        ):
            batch = collate(batch, torch.bfloat16)

            optimizer.zero_grad()

            # Convert images to latent space
            latents = vae.encode(batch["images"]).latent_dist.sample() * 0.18215

            # Sample noise that we'll add to the latents
            noise = torch.randn_like(latents)
            bsz = latents.shape[0]
            # Sample a random timestep for each image
            timesteps = torch.randint(
                0,
                noise_scheduler.config.num_train_timesteps,
                (bsz,),
                device=latents.device,
            )
            timesteps = timesteps.long()

            # Add noise to the latents according to the noise magnitude at each timestep
            # (this is the forward diffusion process)
            noisy_latents = noise_scheduler.add_noise(latents, noise, timesteps)

            # Get the text embedding for conditioning
            encoder_hidden_states = text_encoder(batch["prompt_ids"])[0]

            # Predict the noise residual.
            model_pred = unet(
                noisy_latents.to(train.torch.get_device()),
                timesteps.to(train.torch.get_device()),
                encoder_hidden_states.to(train.torch.get_device()),
            ).sample
            target = get_target(noise_scheduler, noise, latents, timesteps)

            loss = prior_preserving_loss(
                model_pred, target, config["prior_loss_weight"]
            )
            loss.backward()

            # Gradient clipping before optimizer stepping.
            clip_grad_norm_(
                itertools.chain(unet_trainable_parameters, text_trainable_parameters),
                config["max_grad_norm"],
            )

            optimizer.step()  # Step all optimizers.

            global_step += 1
            results = {
                "step": global_step,
                "loss": loss.detach().item(),
            }
            train.report(results)

            if global_step >= config["max_train_steps"]:
                break
然后可以使用 Ray Train 的 TorchTrainer 运行此训练函数
args = train_arguments().parse_args()

# Build training dataset.
train_dataset = get_train_dataset(args)

print(f"Loaded training dataset (size: {train_dataset.count()})")

# Train with Ray Train TorchTrainer.
trainer = TorchTrainer(
    train_fn,
    train_loop_config=vars(args),
    scaling_config=ScalingConfig(
        use_gpu=True,
        num_workers=args.num_workers,
    ),
    datasets={
        "train": train_dataset,
    },
)
result = trainer.fit()
配置规模#
在 TorchTrainer 中,您可以轻松配置规模。前面的示例使用 num_workers 参数指定工作器数量。此参数默认设置为 2 个工作器,每个工作器使用 1 个 GPU,总共使用 2 个 GPU。
要在 4 个 GPU 上运行示例,请使用 --num-workers=4 将工作器数量设置为 4。或者您可以直接更改扩缩配置
 scaling_config=ScalingConfig(
     use_gpu=True,
-    num_workers=args.num_workers,
+    num_workers=4,
 )
如果您正在运行多节点训练,请确保所有节点都能访问共享存储,例如 NFS 或 EFS。在以下示例脚本中,您可以使用 DATA_PREFIX 环境变量调整位置。
训练吞吐量#
比较使用 1、2 和 4 个工作器或 GPU 进行的先前训练运行的吞吐量。
考虑以下设置
1 个配备 4 个 GPU 的 GCE g2-standard-48-nvidia-l4-4 实例
按如下配置的模型
来自此示例的数据
200 张正则化图像
训练 4 个 epoch (本地批量大小 = 2)
每种配置运行 3 次
您预计训练时间会受益于规模扩展,并在使用更多工作器和 GPU 时缩短。
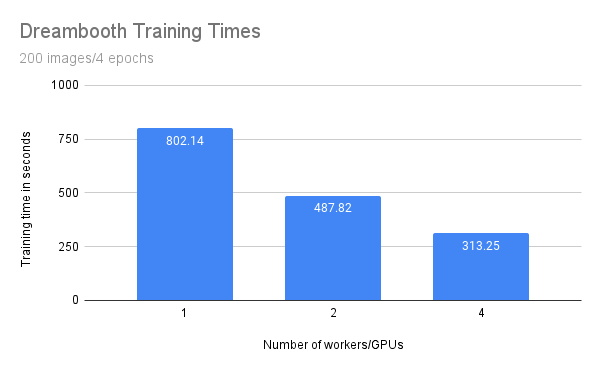
工作器/GPU 数量 |
训练时间 (秒) |
|---|---|
1 |
802.14 |
2 |
487.82 |
4 |
313.25 |
虽然训练时间随着工作器/GPU 数量线性减少,但您可以观察到一些开销。具体来说,工作器数量翻倍并不能使训练时间减半。
这种开销很可能是由于进程间额外的通信和大型模型权重的传输造成的。此外,由于 GPU 内存限制,您只使用批量大小为 1 进行训练。在具有更大批量大小的更大 GPU 上,您会期望从横向扩展中获得更大的收益。
运行示例#
首先,下载预训练的 Stable Diffusion 模型作为起点。
然后使用对象的少量图像训练此模型。
为此,选择一个非单词作为标识符,例如 unqtkn。当使用此对象微调模型时,您教会模型提示是 A photo of a unqtkn <class>。
微调后,您可以使用此特定提示运行推理。例如:A photo of a unqtkn <class> 创建对象的图像。类似地,A photo of a unqtkn <class> at the beach 创建对象在海滩上的图像。
步骤 0:准备#
克隆 Ray 仓库,进入示例目录,并安装依赖项。
git clone https://github.com/ray-project/ray.git
cd doc/source/templates/05_dreambooth_finetuning
pip install -Ur dreambooth/requirements.txt
准备一些目录和环境变量。
# TODO: If running on multiple nodes, change this path to a shared directory (ex: NFS)
export DATA_PREFIX="/tmp"
export ORIG_MODEL_NAME="CompVis/stable-diffusion-v1-4"
export ORIG_MODEL_HASH="b95be7d6f134c3a9e62ee616f310733567f069ce"
export ORIG_MODEL_DIR="$DATA_PREFIX/model-orig"
export ORIG_MODEL_PATH="$ORIG_MODEL_DIR/models--${ORIG_MODEL_NAME/\//--}/snapshots/$ORIG_MODEL_HASH"
export TUNED_MODEL_DIR="$DATA_PREFIX/model-tuned"
export IMAGES_REG_DIR="$DATA_PREFIX/images-reg"
export IMAGES_OWN_DIR="$DATA_PREFIX/images-own"
export IMAGES_NEW_DIR="$DATA_PREFIX/images-new"
# TODO: Add more worker nodes and increase NUM_WORKERS for more data-parallelism
export NUM_WORKERS=2

mkdir -p $ORIG_MODEL_DIR $TUNED_MODEL_DIR $IMAGES_REG_DIR $IMAGES_OWN_DIR $IMAGES_NEW_DIR
步骤 1:下载预训练模型#
在本地下载并缓存预训练的 Stable Diffusion 模型。
python cache_model.py --model_dir=$ORIG_MODEL_DIR --model_name=$ORIG_MODEL_NAME --revision=$ORIG_MODEL_HASH
您可以在 $ORIG_MODEL_PATH 访问下载的模型检查点。
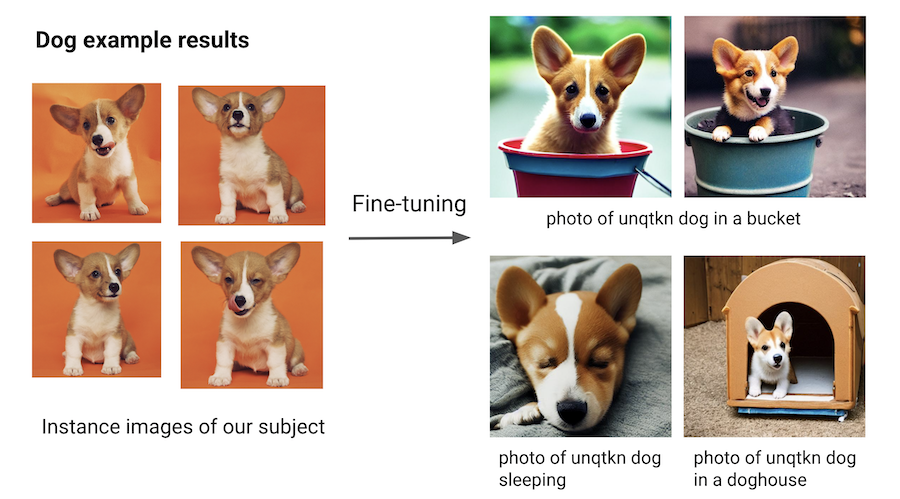
步骤 2:提供对象的图像#
使用示例数据集之一,例如 dog 或 lego car,或者提供您自己的图像目录,并使用 $INSTANCE_DIR 环境变量指定该目录。
然后,将这些图像复制到 $IMAGES_OWN_DIR。
  # Only uncomment one of the following:

  # Option 1: Use the dog dataset ---------
  export CLASS_NAME="dog"
  python download_example_dataset.py ./images/dog
  export INSTANCE_DIR=./images/dog
  # ---------------------------------------

  # Option 2: Use the lego car dataset ----
  # export CLASS_NAME="car"
  # export INSTANCE_DIR=./images/lego-car
  # ---------------------------------------

  # Option 3: Use your own images ---------
  # export CLASS_NAME="<class-of-your-subject>"
  # export INSTANCE_DIR="/path/to/images/of/subject"
  # ---------------------------------------

  # Copy own images into IMAGES_OWN_DIR
  cp -rf $INSTANCE_DIR/* "$IMAGES_OWN_DIR/"
请注意,$CLASS_NAME 应该是您的对象所属的通用类别。提示 photo of a unqtkn <class> 生成的图像应该足够多样化且与对象本身足够不同,以便生成的图像能够清晰地展示微调的效果。
步骤 3:创建正则化图像#
使用预训练的 Stable Diffusion 模型为一类对象创建一个正则化图像集。此正则化集确保模型仍然能够为同一类别的随机图像生成不错的图像,而不是仅仅优化以生成对象的良好图像。
  python generate.py \
    --model_dir=$ORIG_MODEL_PATH \
    --output_dir=$IMAGES_REG_DIR \
    --prompts="photo of a $CLASS_NAME" \
    --num_samples_per_prompt=200 \
    --use_ray_data
使用 Ray Data 和 4 个工作器进行批量推理,以并行生成更多图像。
步骤 4:微调模型#
将要微调的对象的少量图像(例如 4 到 5 张)保存在本地目录中。然后使用以下命令启动训练作业
  python train.py \
    --model_dir=$ORIG_MODEL_PATH \
    --output_dir=$TUNED_MODEL_DIR \
    --instance_images_dir=$IMAGES_OWN_DIR \
    --instance_prompt="photo of $UNIQUE_TOKEN $CLASS_NAME" \
    --class_images_dir=$IMAGES_REG_DIR \
    --class_prompt="photo of a $CLASS_NAME" \
    --train_batch_size=2 \
    --lr=5e-6 \
    --num_epochs=4 \
    --max_train_steps=200 \
    --num_workers $NUM_WORKERS
步骤 5:生成对象的图像#
使用与步骤 2 相同的命令行尝试您的模型,但这次指向您自己的模型。
  python generate.py \
    --model_dir=$TUNED_MODEL_DIR \
    --output_dir=$IMAGES_NEW_DIR \
    --prompts="photo of a $UNIQUE_TOKEN $CLASS_NAME in a bucket" \
    --num_samples_per_prompt=5
接下来,尝试用更有趣的内容替换提示。
例如,对于狗对象,您可以尝试
“unqtkn 狗在桶里的照片”
“unqtkn 狗睡觉的照片”
“unqtkn 狗在狗窝里的照片”
另请参阅#
Ray Train 示例 获取更多用例
Ray Train 用户指南 获取操作指南