使用 Ray Serve 构建实时对象检测服务#
概述#
本教程演示了如何使用 Ray Serve 部署一个生产就绪的实时对象检测服务。你将学习如何利用自动 GPU 资源管理和扩展能力,高效地服务 YOLOv5 对象检测模型。
安装#
安装所需的依赖项
pip install "ray[serve]" requests torch pillow numpy opencv-python-headless pandas "gitpython>=3.1.30"
实现#
本示例使用 ultralytics/yolov5 模型进行对象检测,并使用 FastAPI 创建 Web API。
代码结构#
将以下代码保存到名为 object_detection.py 的文件中
import torch
from PIL import Image
import numpy as np
from io import BytesIO
from fastapi.responses import Response
from fastapi import FastAPI

from ray import serve
from ray.serve.handle import DeploymentHandle


app = FastAPI()


@serve.deployment(num_replicas=1)
@serve.ingress(app)
class APIIngress:
    def __init__(self, object_detection_handle: DeploymentHandle):
        self.handle = object_detection_handle

    @app.get(
        "/detect",
        responses={200: {"content": {"image/jpeg": {}}}},
        response_class=Response,
    )
    async def detect(self, image_url: str):
        image = await self.handle.detect.remote(image_url)
        file_stream = BytesIO()
        image.save(file_stream, "jpeg")
        return Response(content=file_stream.getvalue(), media_type="image/jpeg")


@serve.deployment(
    ray_actor_options={"num_gpus": 1},
    autoscaling_config={"min_replicas": 1, "max_replicas": 2},
)
class ObjectDetection:
    def __init__(self):
        self.model = torch.hub.load("ultralytics/yolov5", "yolov5s")
        self.model.cuda()
        self.model.to(torch.device(0))

    def detect(self, image_url: str):
        result_im = self.model(image_url)
        return Image.fromarray(result_im.render()[0].astype(np.uint8))


entrypoint = APIIngress.bind(ObjectDetection.bind())
代码包含两个主要部署
APIIngress: 一个基于 FastAPI 的前端,用于处理 HTTP 请求
ObjectDetection: 后端部署,用于加载 YOLOv5 模型并在 GPU 上执行推理
注意
理解自动扩缩容
此示例中的配置将 min_replicas 设置为 0,这意味着
部署启动时没有
ObjectDetection副本Ray Serve 仅在请求到达时创建副本
在一段时间不活动后,Ray Serve 会将副本缩减回 0
这种“按需缩容至零”的能力有助于在服务不活跃时节省 GPU 资源
部署#
使用以下命令部署服务
serve run object_detection:entrypoint
成功部署后,你应该看到类似的日志消息
(ServeReplica:ObjectDection pid=4747)   warnings.warn(
(ServeReplica:ObjectDection pid=4747) Downloading: "https://github.com/ultralytics/yolov5/zipball/master" to /home/ray/.cache/torch/hub/master.zip
(ServeReplica:ObjectDection pid=4747) YOLOv5 🚀 2023-3-8 Python-3.9.16 torch-1.13.0+cu116 CUDA:0 (Tesla T4, 15110MiB)
(ServeReplica:ObjectDection pid=4747)
(ServeReplica:ObjectDection pid=4747) Fusing layers...
(ServeReplica:ObjectDection pid=4747) YOLOv5s summary: 213 layers, 7225885 parameters, 0 gradients
(ServeReplica:ObjectDection pid=4747) Adding AutoShape...
2023-03-08 21:10:21,685 SUCC <string>:93 -- Deployed Serve app successfully.
故障排除#
提示
常见 OpenCV 错误
运行示例时可能会遇到此错误
ImportError: libGL.so.1: cannot open shared object file: No such file or directory
这通常在使用无头环境(如容器)运行 opencv-python 时发生。解决方案是使用无头版本
pip uninstall opencv-python; pip install opencv-python-headless
测试服务#
服务运行后,可以使用以下 Python 代码进行测试
import requests

# Sample image URL for testing
image_url = "https://ultralytics.com/images/zidane.jpg"

# Send request to the object detection service
resp = requests.get(f"http://127.0.0.1:8000/detect?image_url={image_url}")

# Save the annotated image with detected objects
with open("output.jpeg", 'wb') as f:
    f.write(resp.content)
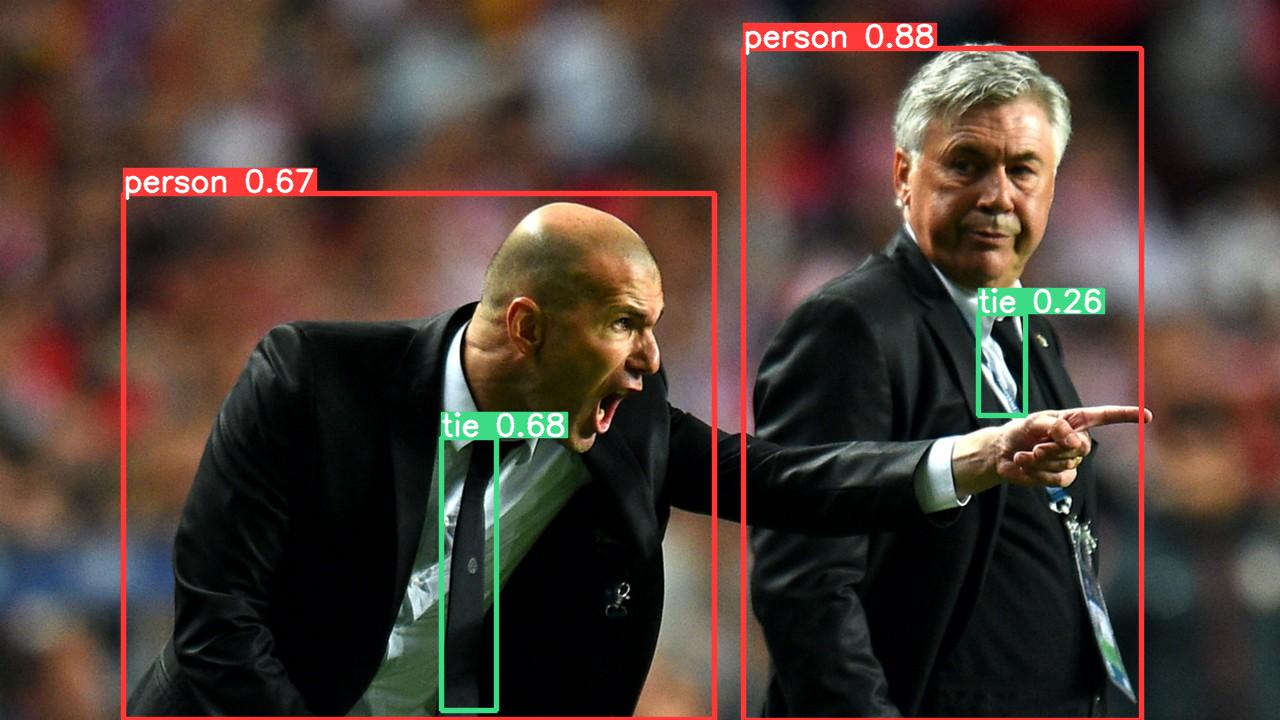
示例输出#
服务处理图像并返回带有检测到对象的边界框的图像