使用 PyTorch 进行图像分类批量推理#

在此示例中,我们将介绍如何使用 Ray Data 进行使用多个 GPU worker 的大规模批量推理。
具体来说,我们将
从 S3 存储桶加载 Imagenette 数据集并创建 Ray Dataset。
加载预训练的 ResNet 模型。
使用 Ray Data 预处理数据集并在多个 GPU 上并行进行模型推理
评估预测结果并将结果保存到 S3/本地磁盘。
即使你没有可用的 GPU,此示例仍然可以工作,但整体性能会较慢。
请参阅此批量推理指南,了解如何调整此示例以使用你自己的模型和数据集的技巧和故障排除!
要运行此示例,你需要以下包
!pip install -q "ray[data]" torch torchvision
步骤 1:从 S3 读取数据集#
Imagenette 是 Imagenet 的一个子集,包含 10 个类别。我们将此数据集公开托管在 S3 存储桶中。由于我们这里只进行推理,因此我们只加载验证集。
在这里,我们使用 ray.data.read_images 从 S3 加载验证集。Ray Data 还支持从各种其他数据源和格式读取数据。
import ray

s3_uri = "s3://anonymous@air-example-data-2/imagenette2/train/"

ds = ray.data.read_images(s3_uri, mode="RGB")
ds
2023-06-27 23:23:57,184	INFO worker.py:1452 -- Connecting to existing Ray cluster at address: 10.0.5.141:6379...
2023-06-27 23:23:57,228	INFO worker.py:1627 -- Connected to Ray cluster. View the dashboard at https://session-kncgqf3p7w2j7qcsnz2safl4tj.i.anyscaleuserdata-staging.com
2023-06-27 23:23:57,243	INFO packaging.py:347 -- Pushing file package 'gcs://_ray_pkg_32ef287a3a39e82021e70d2413880a69.zip' (4.49MiB) to Ray cluster...
2023-06-27 23:23:57,257	INFO packaging.py:360 -- Successfully pushed file package 'gcs://_ray_pkg_32ef287a3a39e82021e70d2413880a69.zip'.
2023-06-27 23:23:59,629	WARNING dataset.py:253 -- Important: Ray Data requires schemas for all datasets in Ray 2.5. This means that standalone Python objects are no longer supported. In addition, the default batch format is fixed to NumPy. To revert to legacy behavior temporarily, set the environment variable RAY_DATA_STRICT_MODE=0 on all cluster processes.

Learn more here: https://docs.rayai.org.cn/en/master/data/faq.html#migrating-to-strict-mode
检查 schema,我们可以看到数据集中有 1 列包含以 Numpy 数组形式存储的图像。
ds.schema()
Column  Type
------  ----
image   numpy.ndarray(ndim=3, dtype=uint8)
步骤 2:在单个批次上进行推理#
接下来,我们可以使用预训练的 ResNet152 模型,并按照此 PyTorch 示例,在单个批次数据上进行推理。
让我们从数据集中获取 10 个图像的批次。批次中的每个图像都表示为一个 Numpy 数组。
single_batch = ds.take_batch(10)
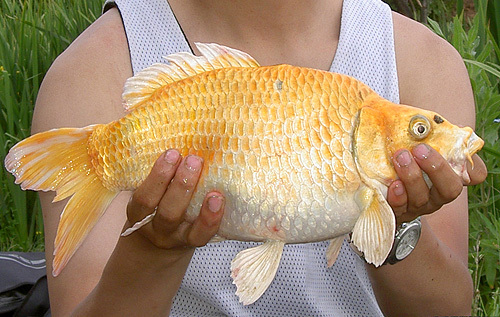
我们可以可视化此批次中的 1 个图像。
from PIL import Image

img = Image.fromarray(single_batch["image"][0])
img

现在,让我们下载一个预训练的 PyTorch Resnet 模型,并获取必要的预处理转换,以便在预测前对图像进行预处理。
import torch
from torchvision.models import ResNet152_Weights
from torchvision import transforms
from torchvision import models

weights = ResNet152_Weights.IMAGENET1K_V1

# Load the pretrained resnet model and move to GPU if one is available.

device = torch.device("cuda" if torch.cuda.is_available() else "cpu")

model = models.resnet152(weights=weights).to(device)
model.eval()

imagenet_transforms = weights.transforms
transform = transforms.Compose([transforms.ToTensor(), imagenet_transforms()])
然后,我们将这些转换应用到我们的图像批次,并将批次传递给模型进行推理,确保使用 GPU 设备进行推理。
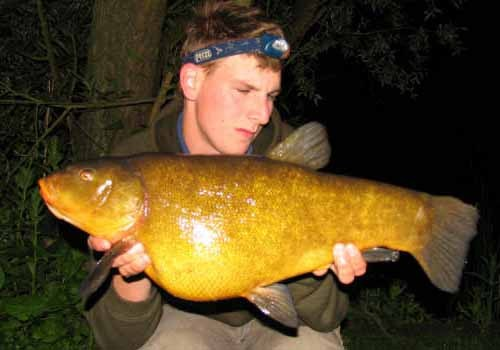
我们可以看到批次中的大多数图像都被正确分类为“tench”,这是一种鱼类。
transformed_batch = [transform(image) for image in single_batch["image"]]
with torch.inference_mode():
    prediction_results = model(torch.stack(transformed_batch).to(device))
    classes = prediction_results.argmax(dim=1).cpu()

del model  # Free up GPU memory

labels = [weights.meta["categories"][i] for i in classes]
labels
['tench',
 'tench',
 'tench',
 'tench',
 'tench',
 'tench',
 'tench',
 'tench',
 'bittern',
 'tench']
步骤 3:使用 Ray Data 扩展到整个数据集#
通过使用 Ray Data,我们可以应用上一节中的相同逻辑,将处理扩展到整个数据集,利用集群中的所有 GPU。
预处理#
首先,让我们将预处理代码转换为 Ray Data。我们将预处理代码打包在一个 preprocess_image 函数中。此函数应只接受一个参数,该参数是一个字典,包含数据集中的单个图像,表示为 numpy 数组。我们使用上面定义的相同 transform 函数,并将转换后的图像存储在一个新的 transformed_image 字段中。
请注意,通常为了效率,我们只会保留转换后的图像。但是,为了本教程的目的,我们也保留了原始图像,以便在最后与预测结果一起显示它们。
import numpy as np
from typing import Dict

def preprocess_image(row: Dict[str, np.ndarray]):
    return {
        "original_image": row["image"],
        "transformed_image": transform(row["image"]),
    }
然后我们使用 map() 方法将函数逐行应用于整个数据集。我们使用它而不是 map_batches(),因为 torchvision 转换必须一次应用于一张图像,这是由于数据集中包含不同大小的图像。
通过使用 Ray Data 的 map() 方法,我们可以扩展预处理,利用 Ray 集群中的所有资源。
“注意:map() 方法是惰性的。直到我们使用 iter_batches() 或 take() 等方法消费结果后,它才会执行。”
transformed_ds = ds.map(preprocess_image)
2023-06-27 23:25:59,387 WARNING dataset.py:4384 -- The `map`, `flat_map`, and `filter` operations are unvectorized and can be very slow. If you're using a vectorized transformation, consider using `.map_batches()` instead.
模型推理#
接下来,让我们转换模型推理部分。与预处理相比,模型推理有 2 个区别
模型加载和初始化通常开销较大。
如果我们批量处理数据,模型推理可以通过硬件加速进行优化。使用更大的批次可以提高 GPU 利用率和推理作业的总体运行时。
因此,我们将模型推理代码转换为以下 ResnetModel 类。在此类中,我们将开销较大的模型加载和初始化代码放在 __init__ 构造函数中,它只会运行一次。我们将模型推理代码放在 __call__ 方法中,该方法将为每个批次调用。
__call__ 方法接受一批数据项,而不是单个数据项。在这种情况下,该批次是一个字典,其中包含由我们的预处理步骤填充的 "transformed_image" 键,对应的值是表示为 np.ndarray 格式的图像 Numpy 数组。我们重用步骤 2 中的相同推理逻辑。
from typing import Dict
import numpy as np
import torch


class ResnetModel:
    def __init__(self):
        self.weights = ResNet152_Weights.IMAGENET1K_V1
        self.device = torch.device("cuda" if torch.cuda.is_available() else "cpu")
        self.model = models.resnet152(weights=self.weights).to(self.device)
        self.model.eval()

    def __call__(self, batch: Dict[str, np.ndarray]):
        # Convert the numpy array of images into a PyTorch tensor.
        # Move the tensor batch to GPU if available.
        torch_batch = torch.from_numpy(batch["transformed_image"]).to(self.device)
        with torch.inference_mode():
            prediction = self.model(torch_batch)
            predicted_classes = prediction.argmax(dim=1).detach().cpu()
            predicted_labels = [
                self.weights.meta["categories"][i] for i in predicted_classes
            ]
            return {
                "predicted_label": predicted_labels,
                "original_image": batch["original_image"],
            }
然后我们使用 map_batches() API 将模型应用于整个数据集
map_batches的第一个参数是用户定义函数 (UDF),它可以是函数或类。由于此示例使用类,UDF 将作为长期运行的 Ray actors 运行。对于基于类的 UDF,使用concurrency参数指定并行 Actor 的数量。num_gpus参数指定每个ResnetModel实例所需的 GPU 数量。在此示例中,我们为每个模型副本需要 1 个 GPU。如果你正在进行 CPU 推理,可以删除num_gpus=1。batch_size参数表示每个批次中图像的数量。使用你自己的模型和数据集时,请查看 Ray dashboard 中的 GPU 内存使用情况,以尝试调整batch_size。你应该尝试最大化批次大小,同时不超过 GPU 内存。你可能需要减小此数字才能在本地运行。
predictions = transformed_ds.map_batches(
    ResnetModel,
    concurrency=4,  # Use 4 GPUs. Change this number based on the number of GPUs in your cluster.
    num_gpus=1,  # Specify 1 GPU per model replica.
    batch_size=720,  # Use the largest batch size that can fit on our GPUs.
)
验证并保存结果#
让我们取一小批预测结果并验证它们。
prediction_batch = predictions.take_batch(5)
2023-06-27 23:26:04,893	INFO streaming_executor.py:91 -- Executing DAG InputDataBuffer[Input] -> TaskPoolMapOperator[ReadImage->Map] -> ActorPoolMapOperator[MapBatches(ResnetModel)]
2023-06-27 23:26:04,894	INFO streaming_executor.py:92 -- Execution config: ExecutionOptions(resource_limits=ExecutionResources(cpu=None, gpu=None, object_store_memory=None), locality_with_output=False, preserve_order=False, actor_locality_enabled=True, verbose_progress=False)
2023-06-27 23:26:04,895	INFO streaming_executor.py:94 -- Tip: For detailed progress reporting, run `ray.data.DataContext.get_current().execution_options.verbose_progress = True`
2023-06-27 23:26:04,950	INFO actor_pool_map_operator.py:114 -- MapBatches(ResnetModel): Waiting for 4 pool actors to start...
2023-06-27 23:26:29,120	INFO streaming_executor.py:149 -- Shutting down <StreamingExecutor(Thread-36, started daemon 140560158410496)>.
2023-06-27 23:26:29,335	WARNING actor_pool_map_operator.py:264 -- To ensure full parallelization across an actor pool of size 4, the specified batch size should be at most 360. Your configured batch size for this operator was 720.
我们看到所有图像都被正确分类为“tench”,这是一种鱼类。
from PIL import Image

for image, prediction in zip(
    prediction_batch["original_image"], prediction_batch["predicted_label"]
):
    img = Image.fromarray(image)
    display(img)
    print("Prediction: ", prediction)
Label: tench
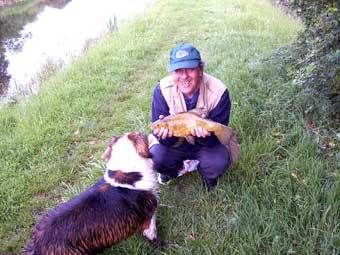
Label: tench

Label: tench

Label: tench
Label: tench
如果样本看起来不错,我们可以继续将结果保存到外部存储(例如,本地磁盘或 AWS S3 等云存储)。有关所有支持的存储和文件格式,请参阅保存数据指南。
import tempfile

temp_dir = tempfile.mkdtemp()

# First, drop the original images to avoid them being saved as part of the predictions.
# Then, write the predictions in parquet format to a path with the `local://` prefix
# to make sure all results get written on the head node.
predictions.drop_columns(["original_image"]).write_parquet(f"local://{temp_dir}")
print(f"Predictions saved to `{temp_dir}`!")
2023-06-27 23:26:38,105	INFO streaming_executor.py:91 -- Executing DAG InputDataBuffer[Input] -> TaskPoolMapOperator[ReadImage->Map] -> ActorPoolMapOperator[MapBatches(ResnetModel)] -> TaskPoolMapOperator[MapBatches(<lambda>)] -> TaskPoolMapOperator[Write]
2023-06-27 23:26:38,106	INFO streaming_executor.py:92 -- Execution config: ExecutionOptions(resource_limits=ExecutionResources(cpu=None, gpu=None, object_store_memory=None), locality_with_output=False, preserve_order=False, actor_locality_enabled=True, verbose_progress=False)
2023-06-27 23:26:38,106	INFO streaming_executor.py:94 -- Tip: For detailed progress reporting, run `ray.data.DataContext.get_current().execution_options.verbose_progress = True`
2023-06-27 23:26:38,141	INFO actor_pool_map_operator.py:114 -- MapBatches(ResnetModel): Waiting for 4 pool actors to start...
2023-06-27 23:27:27,855 INFO streaming_executor.py:149 -- Shutting down <StreamingExecutor(Thread-74, stopped daemon 140560149755648)>.
Predictions saved to `/tmp/tmp0y52g_f5`!