使用 Huggingface Vision Transformer 的图像分类批量推理#

在此示例中,我们将介绍如何使用 Ray Data 进行 **大规模图像分类批量推理,利用多个 GPU worker。**
特别是,我们将:
从 S3 桶加载 Imagenette 数据集并创建一个
Ray Dataset。从 Huggingface 加载一个已在 ImageNet 上训练好的预训练 Vision Transformer。
使用 Ray Data 预处理数据集,并在多个 GPU 上并行进行模型推理。
评估预测结果并将结果保存到 S3/本地磁盘。
注意:即使您没有可用的 GPU,此示例仍然可以工作,但总体性能会较慢。
要运行此示例,您需要安装以下内容
!pip install -q -U "ray[data]" torch transformers Pillow
步骤 1:从 S3 读取数据集#
Imagenette 是 ImageNet 的一个子集,包含 10 个类别。此数据集托管在一个公共 S3 桶中 (s3://anonymous@air-example-data-2/imagenette2/val/)。由于我们在此只进行推理,因此仅加载验证集。
在此,我们使用 ray.data.read_images 从 S3 加载验证集。Ray Data 还支持从多种其他 数据源和格式 中读取数据。
import ray

# Disable progress bars and verbose logs
context = ray.data.DataContext.get_current()
context.enable_progress_bars = False
context.verbose = False

s3_uri = "s3://anonymous@air-example-data-2/imagenette2/val/"

ds = ray.data.read_images(
    s3_uri, mode="RGB"
)
ds
2025-02-05 15:55:02,527	INFO worker.py:1841 -- Started a local Ray instance.
2025-02-05 15:55:03,276	INFO streaming_executor.py:108 -- Starting execution of Dataset. Full logs are in /tmp/ray/session_2025-02-05_15-55-01_937163_54751/logs/ray-data
2025-02-05 15:55:03,276	INFO streaming_executor.py:109 -- Execution plan of Dataset: InputDataBuffer[Input] -> TaskPoolMapOperator[ReadImage]
2025-02-05 15:55:04,483	INFO streaming_executor.py:108 -- Starting execution of Dataset. Full logs are in /tmp/ray/session_2025-02-05_15-55-01_937163_54751/logs/ray-data
2025-02-05 15:55:04,484	INFO streaming_executor.py:109 -- Execution plan of Dataset: InputDataBuffer[Input] -> TaskPoolMapOperator[ReadImage]
检查 schema,我们可以看到数据集中有一个名为“image”的列,其中包含存储为 Numpy 数组的图像。
ds.schema()
Column  Type
------  ----
image   numpy.ndarray(ndim=3, dtype=uint8)
步骤 2:对单个批次进行推理#
接下来,我们可以使用 Huggingface 的预训练 Vision Transformer 对单个批次数据进行推理,参照 此 Huggingface 示例。
让我们从数据集中获取一个包含 10 个样本的批次。该批次是一个从列名到数据的字典,这里我们有一个名为“image”的列。批次中的每张图片(共 10 张)都表示为一个 Numpy 数组。
single_batch = ds.take_batch(10)
print(f"Num columns: {len(single_batch['image'])}")
print(f"Image shape: {single_batch['image'][0].shape}")
2025-02-05 15:55:37,679	INFO streaming_executor.py:108 -- Starting execution of Dataset. Full logs are in /tmp/ray/session_2025-02-05_15-55-01_937163_54751/logs/ray-data
2025-02-05 15:55:37,679	INFO streaming_executor.py:109 -- Execution plan of Dataset: InputDataBuffer[Input] -> TaskPoolMapOperator[ReadImage] -> LimitOperator[limit=10]
Num columns: 10
Image shape: (480, 590, 3)
我们可以使用 PIL 可视化此批次中的第一张图片。
from PIL import Image

img = Image.fromarray(single_batch["image"][0])
img
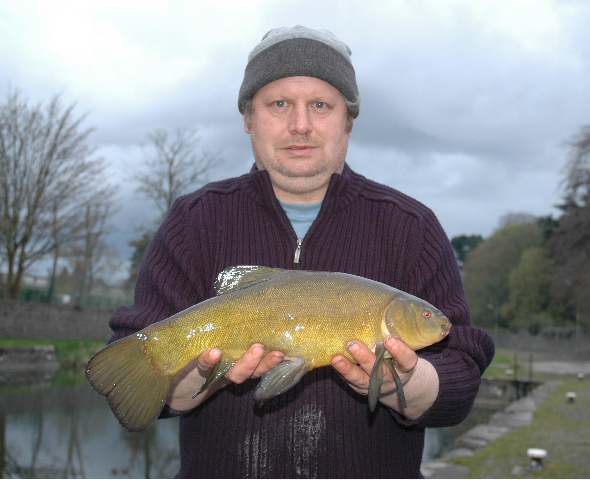
现在,让我们从一个预训练的 Vision Transformer 模型创建一个 Huggingface 图像分类流水线。
我们指定以下配置:
将设备设置为“cuda”,以使用 NVIDIA GPU 进行推理。
我们将批次大小设置为 10,以便一次性对整个批次进行推理。
由于 Huggingface 期望 PIL 图像格式,我们还将表示图像的 Numpy 数组转换为 PIL 图像。
从结果中,我们看到批次中的所有图像都正确地被分类为 “tench”,这是一种鱼。
import torch
from transformers import pipeline
from PIL import Image

# Note, you must have GPUs on your head node in order to do this with GPUs.
# If doing CPU inference, set DEVICE="cpu" instead.
DEVICE = "cuda" if torch.cuda.is_available() else "cpu"
classifier = pipeline("image-classification", model="google/vit-base-patch16-224", device=DEVICE)
outputs = classifier([Image.fromarray(image_array) for image_array in single_batch["image"]], top_k=1, batch_size=10)
del classifier # Delete the classifier to free up GPU memory.
outputs
Device set to use cuda
[[{'label': 'tench, Tinca tinca', 'score': 0.9997251629829407}],
 [{'label': 'tench, Tinca tinca', 'score': 0.5197089314460754}],
 [{'label': 'tench, Tinca tinca', 'score': 0.9994671940803528}],
 [{'label': 'tench, Tinca tinca', 'score': 0.9946863651275635}],
 [{'label': 'tench, Tinca tinca', 'score': 0.999672532081604}],
 [{'label': 'tench, Tinca tinca', 'score': 0.9996077418327332}],
 [{'label': 'tench, Tinca tinca', 'score': 0.9995598196983337}],
 [{'label': 'tench, Tinca tinca', 'score': 0.991676926612854}],
 [{'label': 'tench, Tinca tinca', 'score': 0.9948246479034424}],
 [{'label': 'tench, Tinca tinca', 'score': 0.9366462230682373}]]
步骤 3:使用 Ray Data 扩展到完整数据集#
通过使用 Ray Data,我们可以应用上一节中的相同逻辑来扩展到整个数据集,利用集群中的所有 GPU。
推理步骤有几个独特的属性:
模型初始化通常非常耗时
我们希望通过批处理进行推理,以最大化 GPU 利用率。
为了解决第 1 点,我们将推理代码封装在一个 ImageClassifier 类中。使用类允许我们将耗时的流水线加载和初始化代码放在 __init__ 构造函数中,该函数只会运行一次。实际的模型推理逻辑位于 __call__ 方法中,该方法将为每个批次调用。
为了解决第 2 点,我们通过批处理进行推理,并为 Huggingface Pipeline 指定 batch_size。 __call__ 方法接收一批数据项,而不是单个数据项。如上所述,批次是一个字典,包含一个名为“image”的键,其值是 np.ndarray 格式表示的图像 Numpy 数组。由于这与步骤 2 中的格式相同,我们可以重用之前的推理逻辑。
from typing import Dict
import numpy as np

from transformers import pipeline
from PIL import Image

# Pick the largest batch size that can fit on our GPUs.
# If doing CPU inference you might need to lower considerably (e.g. to 10).
BATCH_SIZE = 1024

class ImageClassifier:
    def __init__(self):
        self.classifier = pipeline("image-classification", model="google/vit-base-patch16-224", device=DEVICE)

    def __call__(self, batch: Dict[str, np.ndarray]):
        # Convert the numpy array of images into a list of PIL images which is the format the HF pipeline expects.
        outputs = self.classifier(
            [Image.fromarray(image_array) for image_array in batch["image"]],
            top_k=1,
            batch_size=BATCH_SIZE)

        # `outputs` is a list of length-one lists. For example:
        # [[{'score': '...', 'label': '...'}], ..., [{'score': '...', 'label': '...'}]]
        batch["score"] = [output[0]["score"] for output in outputs]
        batch["label"] = [output[0]["label"] for output in outputs]
        # note: we keep the original image column in the result so that we can display the images later
        return batch
然后我们使用 map_batches API 将模型应用于整个数据集。
map_batches 的第一个参数是用户自定义函数 (UDF),它可以是一个函数或一个类。这里我们使用类,因此 UDF 将作为长期运行的 Ray actor 运行。对于基于类的 UDF,使用 concurrency 参数指定并发 actor 的数量。 batch_size 参数表示每个批次中的图像数量。
num_gpus 参数指定每个 ImageClassifier 实例所需的 GPU 数量。在这种情况下,我们希望每个模型副本使用 1 个 GPU。
请注意, map_batches 是一个惰性操作,因此在数据集被消费之前不会进行任何计算(参见消费数据)。
predictions = ds.map_batches(
    ImageClassifier,
    concurrency=4, # Use 4 model replicas. Change this number based on the number of GPUs in your cluster.
    num_gpus=1 if torch.cuda.is_available() else 0,  # Specify GPUs per model replica (use 0 for CPU inference)
    batch_size=BATCH_SIZE # Use batch size from above.
)
验证并保存结果#
让我们取一小批数据并验证结果。这将触发对前 5 个数据项的惰性计算。
prediction_batch = predictions.take_batch(5)
2025-02-05 15:55:51,527	INFO streaming_executor.py:108 -- Starting execution of Dataset. Full logs are in /tmp/ray/session_2025-02-05_15-55-01_937163_54751/logs/ray-data
2025-02-05 15:55:51,528	INFO streaming_executor.py:109 -- Execution plan of Dataset: InputDataBuffer[Input] -> ActorPoolMapOperator[ReadImage->MapBatches(ImageClassifier)] -> LimitOperator[limit=5]
2025-02-05 15:55:57,603	WARNING actor_pool_map_operator.py:280 -- To ensure full parallelization across an actor pool of size 4, the Dataset should consist of at least 4 distinct blocks. Consider increasing the parallelism when creating the Dataset.
(_MapWorker pid=54998) Device set to use cuda
我们看到所有 5 张图像都被正确分类为“tench”,这是一种鱼。(您可能需要向下滚动才能看到下面的所有样本。)
from PIL import Image
from IPython.display import display


img_count = 0
for image, prediction in zip(prediction_batch["image"], prediction_batch["label"]):
    print("Label: ", prediction)
    print("Image:")
    # Use Jupyter to display the image inline.
    img = Image.fromarray(image)
    display(img)
    img_count += 1
print(f"Successfully displayed {img_count} images.")
Label:  tench, Tinca tinca
Image:
Label:  tench, Tinca tinca
Image:

Label:  tench, Tinca tinca
Image:

Label:  tench, Tinca tinca
Image:

Label:  tench, Tinca tinca
Image:

Successfully displayed 5 images.
如果样本看起来正常,我们可以继续将结果保存到外部存储,例如 S3 或本地磁盘。有关所有支持的存储和文件格式,请参阅Ray Data 输入/输出。